

Click here for version 9 for iOS
What’s new in version 10 for macOS
- New Arrows & Brackets Analysis, Color-coded chart, minor chords optional notation
- Read about these new features on version 10 here:
https://mdecksmusic.com/2024/03/16/jazz-harmonic-analysis-using-mapping-tonal-harmony-pro-10/
- Read about these new features on version 10 here:
- The Analyzer Add-on
- An incredible and unprecedented tool, not found in any app on the market today.
- The Analyzer is able to solve a complete harmonic analysis of any chord progression written in an ordinary text editor. It finds key centers, modulations, pivot chords and of course, functional analysis and chord-scales for every chord in the song.
- Open MUSIC-XML files from other apps (such as iReal Pro), and TXT files with chord changes (in a simple format,) and have the entire progression analyzed and ready to play.
- Edit and save any progression using an ordinary text editor. Share it with others via message, email, or as a text file.
- Analyze the same song using any of the 10 different harmonic languages available: Jazz, Blues, Early Baroque, Late Classical, etc. Remember, although the rules of harmony are universal, some styles differ in the way they approach it (i.e. In Blues you can have a I7 chord)
- The Analyzer includes an Analytics tool (called The Heat Map) which shows how often each function has been used in a set of songs. Filter the song catalog (i.e. by style, or composer, etc.) and find out what are the:
- Most often used functions in the collection (in major, or minor)
- Most often used functions to start or end a song in the collection (in major, or minor)
- Most often used pivot chords in the collection (in major, or minor)
(i.e. Filter to see songs by Jobim and learn his favorite chords to start a song)
- Playlists
- Save and organize songs in playlists
- Mark songs as favorites
- Open recent
- Saving Performance Settings
- Customize the play-along and hit SAVE. Mapping Tonal Harmony Pro will remember: tempo, mixer volumes & reverb, A.I. player customization, key of the song, groove style, and instrument sounds. So the next time you open that song the app will play it just the way you like it.
Index
The concept behind Mapping Tonal Harmony Pro
Opening, Playing And Saving Performances (Play Mode)
Creating And Editing (Edit Mode)
Create and Edit Songs Using The Map
Create/Edit A Song Using The Analyzer (add-on)
Song Collections by mDecks Music (add-ons)
The concept behind Mapping Tonal Harmony Pro
Mapping Tonal Harmony Pro is a vast application that covers tonal harmony for many different styles and levels; from beginners level to college graduate level. Be patient, take your time understanding the concepts used in the app and you’ll improve your playing and writing skills tenfold.
Here are some important points about how the app works
- There’s always a song open. It could be an empty song, a simple cadence, or a complete song.
- The song is always fully analyzed. It could be showing the complete analysis or just the chord changes.
- The song is shown from two perspectives: On the Staff panel (chords & analysis) and on the Map.
- The sound, staff and the map are always linked. Clicking on a chord in the staff panel will play the chord and show it on the map.
- There are two working modes: Play Mode & Edit Mode. While a song is playing, both the map and the staff will show the current chord being played. In edit mode, clicking on a chord in the map will add that chord to the selected beat on the staff.
- For Mapping Tonal Harmony Pro, a song is made out of the form and a harmonic progression. Chord symbols are not stored, they are calculated based on the starting key, modulations, and harmonic functions.
The Map

To understand the map, the first thing to know is that tonality is based on the premise that, at any moment in a piece there’s a tonal center, a magnetic pole, a home. This is what we call the tonic.
Every chord you find in a song is related functionally to the key of moment. (i.e the V7 in the key of C is always G7.) But, it is worth noting that a single chord could play more than one roll (i.e. Am7 could be the vi7, or the ii/V in the key of C)
Each harmonic function offers a certain amount of tension which wants to resolve following a specific path. These paths of resolution are call cadences. (i.e. The IV to I cadence is known as the plagal cadence). Many functions produce similar tension or color, and want to take similar paths of resolution.
This property of tonality allows us to classify functions in 3 regions: Tonic, Subdominant & Dominant. Functions that belong to the same region sound, and behave, similarly. It’s fairly simple to classify functions as belonging to one of these regions. Once we have classified the functions by region, we can then assign a fixed place to each function within its region, and we have a mapped tonal harmony.
In our map we have used the circle of fifths to determine the places in which each function is going to be, since many rules of harmony are already embedded in the circle of fifths.
The I is always going to be at 12 o’clock in the tonic region, and the V is always going to be at 1 o’clock in the dominant region. Every function is assigned a fixed place on the map. By doing this, the paths between functions (a.k.a cadences) will also be fixed, like roads connecting different functions or regions of the map. For example: the IV (in the subdominant region) has a path that connects it to the I (the plagal cadence). But, as you can see, the ii also belongs to the subdominant region. Thus, we can also take the plagal path, from the ii to the I, to create a plagal-like cadence. And this is true for other functions that share the same region.
This is how Mapping Tonal Harmony Pro organizes harmonic functions and cadences, and shows how harmony works in the key of the moment.
Also, it is very common to borrow chords from minor when in major, and sometimes vice versa. This is why the map shows the major and minor keys simultaneously. Chords on the outside of the circles are from the major key, and chords on the inside of the circles are from the minor key.
You can view the map functionally (which will look exactly the same regardless of the key) or using chord symbols (which will show the chord symbols for each function in a certain key.)
Starting on the Secondary Functions Level, the map drastically changes, and the amount of functions shown greatly increases. This is because secondary functions are used to tonicize diatonic chords. So each diatonic chord is now accompanied by its own mini-map. Each diatonic function can play the roll of a short-lived tonic (like a temporary home). To achieve this effect, we use functions from their own map. Every diatonic chord has its own subdominant and dominant region. (i.e. the ii/iii is a subdominant of the iii, and the V7/iii is a dominant of the iii). If you look closely, you can see how these mini-maps look exactly the same as the main map. The circle to the left shows all the secondary subdominant functions, and the circle to the right shows all the dominants. (The V7/iii is still at 1 o’clock in the iii’s mini-map)
Interacting with the map
- Click on any chord to play it.
In edit mode the chord will be immediately added to the beat selected in the staff - Right-click on any chord to choose different chord types and chord-scales available for that function.
Different map templates (styles) will offer different chord/chord-scale pairings for the same function

- Select the inversion you want to use with the inversions panel before playing a chord.
You can lock the inversions panel if you want to keep using that inversion for all the chords you play
Selecting the pedal point will use the root of the last chord played for all the chords you play. - Resize the map by dragging the split panels around
When clicking on the map, Mapping Tonal Harmony Pro will detect (and highlight) often-used cadences and important bass-lines movements.
Also, when edit mode is disabled (play mode), the map does not affect the staff, so you can try chord progressions without affecting the current loaded song.
The inversions panel

As we mentioned earlier the inversions panel allows you to change the inversion of the chord you’ll play next.
It also shows the bass-detector (not clickable,) which displays the amount of consecutive bass movements created by the sequence of chords being played. If you play chords where the roots move around the circle of fifths the bass detector will show and an arrow. For stepwise motion you’ll see an ascending or descending ladder. And for pedal bass notes you’ll see an anchor. The number next to the symbol represents the amount of times the same bass movement has occurred in a row. Bass movement is crucial in harmony. Things like extended dominants or line clichees show up as large numbers in the bass detector’s consecutive count.
The inversions icons are just shapes that represent the degree that is being played on the bass. The root position is a circle. The first inversion (which has the 3rd of the chord on the bass) is a triangle. The second inversion (bass player the 5th of the chord) is a pentagon. And the third inversion (7th in the bass) is a heptagon. Pedal points are represented by a flattened circle indicating that the base is unmovable.
To play an inversion, switch to the inversion you want to use on the next chord, by clicking on its icon in the inversions panel. Then play the chord. By default, the app will immediately go back to root position. If you want to lock that inversion for all the next chords you’ll play, turn on the lock button. Pedal points will automatically turn on the lock button.
Map Settings & Preferences

You configure the map in the Map Menu.
Often-used map controllers are also available in the Global Panel.
Music style (harmonic language)
There are 10 different map templates. Each template is dedicated to a specific harmonic language. The map offers different default chord/chord-scales and functional notation for different music styles. (i.e. The default I chord in the Late Classical map is a triad. In Jazz is a Imaj7, and in Blues is a I7)
NOTE: The map templates popup is only available if the song is empty (no chords have been added yet.) So if you want to try the different map templates make sure the song has no chords (start a new song, or save your own empty song for that purpose.) This is because once the song has at least one chord, Mapping Tonal Harmony Pro makes sure to load an A.I. player that knows how to play in that style.
Map Levels
There are 7 map levels. From Basic Diatonic to Complete Map. Each level includes all previous levels. The higher the level, the more complex the map becomes. Every level offers a new harmonic concept not found in previous levels.
NOTE: The map automatically switches to the minimum level needed for the current song (but you can change the level with this panel at anytime). The map also hides all function that are not being used by the song. To override this setting just enable the eye button in the map display preferences panel.
Key Panel
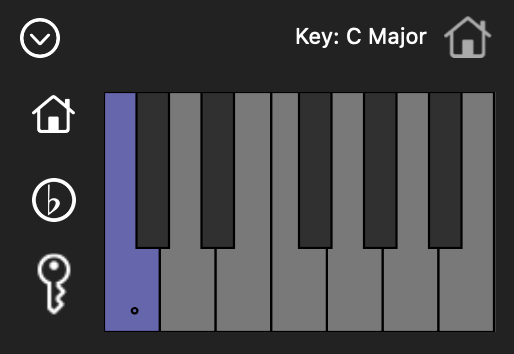
Change the starting key of the current song by using the keyboard in the panel. Use the enharmonic button (flat/sharp) to switch between flats and sharp keys (when available). Use the key button to go back to the original key (the key that was used to create the song). If the song is empty you can toggle between major and minor keys with the house button.
NOTE: Although the map shows chords from major and minor, setting the map to minor will adjust some cadences and paths better suited for the minor mode (it also changes the map background’s hue to let you know that you are in minor)
Map Display Preferences
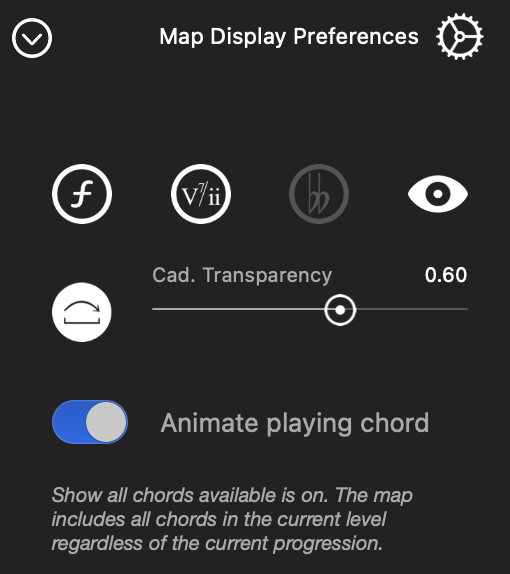
Use this panel to customize the way the map displays chords and cadences.
Enable the functional button (cursive f) if you want to see all the chords in the map notated as harmonic functions. In this setting the map will look the same in all keys.
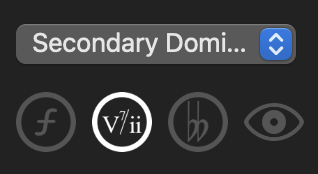
Enable the secondary button (V7/ii) if you want the map to show the complete secondary functional notation (i.e. V7/VI.) Since the location of the secondary functions is obvious, you can disable this button to make the map less crowded if needed.
Enable the accidentals button (double flat icon) to let the app use odd accidentals which are theoretically correct based on the function’s interval to the tonic (such as E# or Abb.) Mapping Tonal Harmony Pro avoids using this spellings by default.
Enable the view all button (eye) if you want to see all the functions available at the current level. Otherwise, the app will only show functions that belong to the current song’s progression.
Adjust the cadences transparency with the slider or turn them off. The app will still briefly show a cadence if you trigger it while clicking on the chords in the map.
Enable animation for the playing chord if you want to see it travel from the previous function to the next (as opposed to just appearing on top of the function you’ve just played)
Map Color Themes
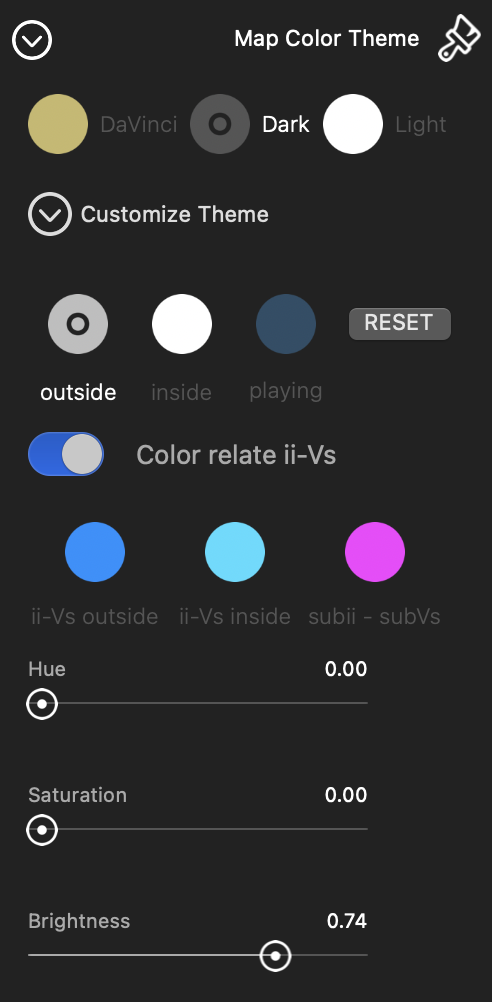
You can fully customize the colors used in the map. There are 3 preset themes: DaVinci, Dark & Light
The color palette is used to organize the map. All the functions in major (except for related ii Vs and tritone substitutions) use the outside color. All the functions in minor (except for related ii Vs and tritone substitutions) used the inside color. Related ii Vs also shared the same color (ii-Vs outside and ii-Vs inside) And related subii subV7s use yet another color from the palette.
You can tweak the way any of these 3 themes use color to make the map look the way you like it. Click on any of the circles (outside, inside & playing, or any of the related ii-Vs circles) and then adjust the Hue, Saturation & Brightness.
When you choose the playing color you will see that color displayed behind all the other circles, so you can adjust it making sure you will still see the chord when the app is playing it.
To load back the original preset use the reset button.
The Staff Panel

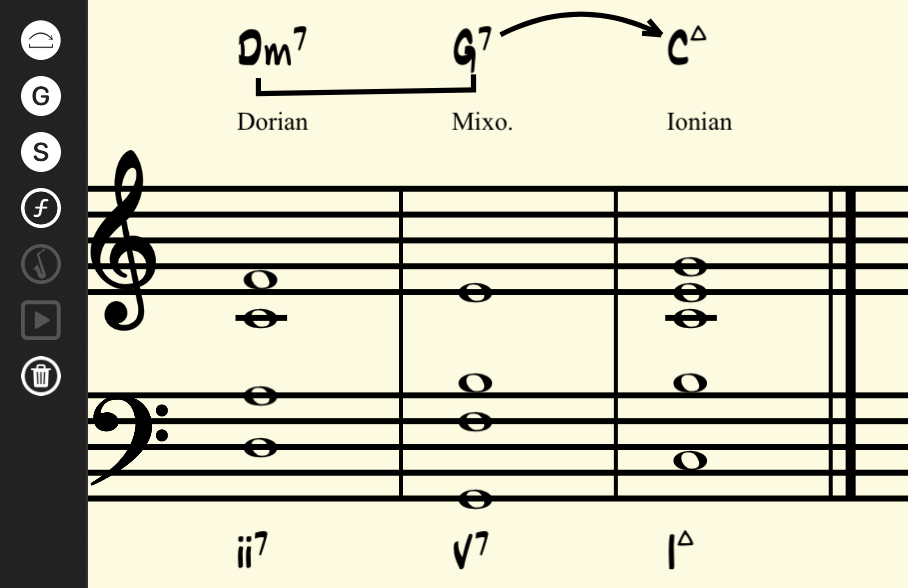
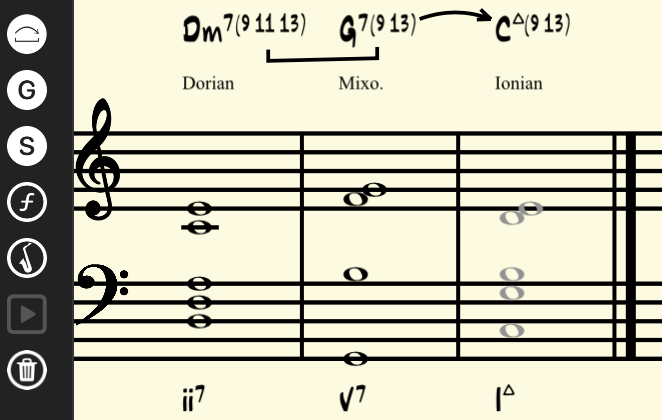
The chart for the song is shown in the staff panel. Aside from the chord symbols, the staff can show a complete analysis of the progression. The analysis is shown using 5 layers: guitar chord-diagrams, arrows & brackets, chord-symbols, chord-scales & harmonic functions. You can turn any of these layers on or off (but will talk about that later on, in the staff menu section.)
When edit mode is off, the only interaction with the staff available is clicking on the chords (or beats/slashes) which plays it, and highlights it on the map.
If you turn edit mode on (by clicking on the pencil button on the left menu bar, below the play button) you will see a tool box appear to the right of the staff panel. These tools are used to move and erase chords, and to edit any form elements in the song (such as repeat signs, double bar-lines, system breaks, etc.)
Remember that to enter chords you must select a beat in this panel, and then use the map to select the chord you want. And now in version 9, you can actually do all the editing in a text box, using the Analyzer Add-On, and then ask Mapping Tonal Harmony Pro to auto-analyze the progression and load it into the staff panel automatically.
We’ll talk about the tool box later on, when we cover how to create a song from scratch.
In edit mode, you can click on the song title to access the song header and edit the title, composer, category, style, tempo, comments and tags.
The Staff Menu

Configure the way the staff looks in this menu
Staff Preferences
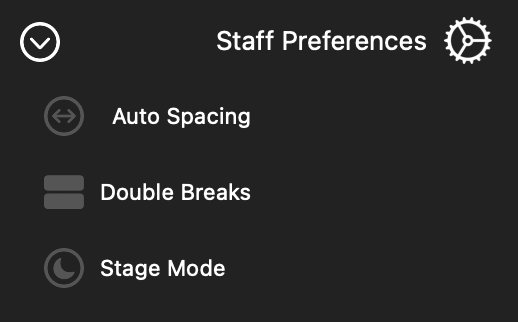
Turn Auto Spacing on to avoid overlapping between chords symbols. With Auto Spacing disabled the app will space each beat evenly across the entire system.
Enable Double Breaks to add double the amount of system breaks. This is a good option for songs with many chords per bar, to avoid clashes between chord symbols)
Enable Stage Mode to see the staff in dark mode (dark background, light chord notation.) This is a good option when you are at a gig.
Staff Presets
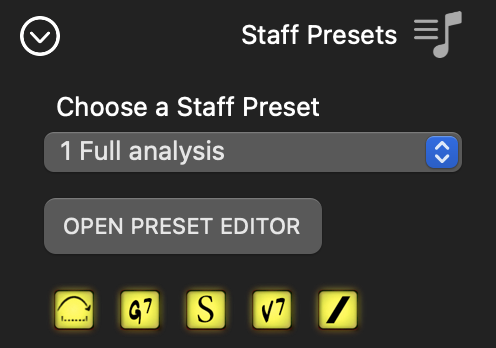
In this panel you can customize how the staff looks.
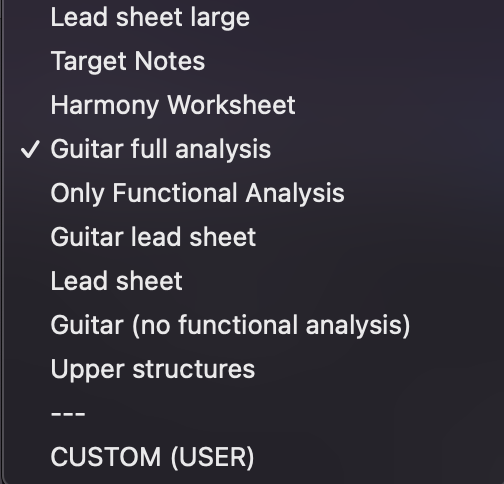
Use the staff preset popup to choose one of the presets. The app comes loaded with 12 presets, from full analysis to lead sheet large. Each preset shows or hide different layers, use different font sizes and staff spacing. Try them all to see how they offer different advantages depending on what you are using the app for.
You can personalize any preset, and create/save your own presets clicking on the OPEN PRESET EDITOR button. In the preset editor you can tweak all the parameters that determine how the staff panel looks.
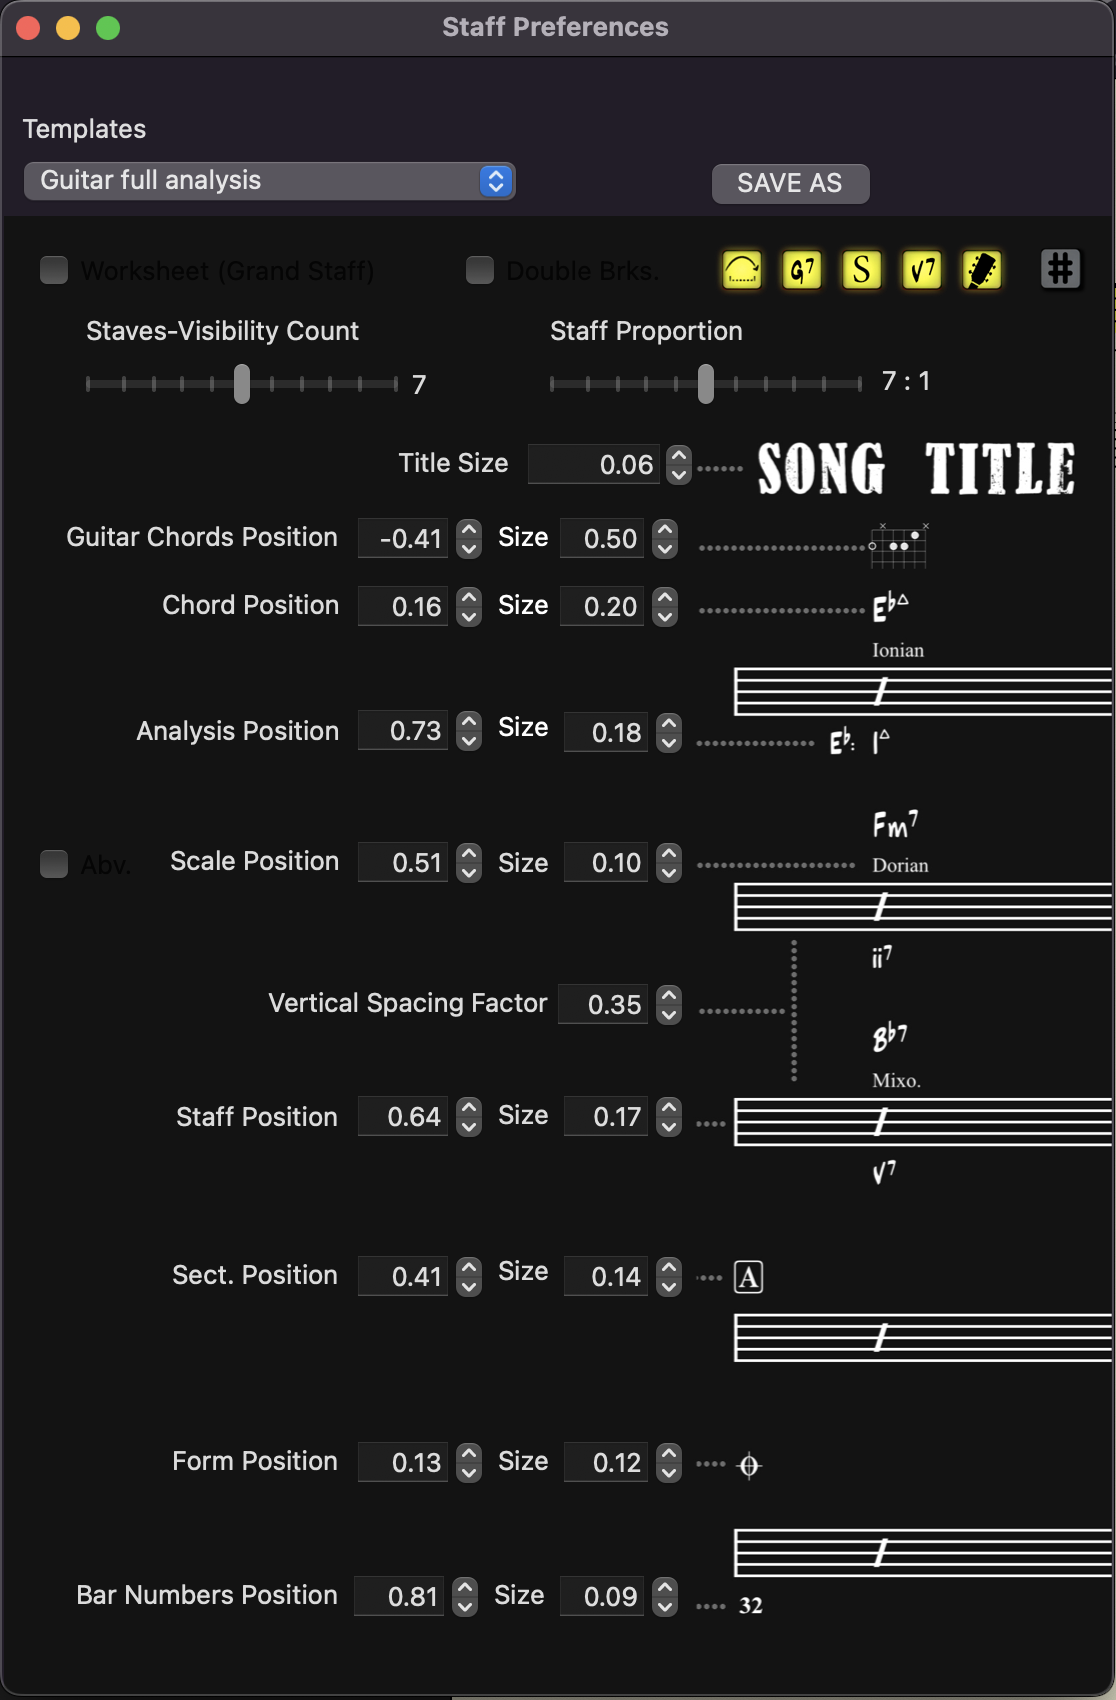
This tool is very intuitive. Try changing any of the parameter values to see how it changes the staff elements. To create your own preset choose the CUSTOM (USER) option (last item on the list) in the TEMPLATES POPUP at the top of the window.
Show/Hide Layer Buttons

Show/hide any layer from the loaded preset with these buttons.
Arrows & Brackets • Chord Symbols • Chord Scales • Harmonic Functions • Guitar Diagrams • Notes/Slashes
The option to hide notes/slashes is very useful if you want to create (print) worksheets to work on or give out to your students (writing chords, scales, solos, etc.)
Note: Every preset is created for a specific purpose (i.e. Lead Sheet Large is a preset that shows big chords only.) So there’s no space left for other layers. For this reason the buttons for the layers that were hidden in a preset, during its creation, will not show up (i.e. in the Lead Sheet Large you will only see the button for the chord symbols, but in the Guitar Full Analysis preset you will see them all)
Main Split Window
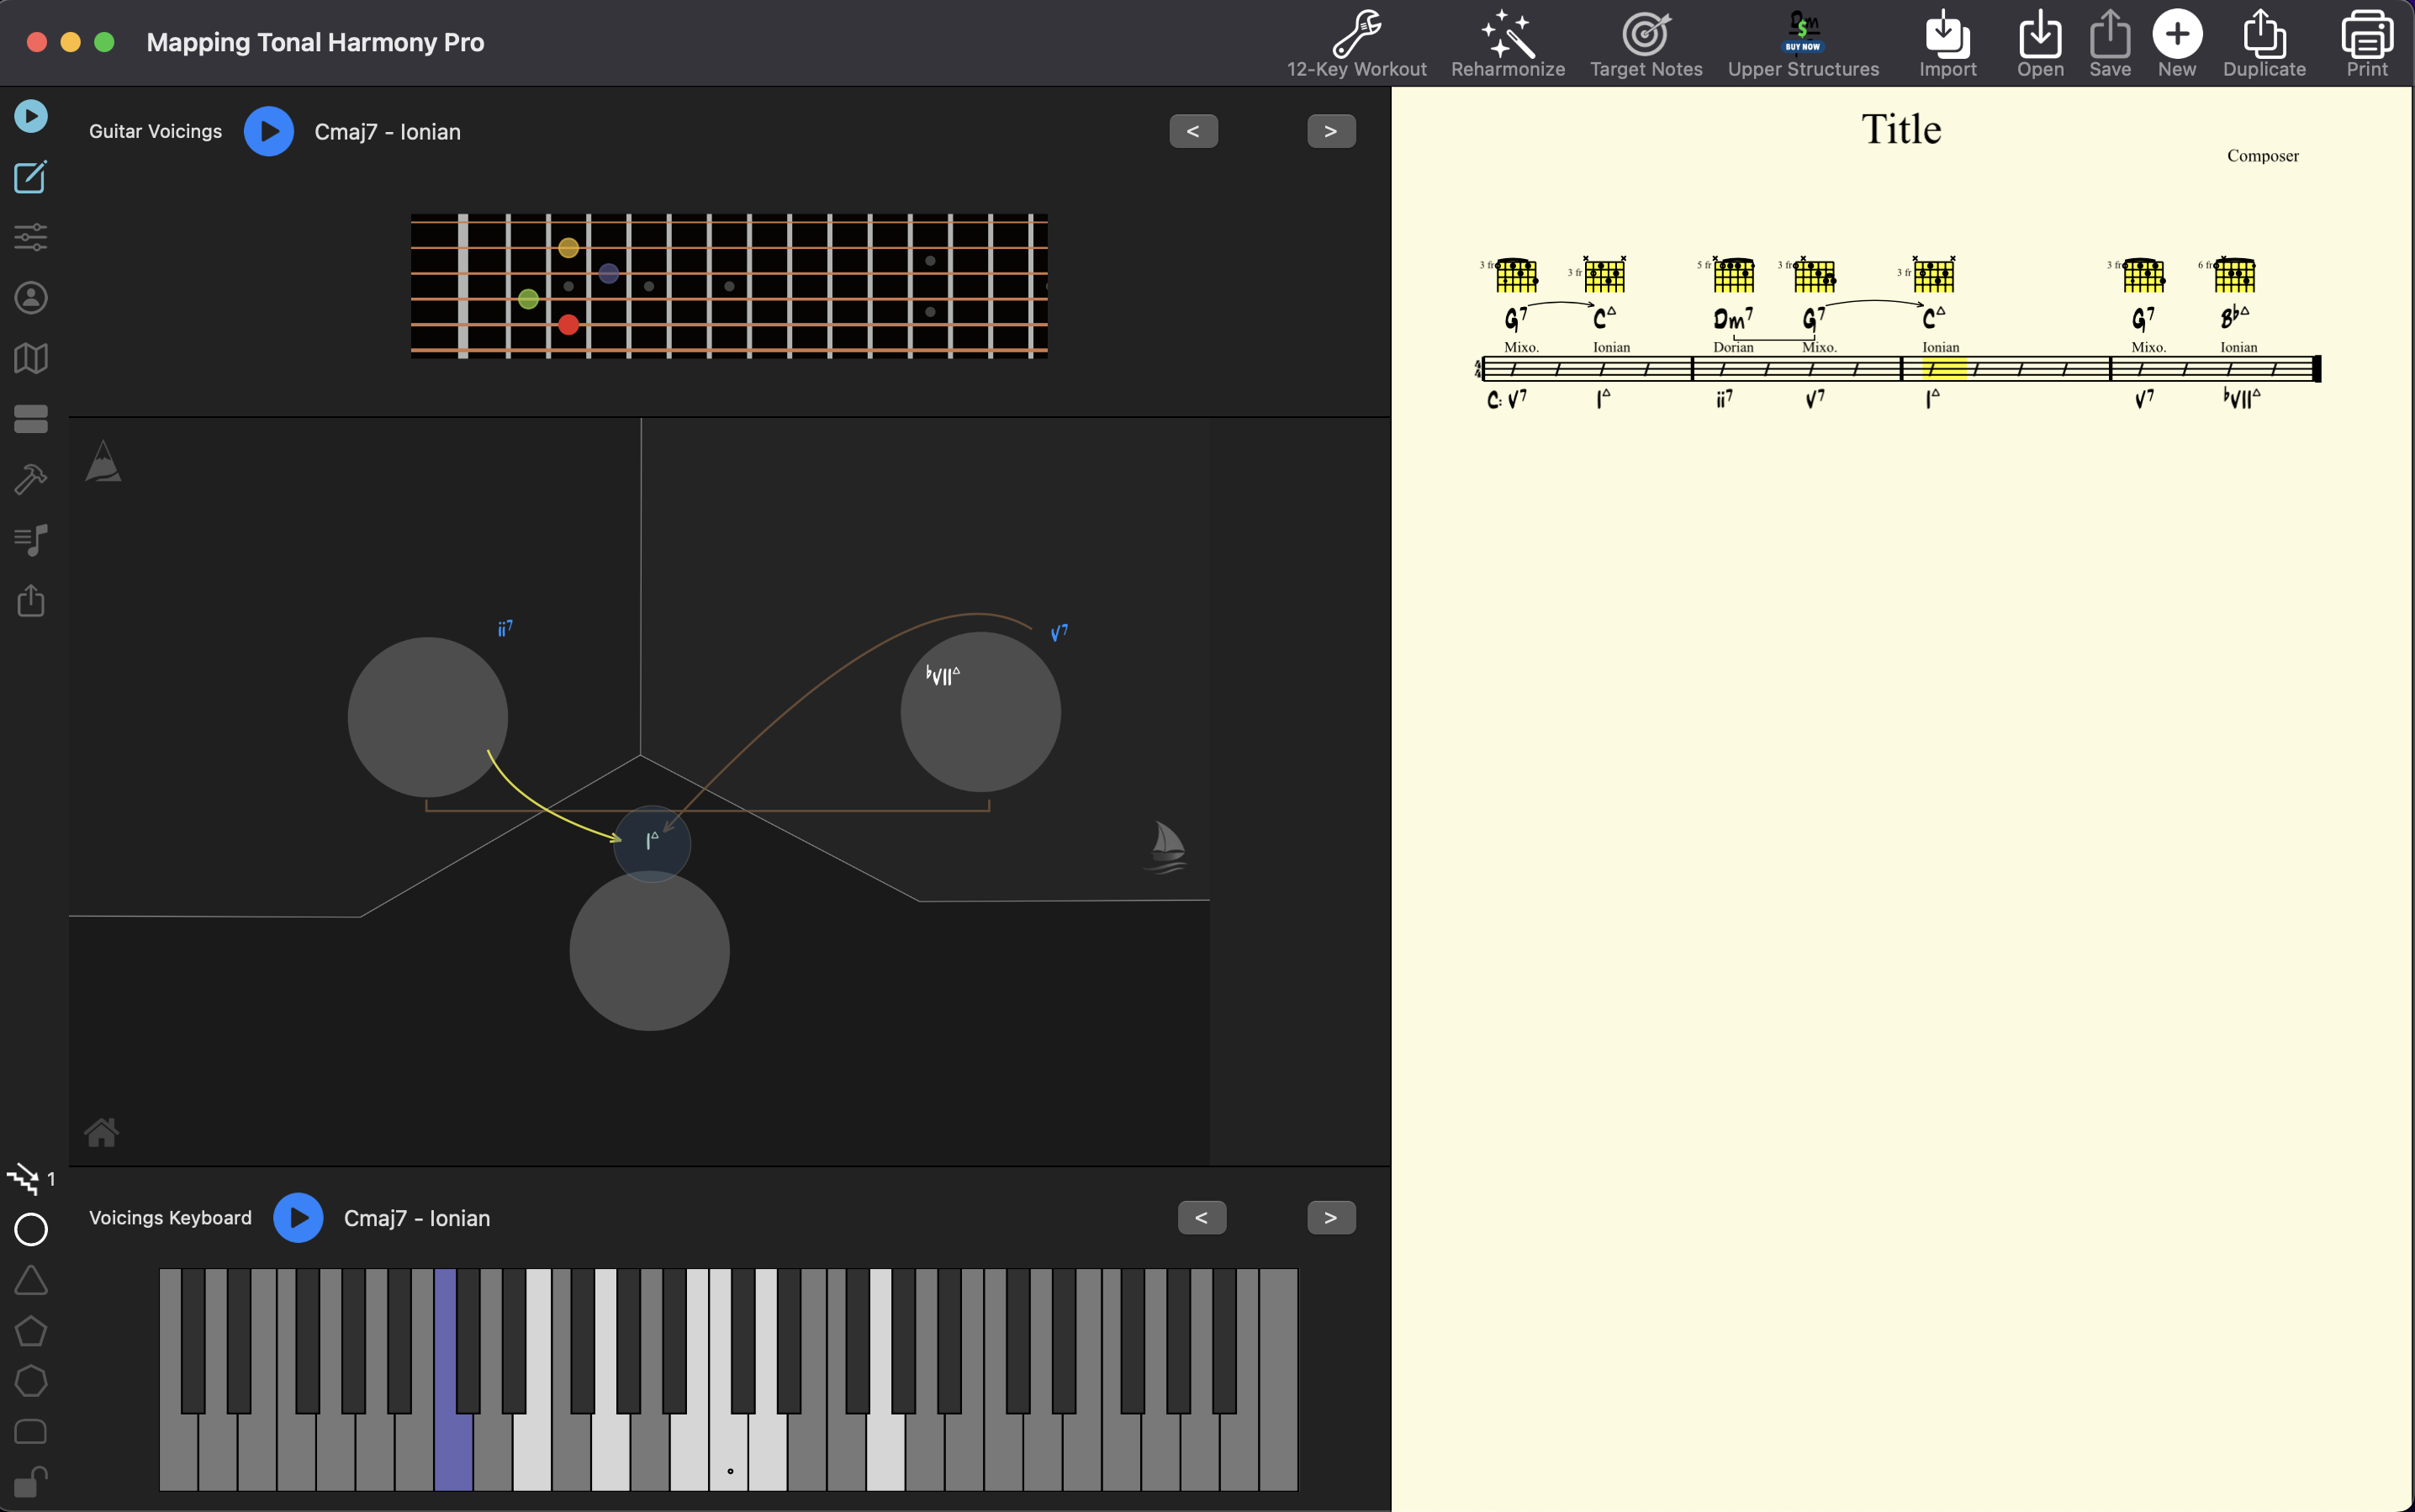
The main split window shows the map, the staff and up to two other panels. The splits can be resized by dragging on the split lines. You choose how you want the split window to look like in the Panels Loader menu item.
Panels Loader Menu

By default the split window shows the staff on the right and the map on the left with the global controller above the map. The panel loader lets you choose which tools to load above the map and below the map. We will discuss available panels later on in the manual.
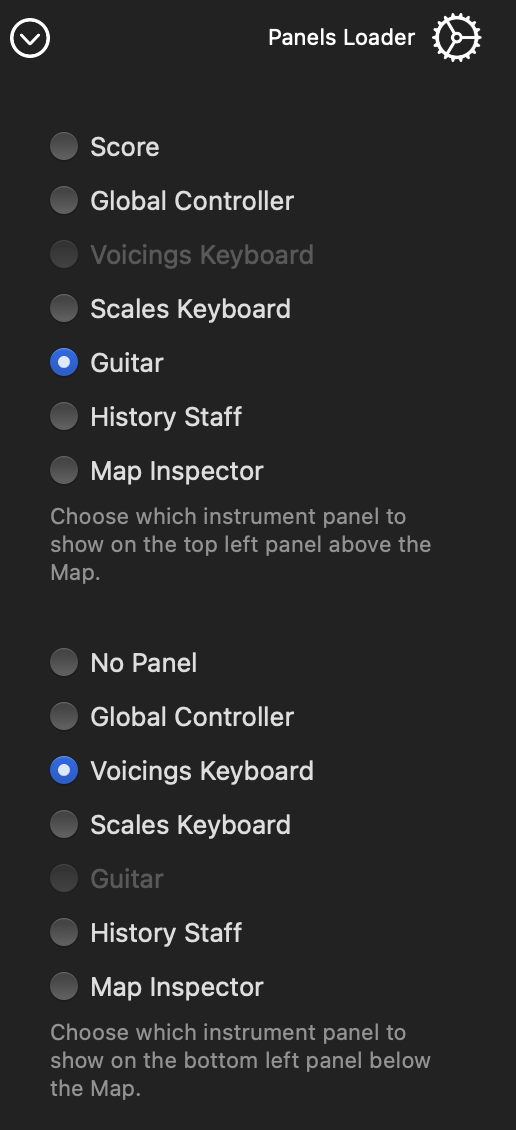
NOTE: If you choose to load the score (staff) above the map then the split-panel on the right disappears. So you will only see two panels: the score (staff) on the top split-panel, and the map on the bottom split-panel.
Play Mode vs. Edit Mode


You toggle between these two modes with the pencil button. The app behaves differently in each mode (and offers different features)
Opening, Playing And Saving Performances (Play Mode)
At this point you should be familiar enough with the UI, so we’ll look at the rest of the features in play mode (menus, and panels) with a walk-through.
Opening a song: Songs are stored in the Catalog. To open the catalog use the Open button in the top menu of the main window. (⌘ O)
Song Catalog / Playlist Manager
The catalog gives you access to all the songs and also allows you to search songs by name, composer, notes and tags, and filter the list by category, style, map, user songs and favorites. It is also where you manage playlists. We’ll talk about playlists later on.
The app comes preloaded with more than 100 progressions (including complete songs, workouts, classical tonal harmony exercises, etc.,) and you can get the add-ons with songs fully analyzed by the hand of seasoned musicians (such as the 1300+ Jazz Standards add-on)
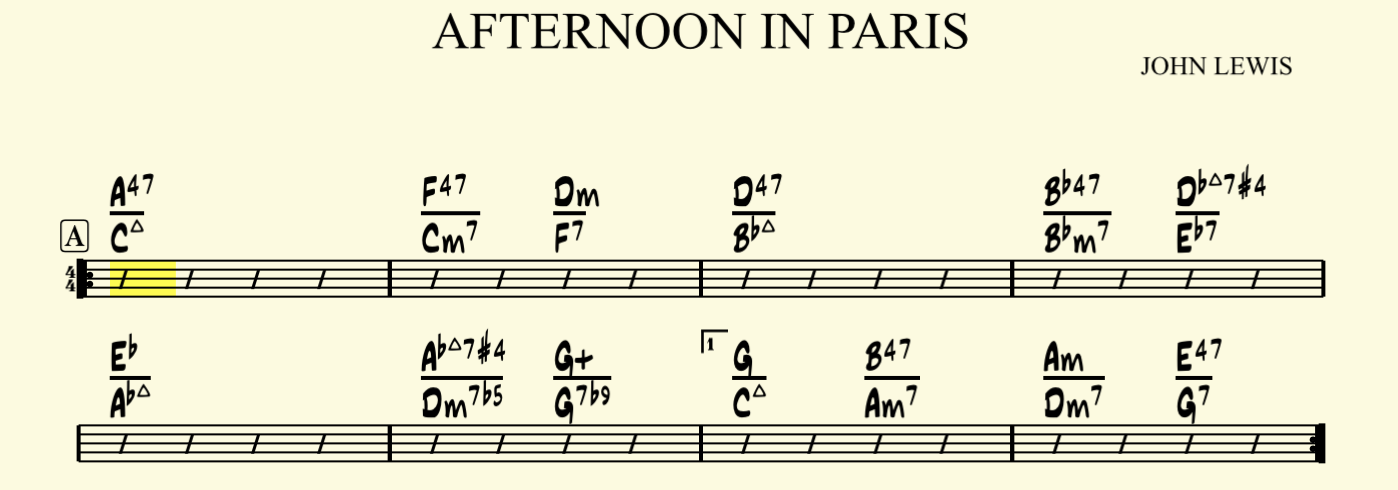
Open Afternoon In Paris by clicking on the song title, and click on the Play button (space bar.)
NOTE: If you don’t hear any sound but you see the app is playing open the Mapping Tonal Harmony Pro menu on top and choose Audio Output Preferences… where you can change where the sound output.
Adjust the tempo in the Play Along Menu: Tempo & Repeats
Underneath the tempo slider you will see tempo zones in different shades of gray. These zones indicate at what tempos the accompaniment changes within the current groove (i.e. It is not the same to play a Standard Jazz Groove at 50 than at 120 or 210. The app will adjust the way the drums, bass and piano/guitar accompany based on the tempo.
NOTE: Although the tempo will change in real time while the app is playing, the accompaniment groove will not. For the tempo zones to take effect you must stop the play along and hit play again (this is because the app creates the entire backing track when you click play.)
You can change the amount of times the song will repeat in the Repeats box. Mapping Tonal Harmony Pro uses sections letters to create variation of the accompaniment (i.e. the A section will sound different than the B section) Also, the first and last choruses will sound more subdued so you can play the head of the song, and the other choruses will sound more elaborate so you can solo over them.
Looping a section of the song
In this panel you can also see the Loop tool. Let’s say you want to practice the turnaround in the 1st ending of the song. Click on the first beat of measure 7 (where the 1st ending is). Then enable loop by clicking on the loop button (circular arrows, will turn yellow when active,) and change the amount of measures you want to loop to 2. You will see that measures 7 & 8 in the score will be highlighted in yellow. Hit play and practice the turnaround. Disable the loop by clicking on the loop button again.
Mapping Tonal Harmony Pro can also play an accompaniment with one block chord per chord symbol. Make sure the loop is off and click on the Play Piano Voicings button (⇧ space.) If you don’t want the metronome sound you can disable it by clicking on the Include Metronome in Voicings Player button.
NOTE: The voicings player only works if the loop is disabled. You cannot turn the metronome of while the accompaniment is playing.
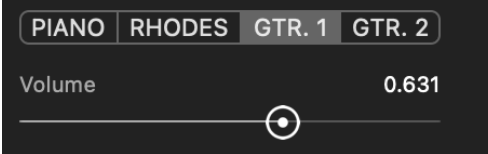
Adjust Volumes in the Play Along Mixer
Just a regular mixer. Changing volumes works in real time while the app is playing.
NOTE: The reverb is applied to the piano/guitar and drums but not the bass
Midi Compressors (Process)
You can add compression to each instrument. This is midi compression. The loudness of each note in an instrument is determine by its midi volume (0 to 120.) Mapping Tonal Harmony Pro uses an algorithm to randomize the midi volume of the notes to make it instrument sound more musical (i.e. the midi volume on a note could be anywhere between 30 and 100.) The bigger the midi volume range, the bigger the dynamic range.
If you set the compressor to a midi volume of 100 and a compression amount of 1.0 then all the notes will be played with a midi volume of 100. No dynamics at all!
If you set the compressor to Volume = 100 and Amount = 0.5 the the note’s midi volume will change to the value a half-way between the original value and 100 (all the midi volumes will get closer to 100 regardless if they are above or below 100)
So, you can use the midi compressor to make the instruments louder. Remember that the dynamic range will also get compressed which will make the instruments sound less musical.
Choosing a Groove Style
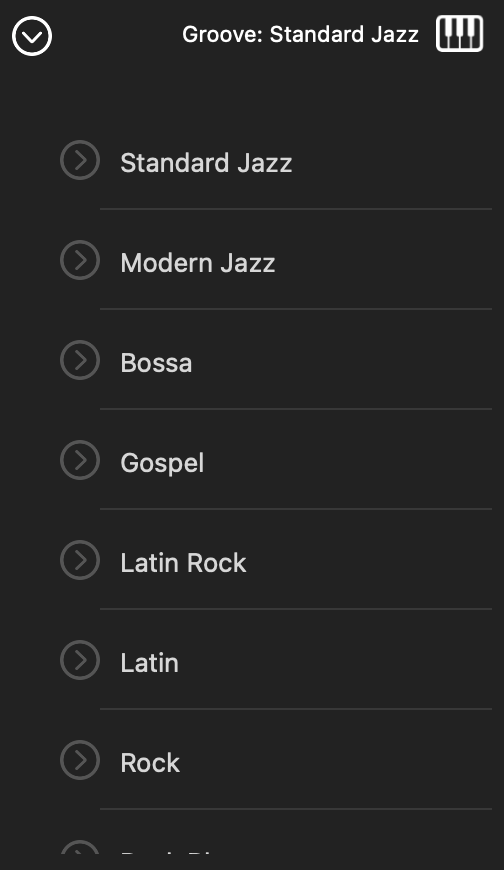
Open the Groove menu and expand the Modern Jazz item. Click on the load button (square with an arrow) to load the groove.
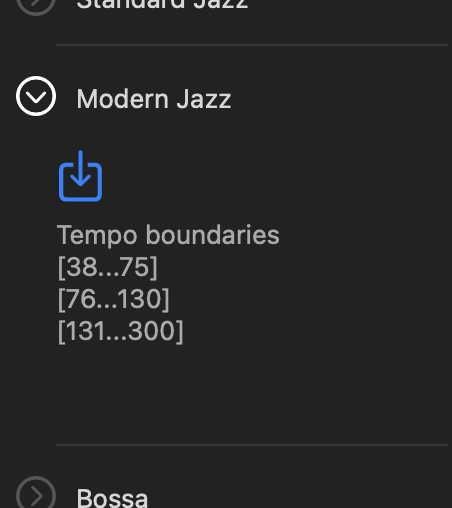
Notice how the Tempo Boundaries are shown below it. These are the gray zones you’ll see below the tempo slider (we mentioned before). [38…75] means that from 38 BPM to 75 BPM the accompaniment will play in a modern jazz style but using drums/bass/piano/guitar patterns that work well at those tempos. At tempos between [76…130] the patterns are different (but still in a modern jazz style.) Play the song to hear how it sounds now. Try tempos in different zones. Remember, you have to stop and replay for the new groove patterns to take effect when changing tempo zones.
Saving the performance settings
You can save all these play along settings – tempo, groove, mixer volumes, reverb, key and the A.I. player settings (as we’ll see later on) – with each song. So the next time you open a song it will use the same mix to play it. To save the performance settings just click on the save button in the top main menu (above the score).
NOTE: The compressors settings are not saved independently for each song, since this is usually a global setting that users want in all songs (depending on the audio card and speakers they use.) The compressors settings are saved automatically (and are the same for all songs) without you having to do anything. The same applies to the instrument transposition
Transposition & Key
If you play a transposition instrument you need to change the transposition of the app. For example, if you play an alto saxophone (which is in Eb) just click on the Eb button below Instrument transposition. You will see that the app changes the Song Key (written), in the keyboard above, from C to A.
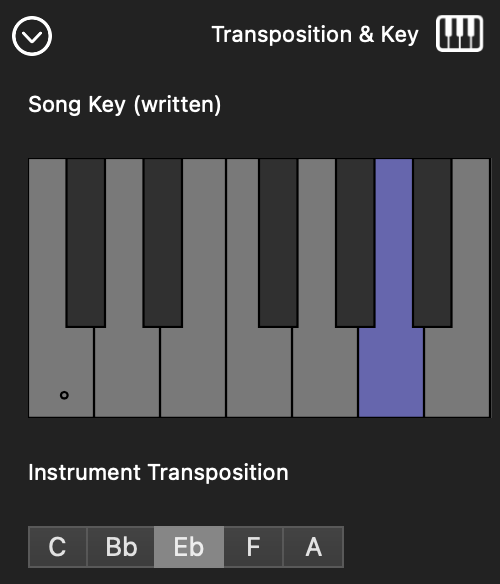
Now the song is written in A but it sounds in C to match the alto sax transposition. You can still change the written key of the song with the keyboard. The app will keep sounding transposed to match the key of your instrument.
NOTE: This is also useful if you want to print a part of your song for transposing instruments.
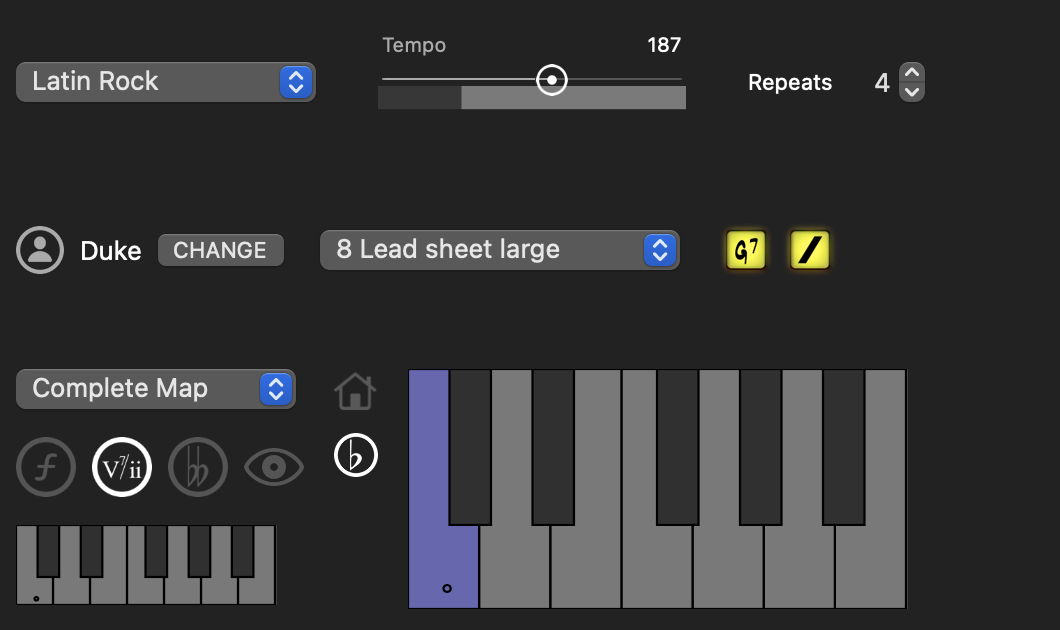
A.I. Players
The last feature related to playing backing tracks is the A.I. players (piano and guitar) Mapping Tonal Harmony Pro has a library of A.I. players that play piano/guitar voicings based on different kinds of player. (i.e. some players prefer to use closed voicings, other like to use more tensions, or spread voicings)
Each player has a name (based on a famous piano or guitar player. i.e. Bill is based on Bill Evans, Duke is Duke Ellington, Ludwig is Beethoven, etc.)
Every player follow different rules to build chord voicings and you can customize many of them in the Voicings Player menu
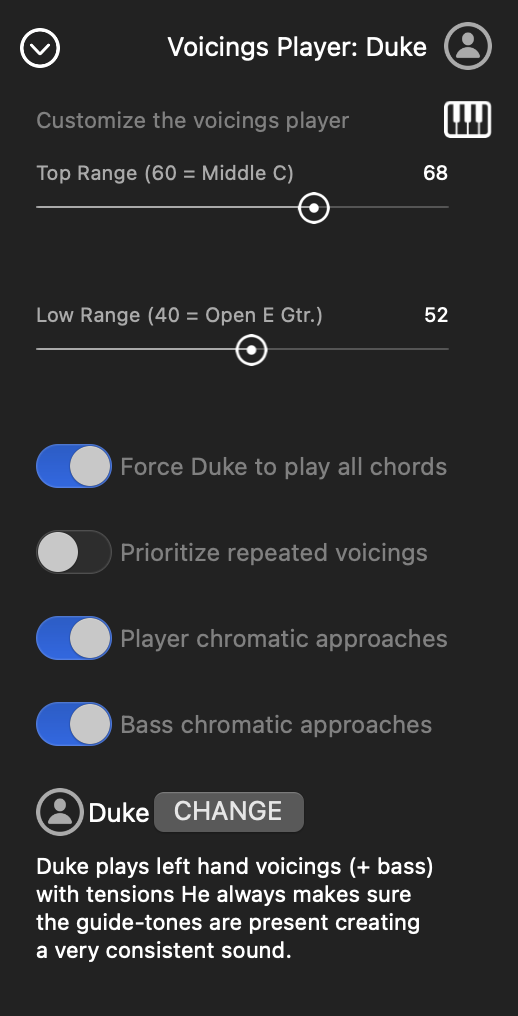
Every player has a default range they like to use when building voicings, but you can tweak it using the Top Range – Low Range sliders (just remember that the midi note value for the piano’s middle C = 60 , and the 6th string on the guitar = 40) The A.I. player will always play voicings within that range.
To make the backing tracks more musical we gave freedom to the A.I. so that they don’t have to play every single chord in the chart. But you can force the player to play all the chords in the chart.
We also allowed the players to use different voicings while playing over the same chord. But some styles (like bossa nova) or songs could benefit from a constant voicing. Switch on the Prioritize repeated voicings if you want the player to prioritize repeating the same voicing while the chord lasts.
It is very common for good players to embellish chords with approach chords (like half step below, or above, etc) If you want to disable this feature just switch the Player chromatic approaches button off. And the same applies to the bass player. In styles like bossa nova the root and 5th are not often approach chromatically (they are repeated). You can select to enable or disable this feature with the Bass chromatic approaches button.
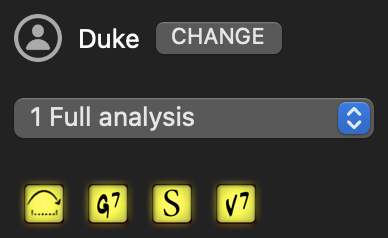
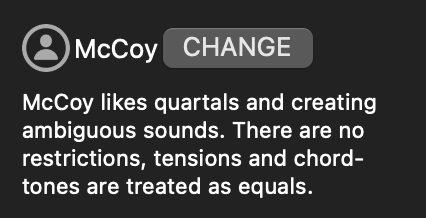
You can load a different player with the CHANGE button. Every player has a description of the rules they follow.
NOTE: Loading a new player will also load the default range for that player. Remember that the player and all its settings are saved with each song when you save the performance for that song. Also changing the player’s settings drastically alters the backing track. Try changing a few parameters and listen to the results.
Instruments
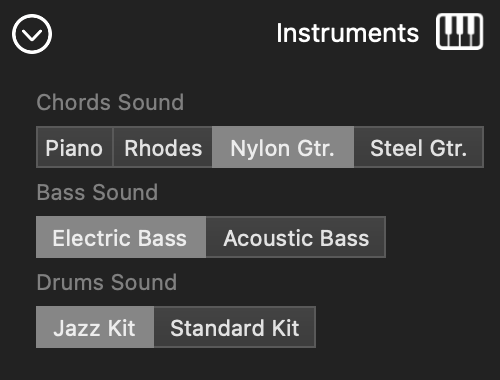
You can assign different instruments to the A.I. players.
NOTE: This settings are also saved with each song when you save the performance. Also, you can assign a guitar sound to a piano player (like Duke) just keep in mind that you might have to adjust the player’s voicings range to fit the instrument’s range.
Map Sound
So far, we’ve seen all the features relevant to the play along. There’s one more item in the player’s menu: The Player’s Mixer for the Map (and the score when you click on any chord)
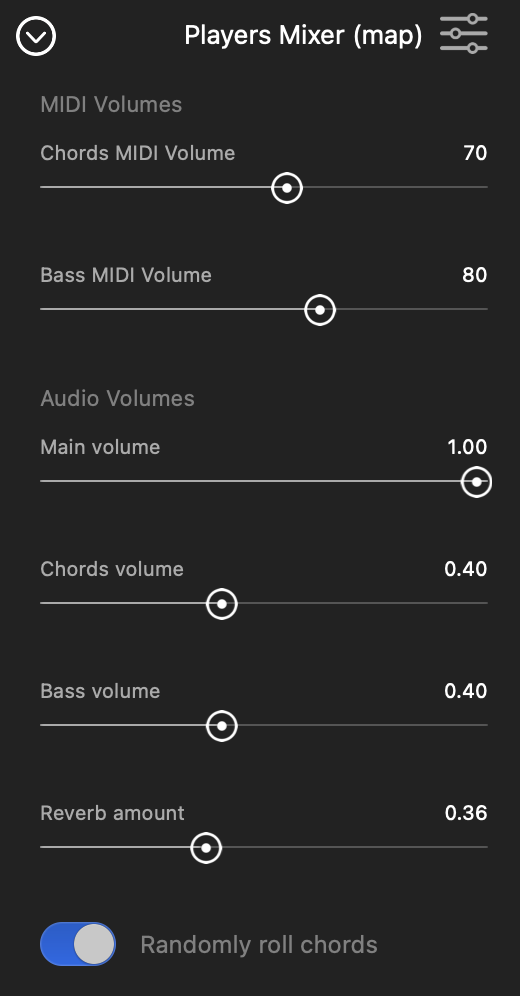
This is a completely independent mixer from the play along mixer. When you click on a chord in the map (or in the score, remember they are linked to each other,) the A.I. players (piano/guitar & bass) assigned to the play along are the ones playing the chord (including the instruments) You can create an independent mix for this in this panel. You can alter how strongly the players attack the notes with the MIDI volume sliders, and how much output volume in the mix you will assign to them with the volume sliders.
If you want the chords to randomly roll when you click on a chord in the map (or score), enable the Randomly roll chords button.
NOTE: The bass of the chord is played by the bass, so make sure to adjust the bass volume so you can hear that note.
Creating And Editing (Edit Mode)
Let’s look at the the features in edit mode (menus, and panels) with a walk-through. In version 9 there are two ways to create and edit a song: using the Map & Score or using the Analyzer. You can use both if you want.
NOTE: Mapping Tonal Harmony Pro stores songs as harmonic progressions, so it does not care which chords the song is made out of. It converts harmonic functions into chords, based on the tonic of the moment. When you create songs in Mapping Tonal Harmony Pro you are writing harmonic progressions (not chord progressions.) This gives Mapping Tonal Harmony Pro a great advantage over other backing tracks apps since it can produce more consistent and musical ideas because it understands how the harmony in a song works.
Create A New Song

To create a new song, click on the NEW button on the main menu on top of the score (⌘ N) and the following window will popup:
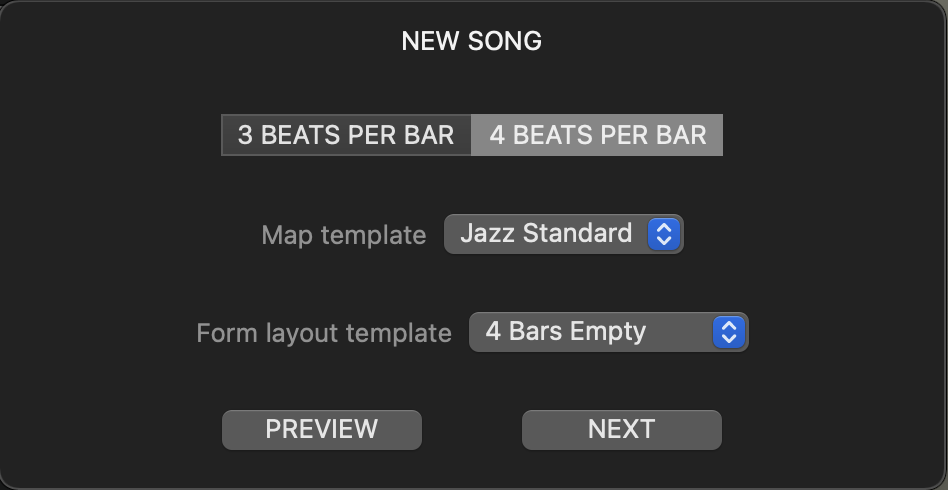
Choose the beats per measure (3 or 4, Mapping Tonal Harmony Pro does not allow other amount of beats per measure at the moment. If you want a song in 6/8 choose 2 beats per measure, in 12/8 choose 4 beats, if you want 3/4, 9/8, etc choose 3 beats per bar. The groove style will be the one determining the time signature)
Then choose the Map Template you are going to use. This tells Mapping Tonal Harmony Pro which harmonic language to load for you song. It is very different to write a Jazz Standard, than a Blues or a Classical piece.
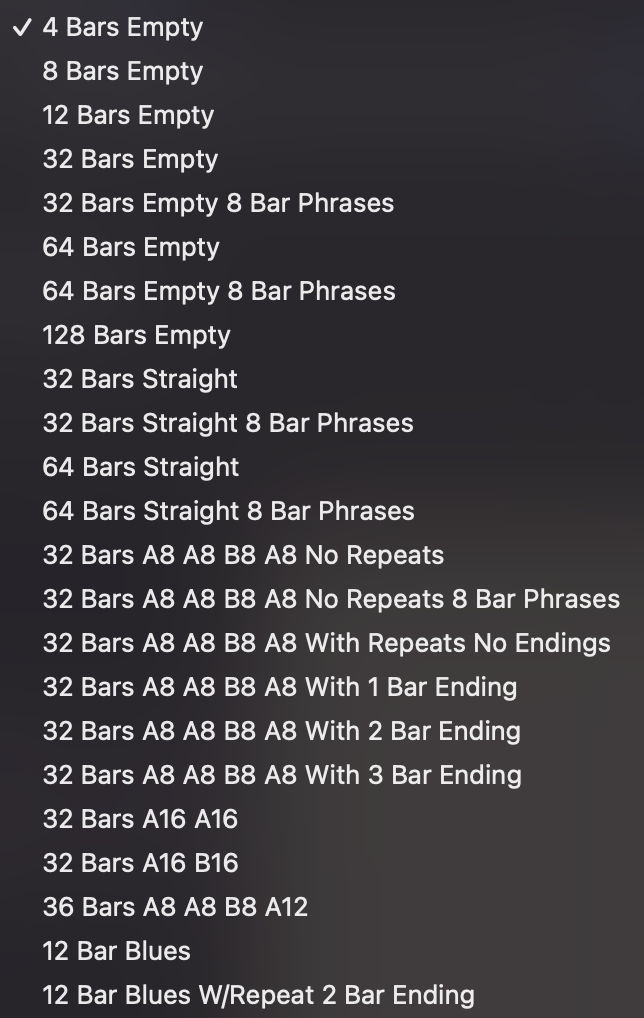
Now you can load one of the Form Layout Templates. There are quite a few to choose from. If you know the form structure you are going to use this will save you tons of time. If you don’t, just choose a 32 or 64 Bars Empty. You will be able to edit the form later on.
You can see how the different templates look on the score by using the APPLY CHANGES button.
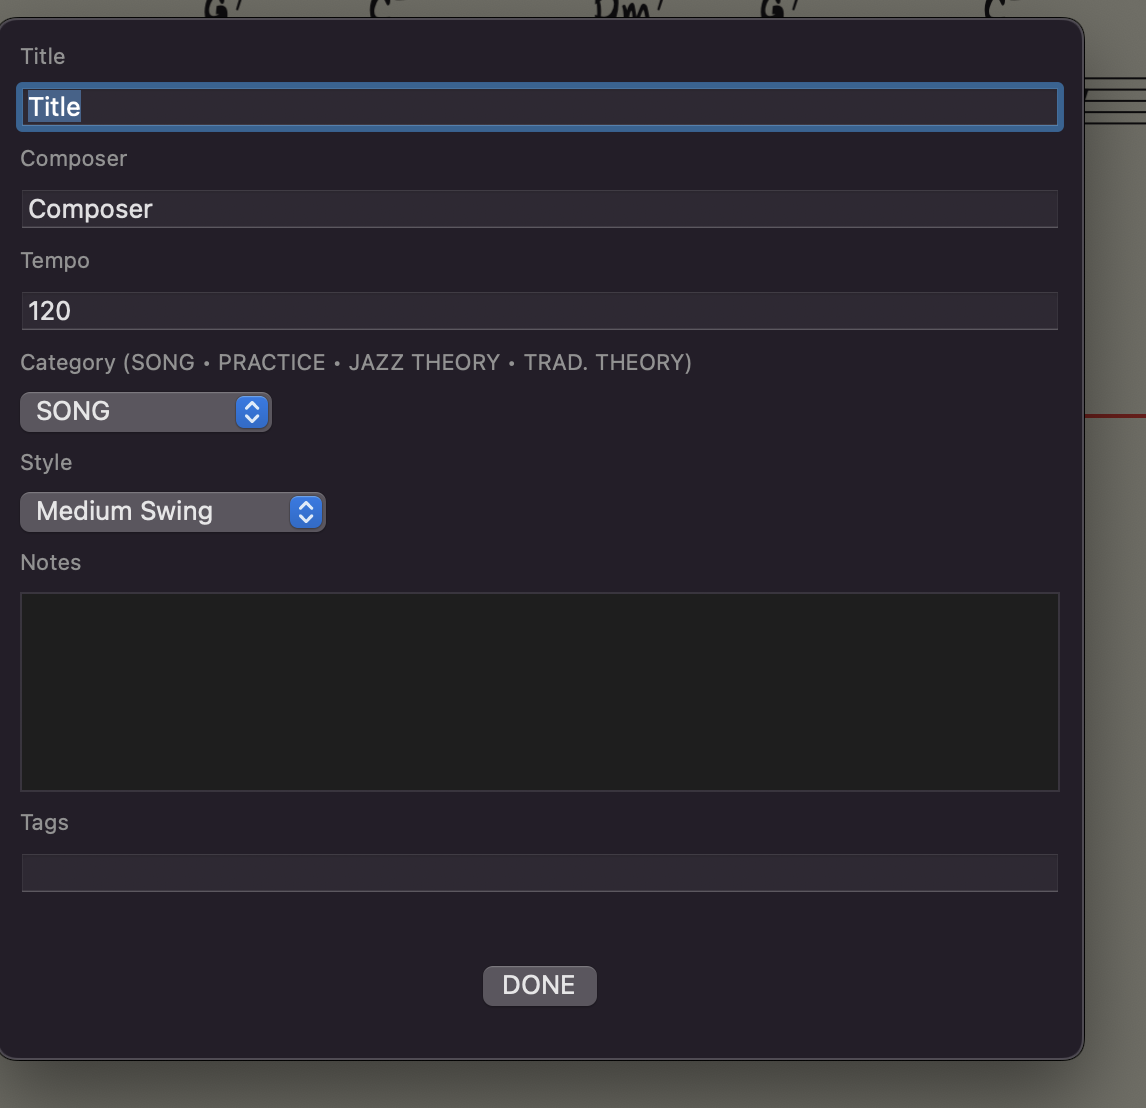
Once you are sure that’s what you want click on APPLY CHANGES AND GO ON to finish setting up your song. This will take you to the next window: The Song Header
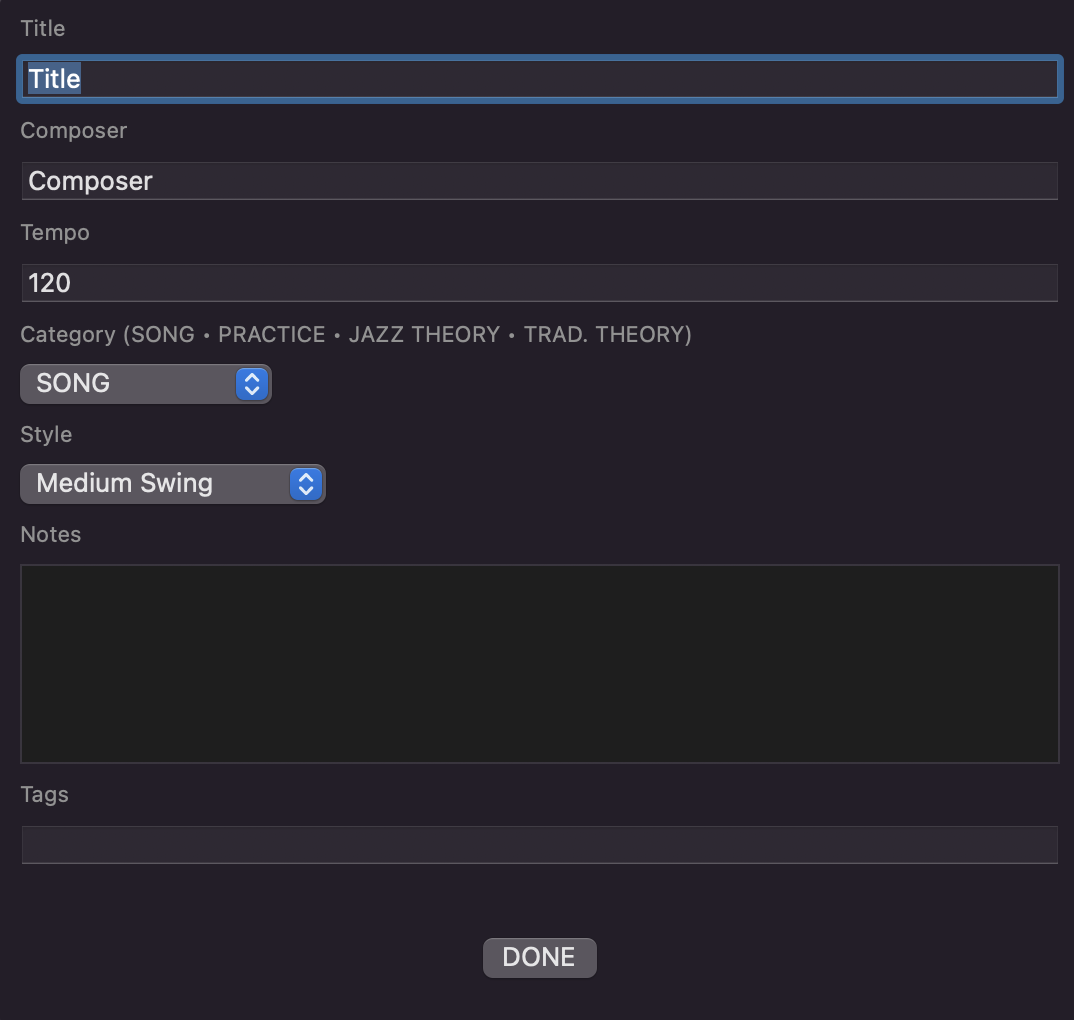
Choose the Title, Composer & Tempo. You can also choose one of the available categories and the style. Add notes and tags. All these attributes may be used later on to search and filter songs in the catalog. Click DONE.
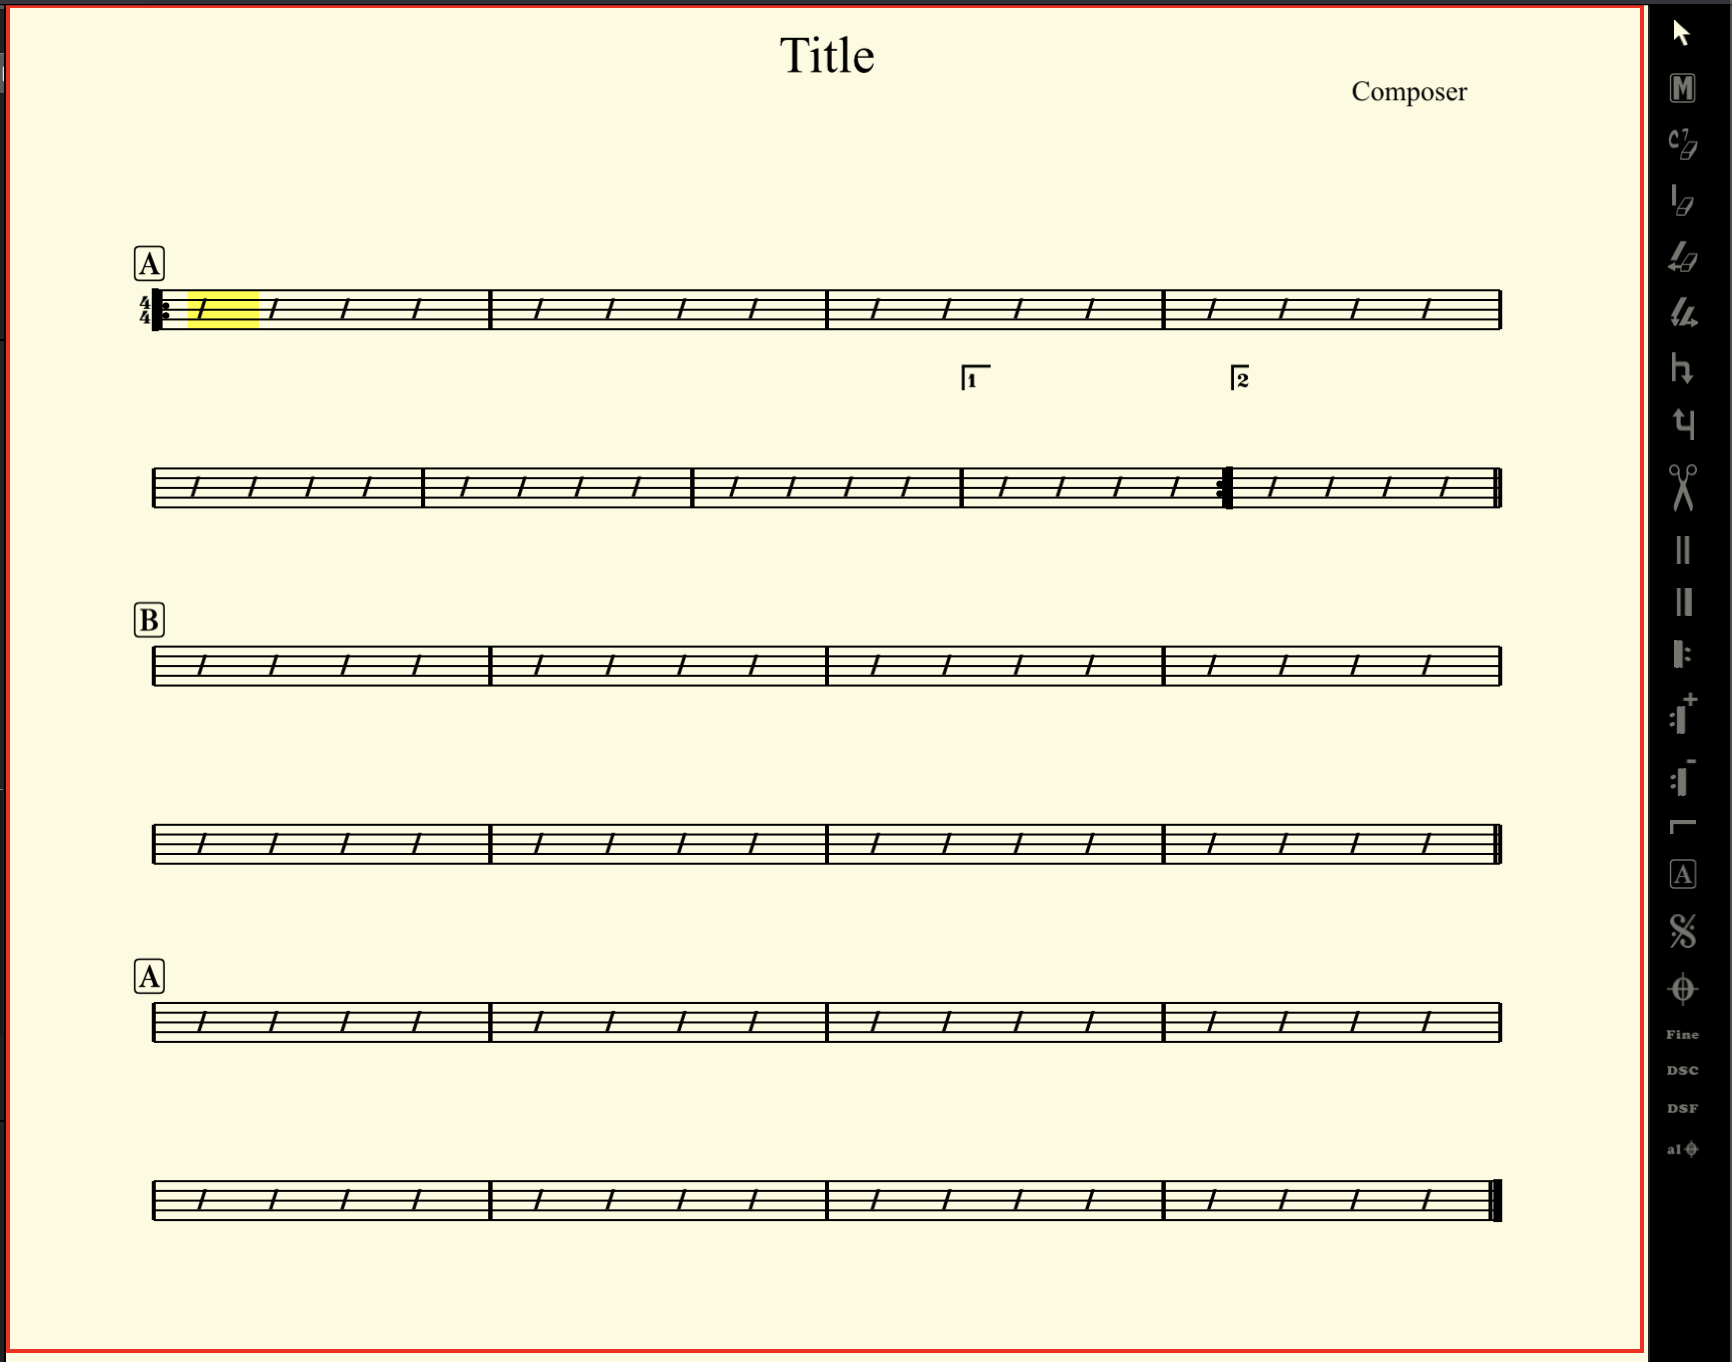
The score will show the form you choose on empty staves and to the right you’ll see the toolbox.
NOTE: The staff will have a red border indicating you are in edit mode, and the pencil button on the left menu will change to a writing icon

Create and Edit Songs Using The Map
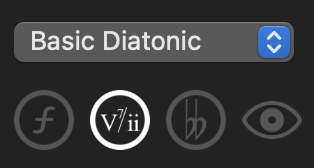
The current beat will be highlighted in yellow. And the map will show all the functions available in the Complete Map. Let’s change the level of the map to Basic Diatonic to make it easier to deal with for now. To do that you can use the map’s menu (as we explained before) or if you have the global controller loaded on top of the map (which I recommend doing,) just choose Basic Diatonic from the popup. Also, if you want to work viewing chord symbols, turn off the function button.
Now the map will look like this:
Choosing the Starting Key
Before you start entering the chords, choose the starting key if your song. Click on the keyboard to select the key (make sure the first beat is selected on the score)
As mentioned before, the map shows both the major and minor keys simultaneously, but you can still set the key to either major or minor with the house button. Try it out and see how the map changes a bit between major and minor.
Now you just start click on the chords in the map to add them to the progression. Click on the I chord (Ebmaj7) and it will be inserted in the score. The beat will automatically advance two beats (to beat 3, since it is very standard to have two chords per measure in a 4-beat measure.
If you want to advanced two more beats, you can just lick on the Eb chord in the map again. As long as you keep clicking on the same chord the current measure will keep moving forward two beats.
Example of a ii – V7 – Imaj7 Progression
Now let’s click on Fm7 (in the subdominant region) then on Bb7 (in the dominant region), and once more in the Ebmaj7. This is a ii – V – I progression.
Click 3 more times on the Ebmaj7 to move forward to the first beat on measure 5.

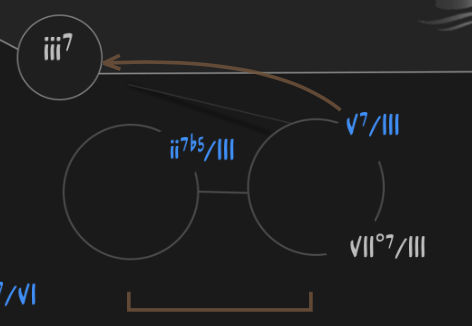
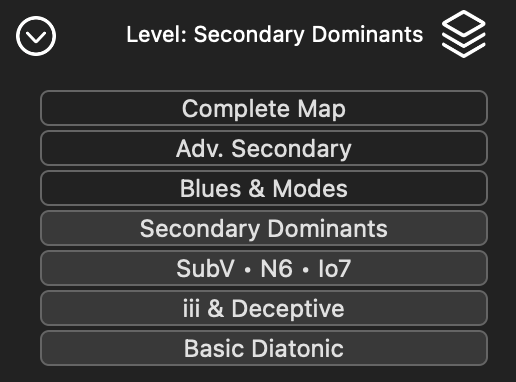
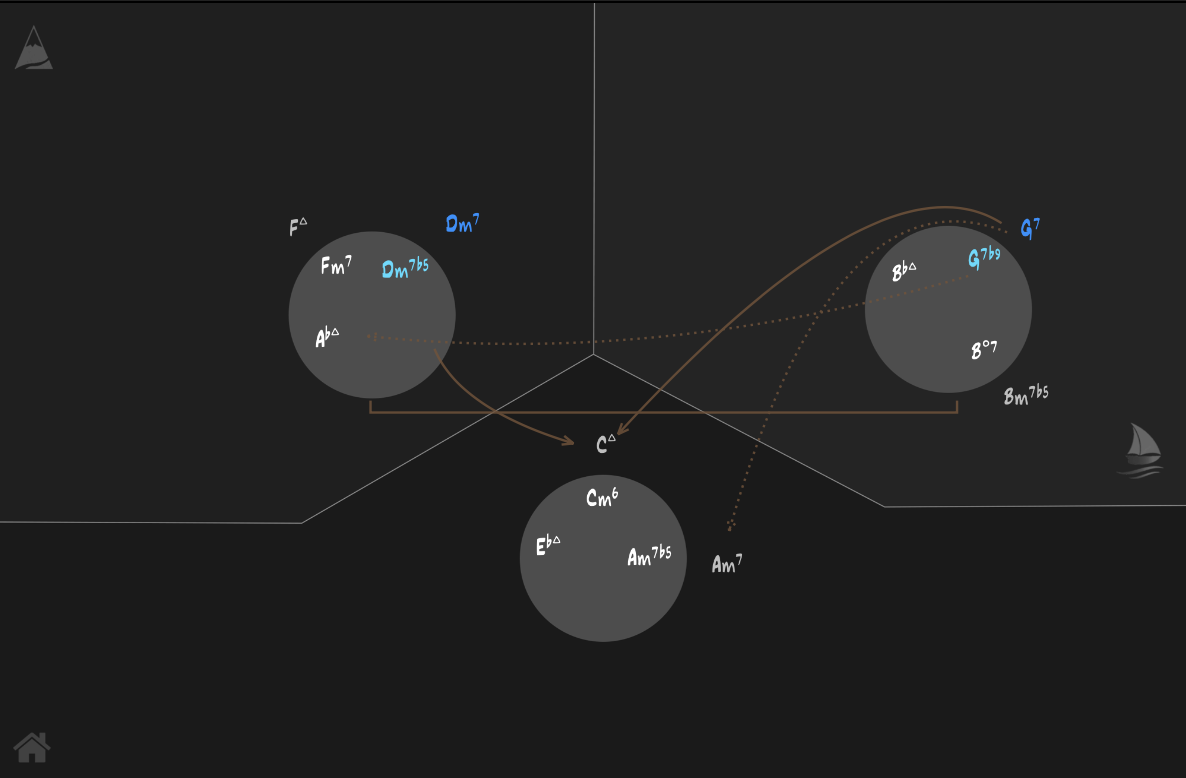
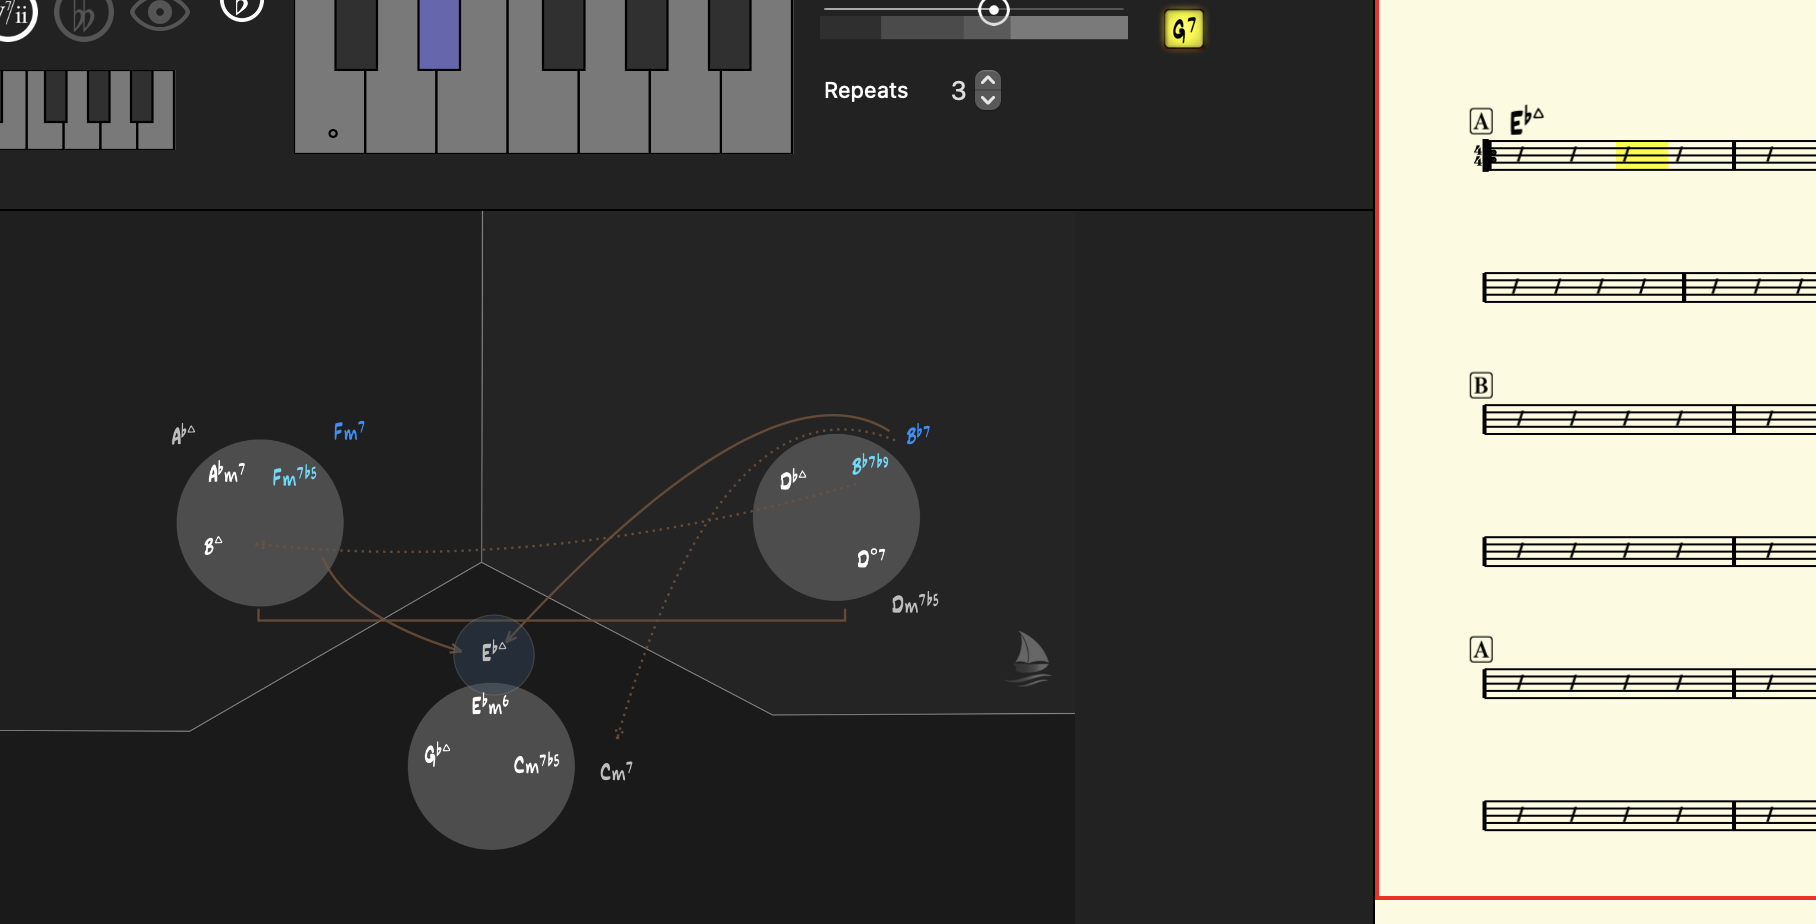
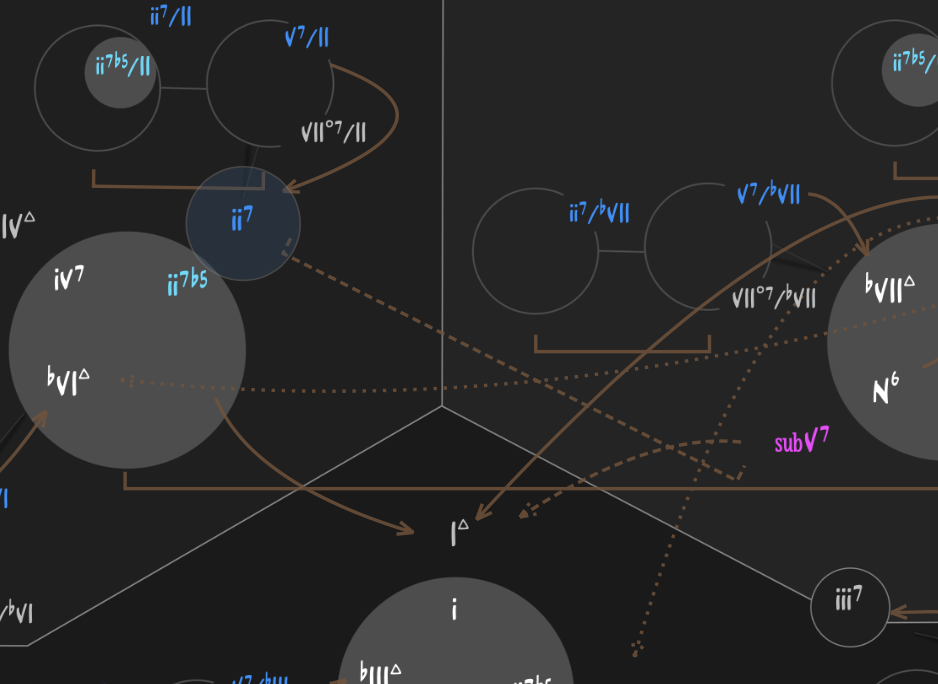
Let’s enter a II/ii – V/ii – ii progression. These are secondary dominants, so you will not find it at this level on the map. Change the map level to secondary dominants using the popup in the global controller above the map.
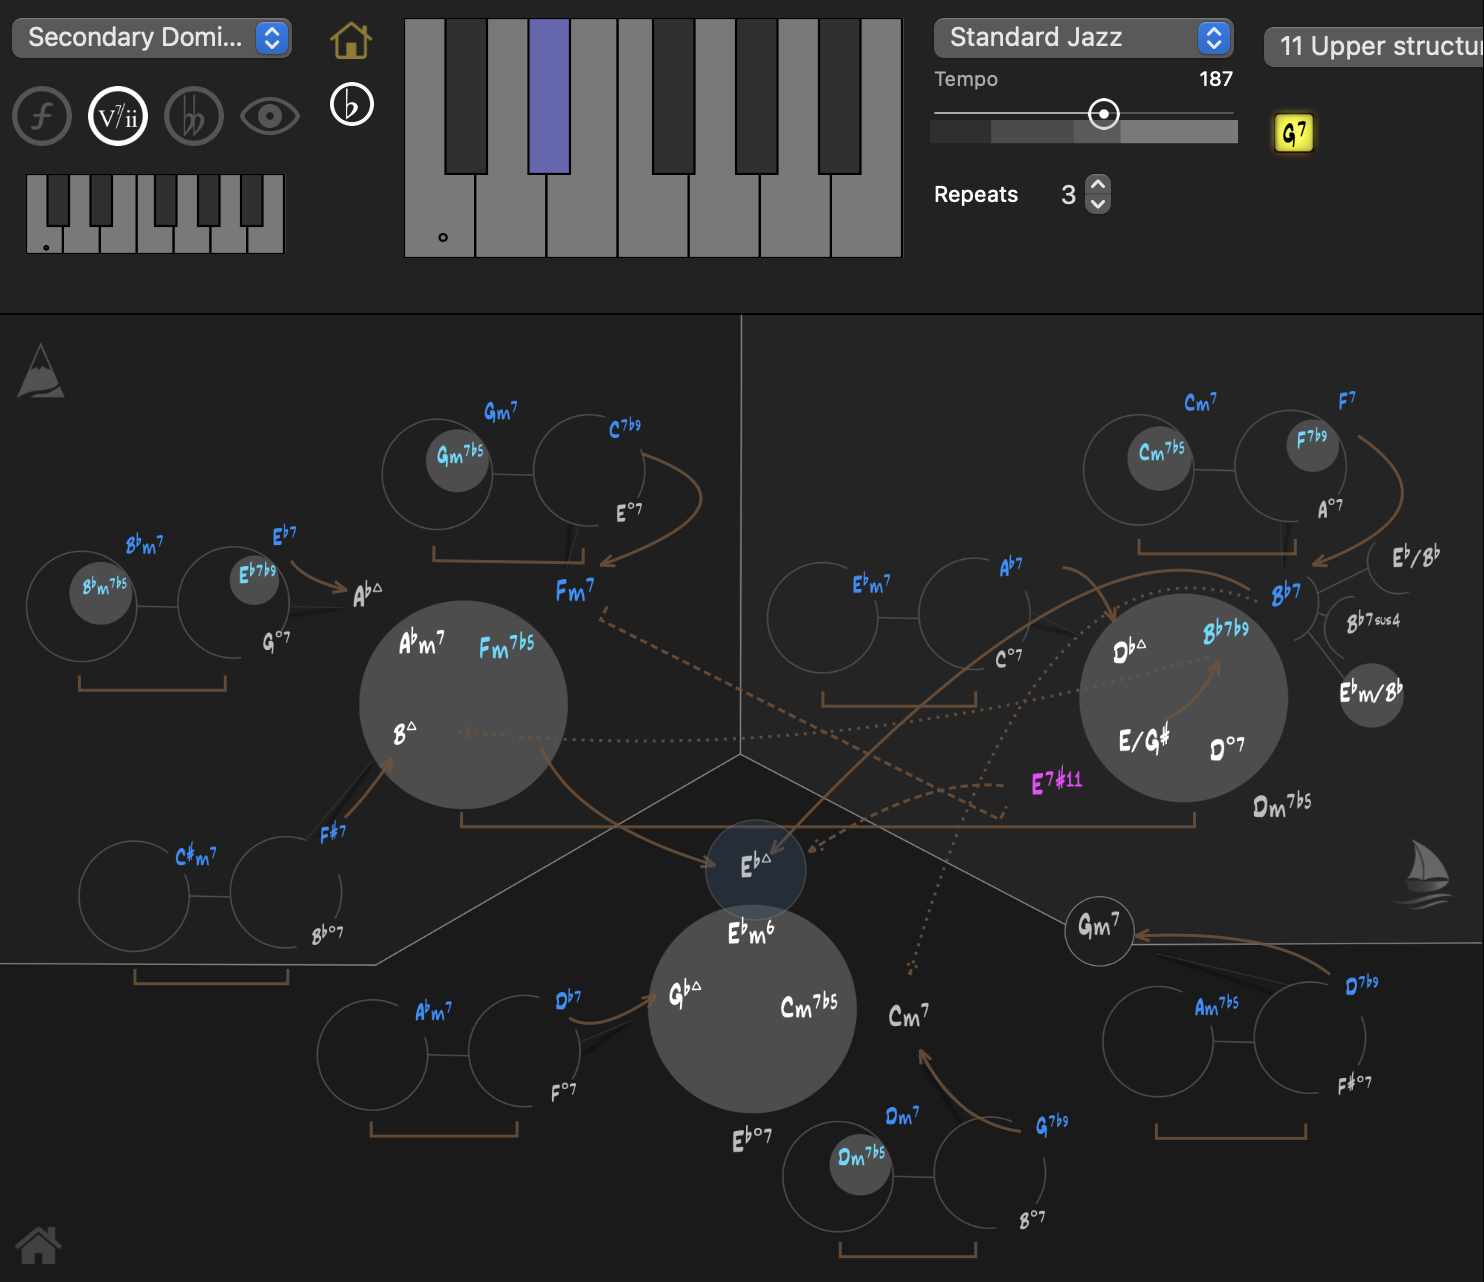
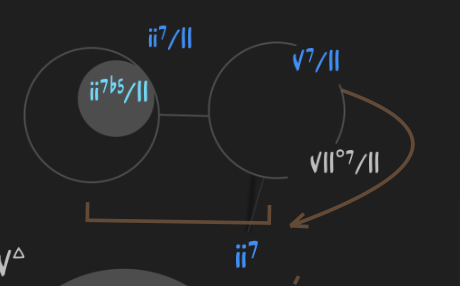
The map looks more complicated, but as we mention before these are just mini-maps targeting the different diatonic functions. Let’s switch to functional view with the f button below the popup you just used.

Now you can clearly see the ii7/ii – V7/ii above the ii7 chord. And the brackets and arrows show you the expected paths between these functions.
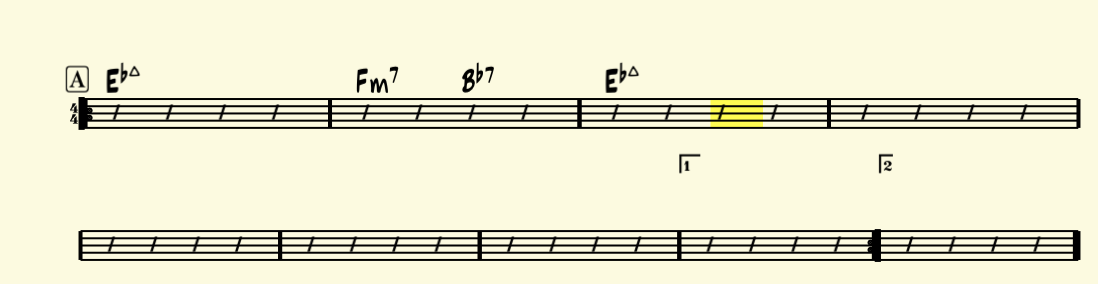
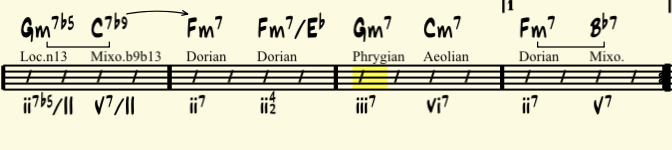
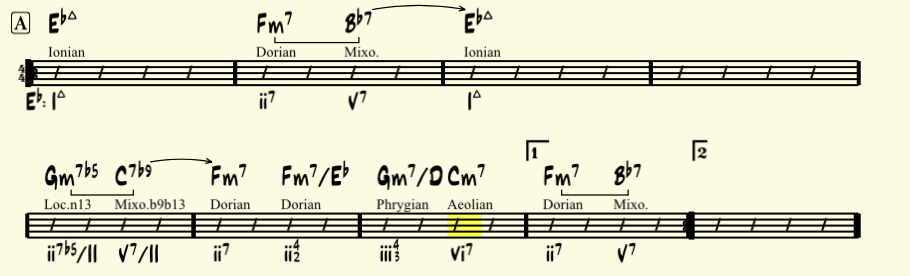
Click on the ii7/II. Then on the V7/II, and then on the ii7. Change the staff preset to Full Analysis (using the popup on the right in the global controller. (Again, the global controller can save you plenty of time because it has the most-often-used tools.)
Look at the score:
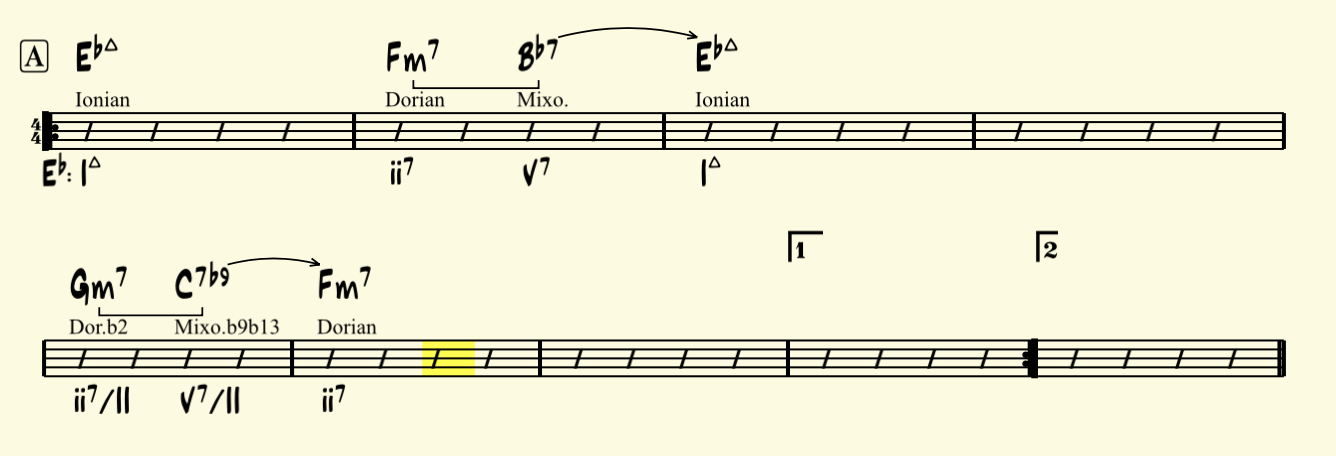
You just entered Gm7 – C7b9 – Fm7 ( a 2 5 targeting the ii chord.) This is why thinking harmonically is a much better and mature way of writing songs. Chords are irrelevant. Using harmonic functions is the way to write, and Mapping Tonal Harmony Pro can help you start thinking using that approach.
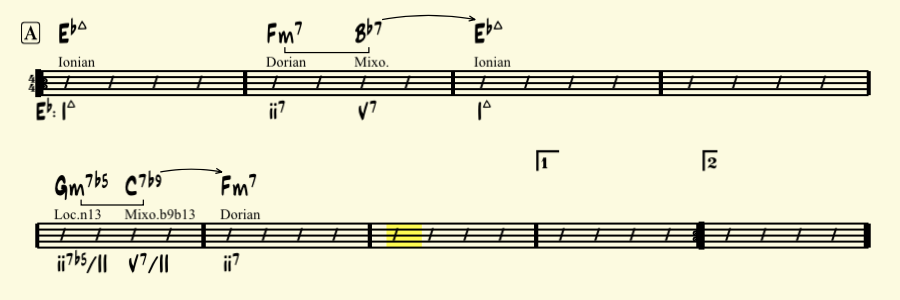
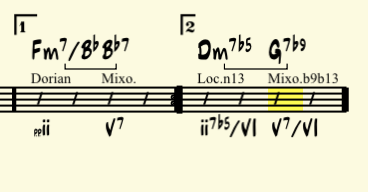
Ok. Let’s say you actually want to use the iim7b5 of ii, not the iim7/ii. (so, instead of a Gm7 you want a Gm7b5 on beat 1 of measure 5)
Click on that beat in the score. It will turn yellow.
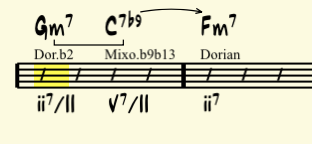
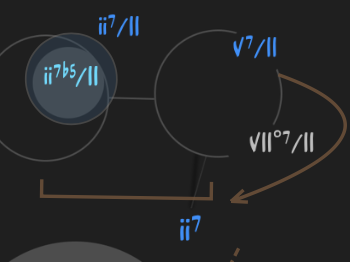
Now click on the ii7b5/ii from the minor mode. It is right next to the ii7/ii but inside the circle. As we mentioned before, chords on the outside of the circles are from major, and chords in the inside from minor. And since we are targeting the ii – a minor chord – it is more common to use the iim7b5/ii.
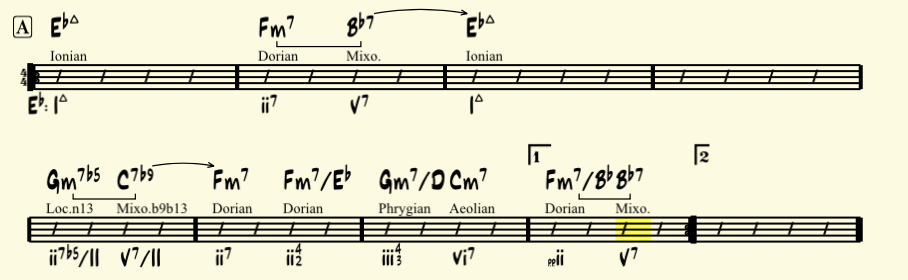
Now the chart looks like this:
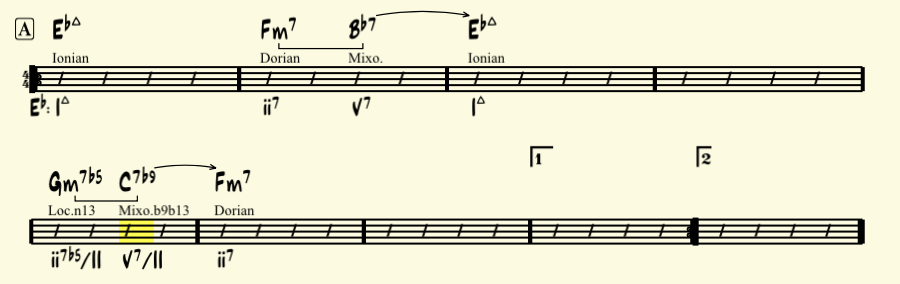
Notice how the chord-scale assigned to the iim7b5 of ii, is now Locrian natural 13 (instead of the Dorian b2 that was paired with the Gm7 before.) Mapping Tonal Harmony Pro knows all the best chord-scales for every function.
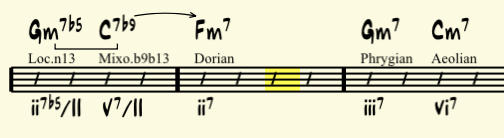
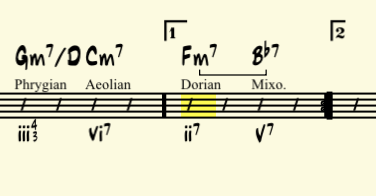
Now let’s add a 3-6-2-5 in measures 7 and 8. Click on the first beat of measure 7 to select it.
And then click on those functions in the map.
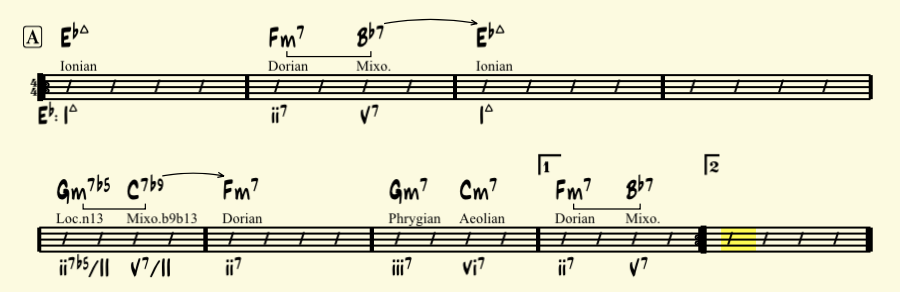
Now, let’s connect that Fm7 in measure 6 with the Gm7 in measure 7 using an Fm7/Eb and change the Gm7 to a Gm7/D. This will create a nice descending bass-line.
Click beat 3 of measure 6 to select it.
Using Inversions
Before clicking on the ii7 (Fm7) let’s change the inversion to 3rd inversion. Fm7/Eb is the 3rd inversion of an Fm7 (the 7th is on the bass). So, click on the heptagon (with 7 vertices, indicating the 7th is on the bass) in the inversions panel.

And then click on the ii7 in the map.
And now you have an Fm7/Eb
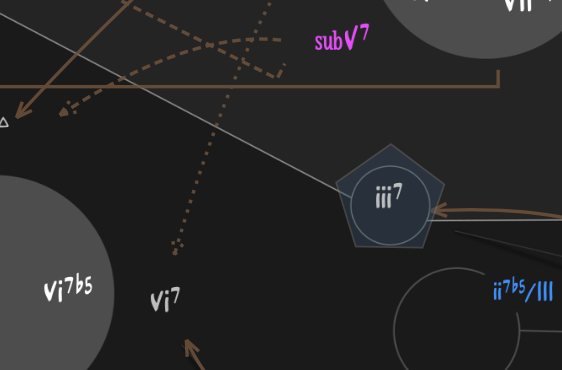
To change Gm7 (which is already selected,) click on the pentagon in the inversion panel to get Gm7/D (second inversion with the 5th on the bass) and then on the iii7 in the map.

And the score now looks like this:
Pedal Point and Slash Chords
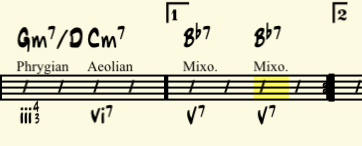
On the next measure (8) let’s change the Fm7 to an Fm7/Bb to create a slash chord with in this case is also a pedal point. (Fm7/Bb – Bb) on the first ending.
So click on the 1st beat in measure 8 (where the Fm7 is) to select it.
To enter a Bb pedal point, we will first enter any chord that has a Bb as the root (we are only going to keep the root of the chord using the pedal point in the inversions panel). So, click on any Bb chord (for example the V7.) It will look like this:
Don’t worry, we just need the Bb bass for that chord. Click again on beat 1 of measure 8 to select it.
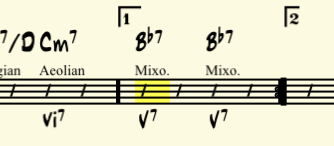
Now choose the pedal point in the inversion panel (circle with a flat base,) and then click on the iim7 (Fm7) on the map.

And we have an Fm7/Bb to Bb (a pedal point)
Modulations (direct & pivot chord)
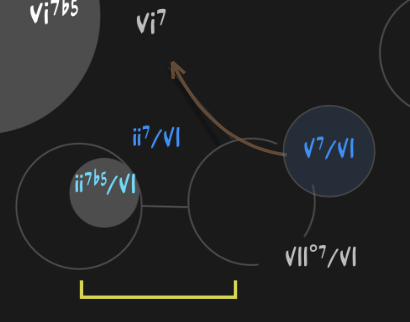
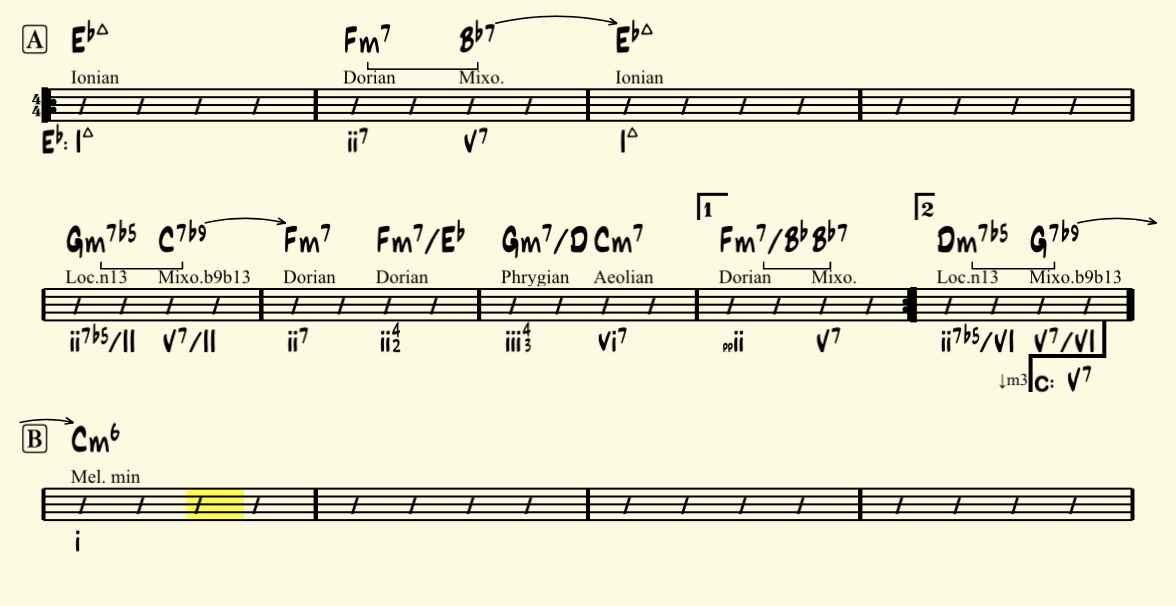
Let’s modulate to C minor in the B Section. A nice way to do this is to use secondary dominants, since Cm is the vi in Eb major. So, let’s add a iim7b5/VI – V7/VI in the 2nd ending of the song.
Before we do anything we need to go back to root position. We used a pedal point so the inversions panel locked that inversion since usually pedal points last for a few chords. Click on the root position button (a circle) in the inversions panel to let know the app you are done with the pedal point.

Now click on the first beat of the measure with the 2nd ending. And then enter the ii/VI and the V7/VI clicking on the chords in the map.
The score should look like this:
It’s time to insert a modulation to the key of C minor. This would be a pivot chord modulation, since G7b9 (the V7/VI) is turning into the V7 of C minor.
Let’s turn on the functional map option so we can see the chords displayed on the map.
Now you can clearly see we are in the key of Eb major at the moment.

Pivot Chord Modulation
We are going to use the Gm7b5 (ii/VI) as our pivot chord. Choose the modulation tool from the toolbox to the left of the score and click on the Gm7b5 in the score

The modulation window appears. It knows we want to enter a pivot-chord modulation (and that we are currently in Eb major)
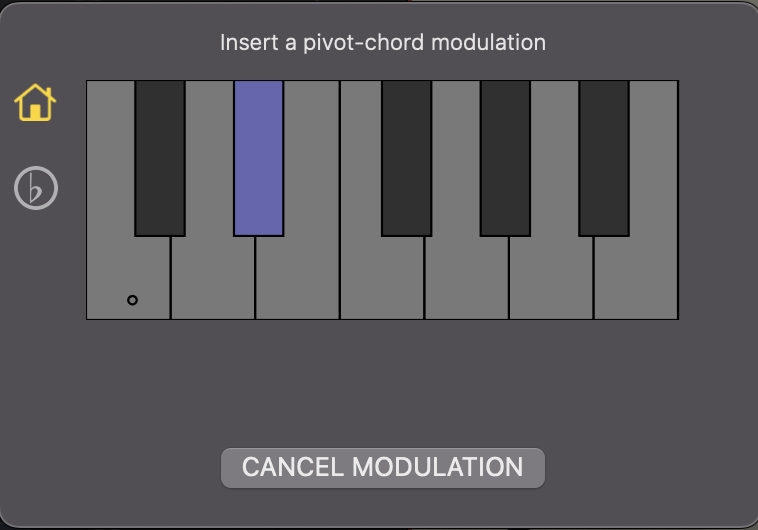
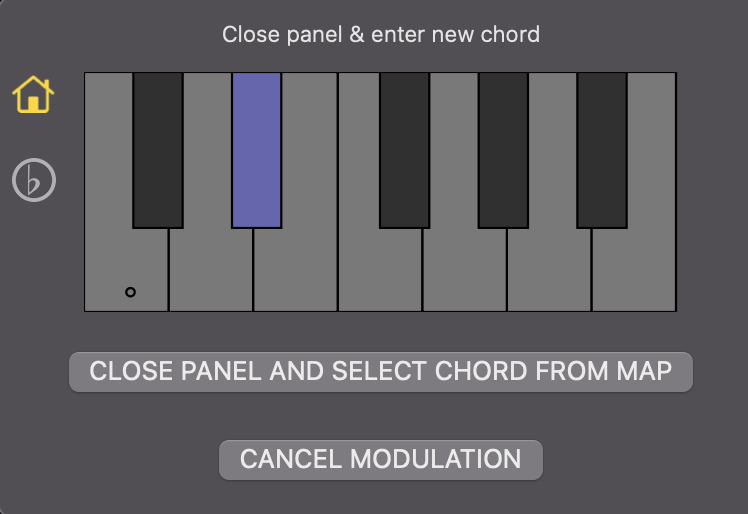
We are modulating to C minor. So click on the C note in the piano keyboard, and then on the house button to toggle to minor key. The panel should now look like this:
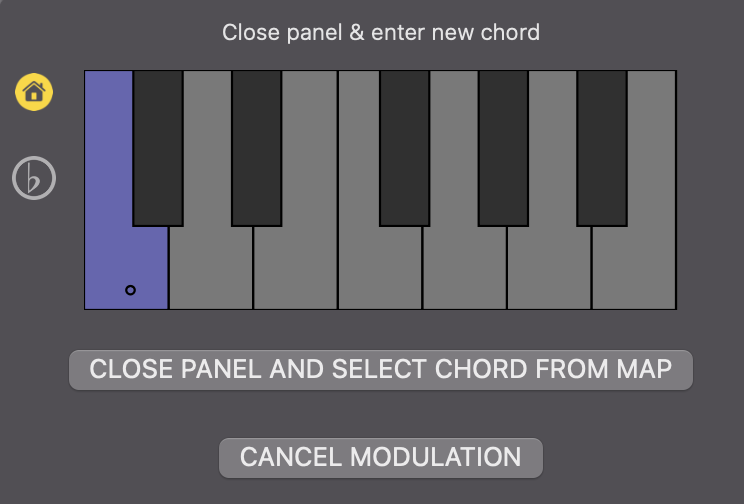
Now click on CLOSE PANEL AND SELECT CHORD FROM MAP
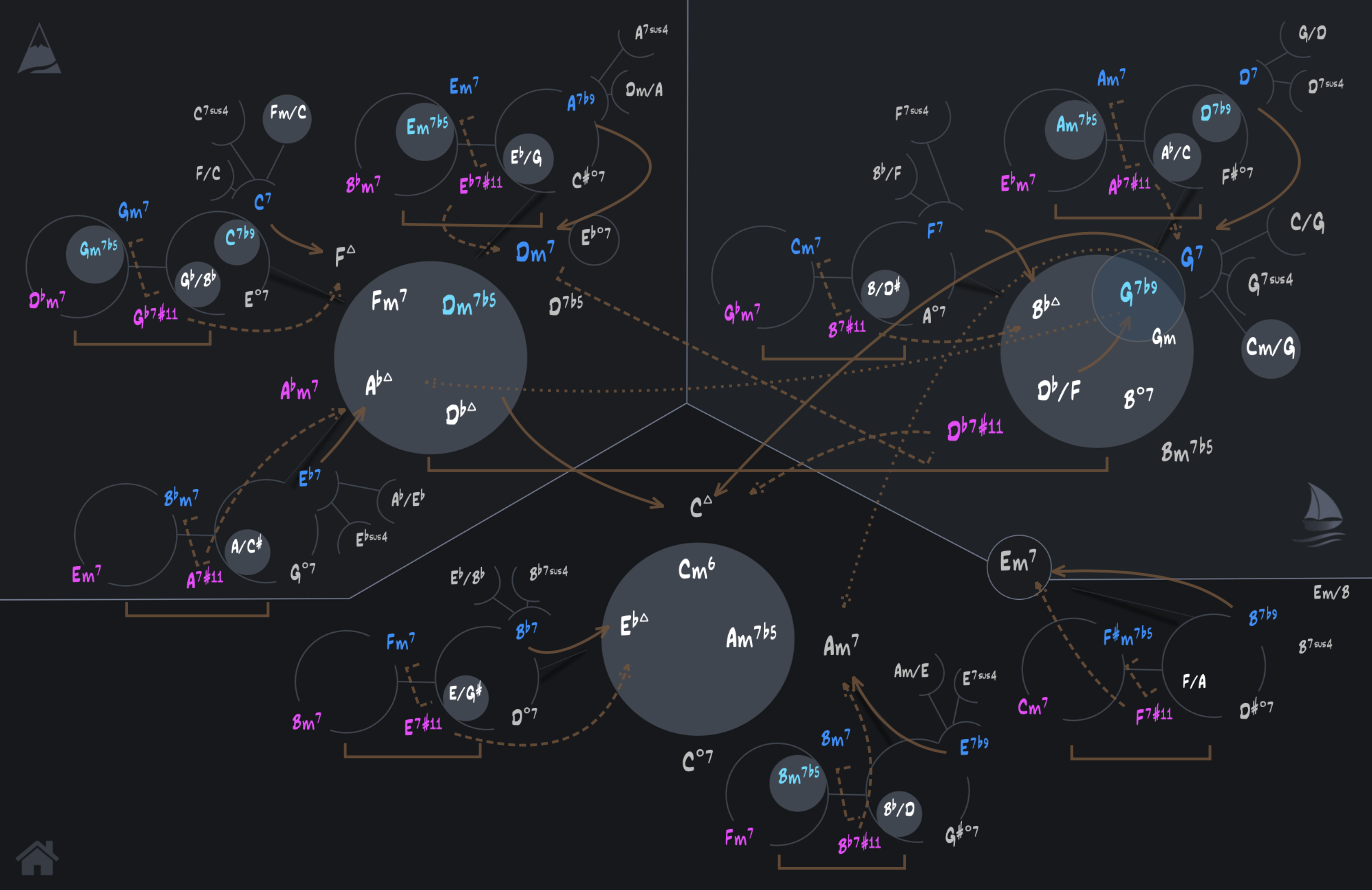
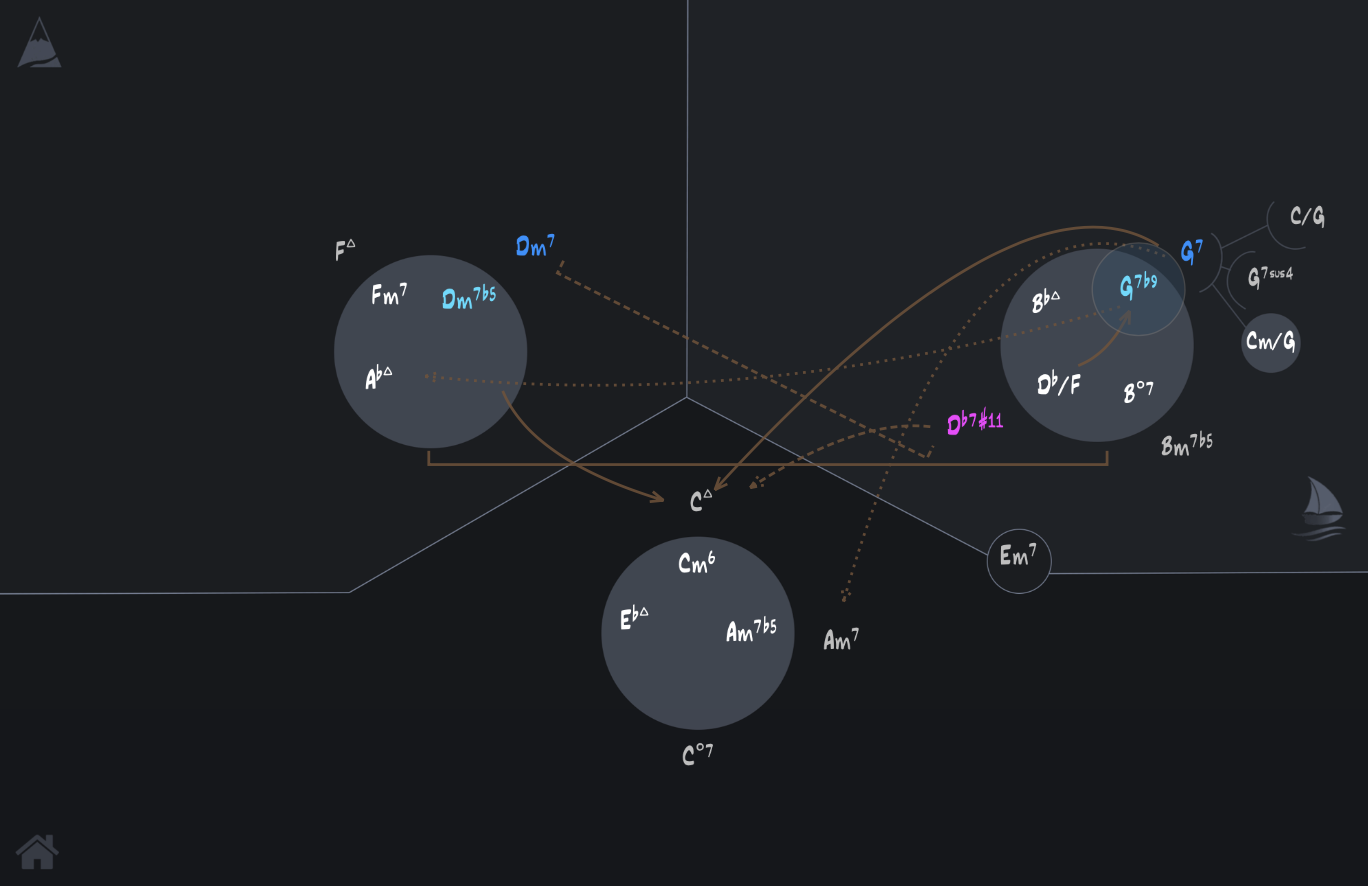
The map is waiting for you to choose a G7 chord in C minor. Mapping Tonal Harmony Pro knows you want to use a G7 from Eb major as the pivot chord, so it is only showing dominant chords in C minor with G as the root (which of course are only the V7 from C minor or C major. Remember, we can borrow chords from the parallel mode, that’s why the G7 from the major key is also a viable option)
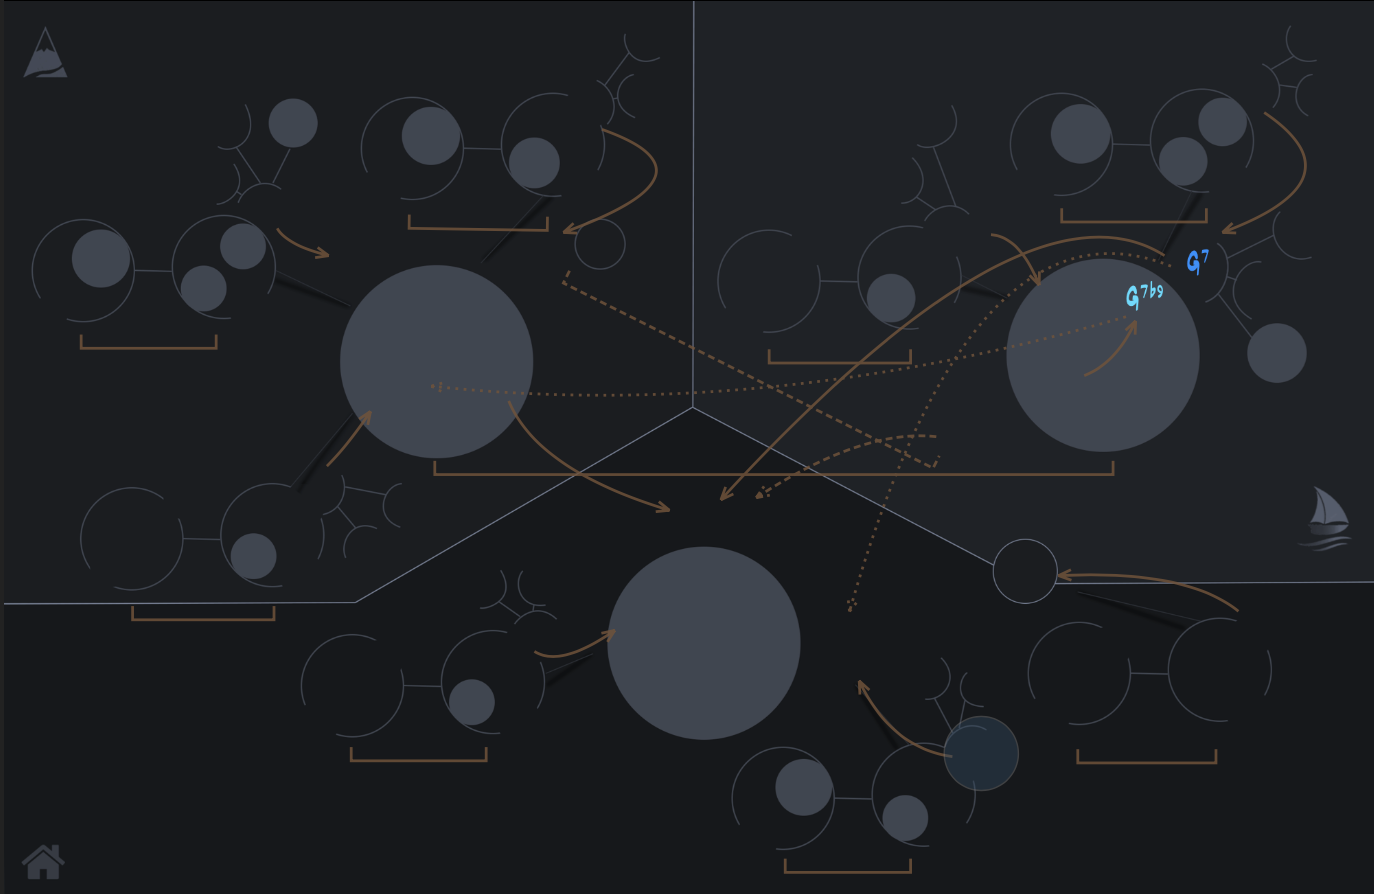
Just click on the G7b9 inside the circle to insert the pivot chord modulation. Now the score should look like this:
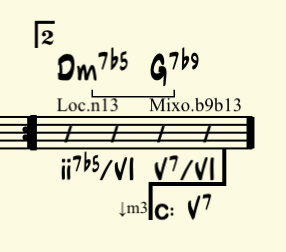
You can see how the G7b9 has been used as a pivot chord to modulate a minor 3rd down (indicated as ↓m3) to the key of C minor. The G7b9 was acting as the V7/VI in the previous key (Eb major) and it now turns into the V7 in the key of Cm (c:). And the map is now in the key of C minor.
Yes, it is showing the entire map again, but we can change that, as we did before using the popup in the global controller, to an easier map level like SubV • N6 • Io7.

Now it looks much simpler. Click on the Cm6 (the tonic in C minor) to enter the chord.
Direct Modulation
Let’s leave the B section with a Cm6 chord throughout, and go back to Eb major on the last A section using a direct modulation. The process is exactly the same as to pivot chord modulations, Mapping Tonal Harmony Pro will know that’s what you want because there’s no chord in that beat.
Select the modulation tool from the toolbox and click on the first beat of the last A section. The modulation window appears, and it shows we are in C minor and we want to insert a direct modulation.
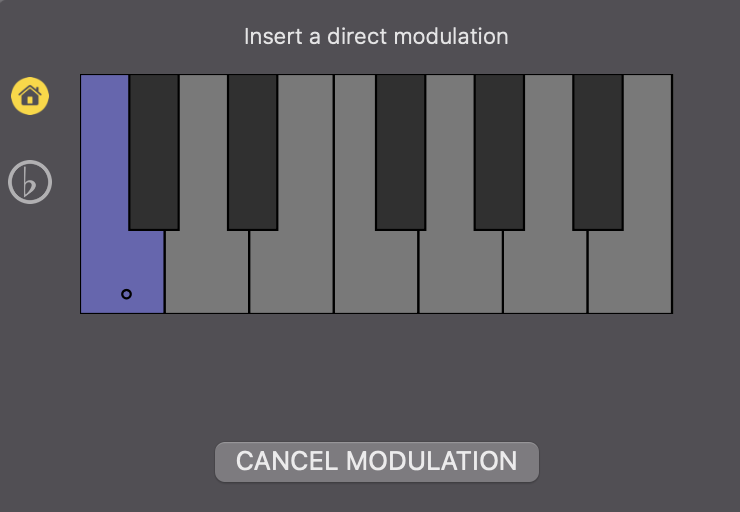
Click on the Eb key and on the house button to toggle to a major key:
CLOSE PANEL AND SELECT CHORD FROM MAP.
Click on the I chord (Ebmaj7) and now our song is back to the key of Eb major.

NOTE: If you click on any chord the map will change to the key of the moment. Try clicking on the Cm6 in the B section and you’ll see the map changing to the key of C minor.
Inserting Non-default Chords
Lastly, let’s add a V7 (Bb7) on the last two beats of the song. Click on beat 3 of the last measure to select it. And the on the map right-click on the Bb7 (the V7). The chord/chord-scale pairings popup will appear:
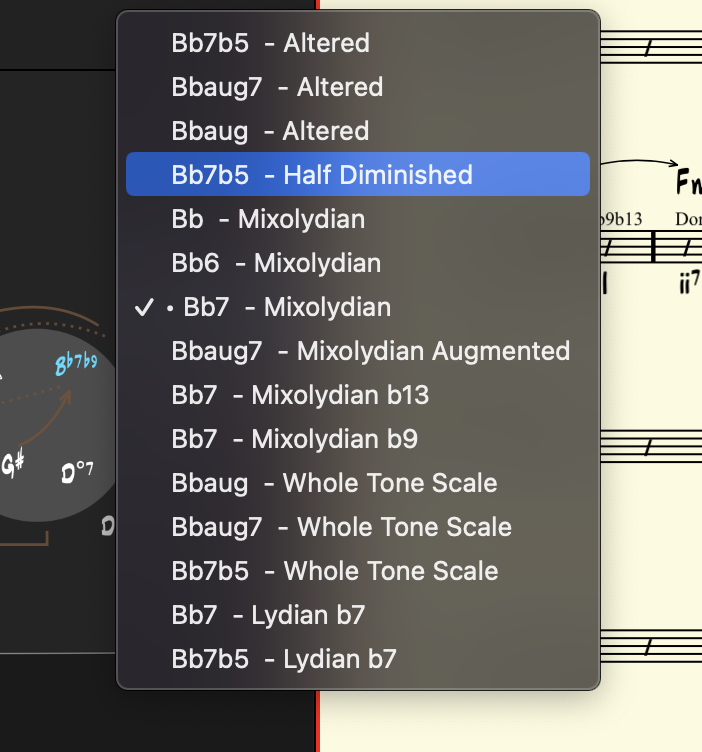
These are all the pairings that work well on a V7 in a major key. Mapping Tonal Harmony Pro has a library of chord/chord-scale pairings for every function in every style.
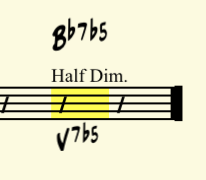
Let’s select the Bb7b5 paired with the Half Diminished scale. And then click on the chord in the map to insert it in the score.
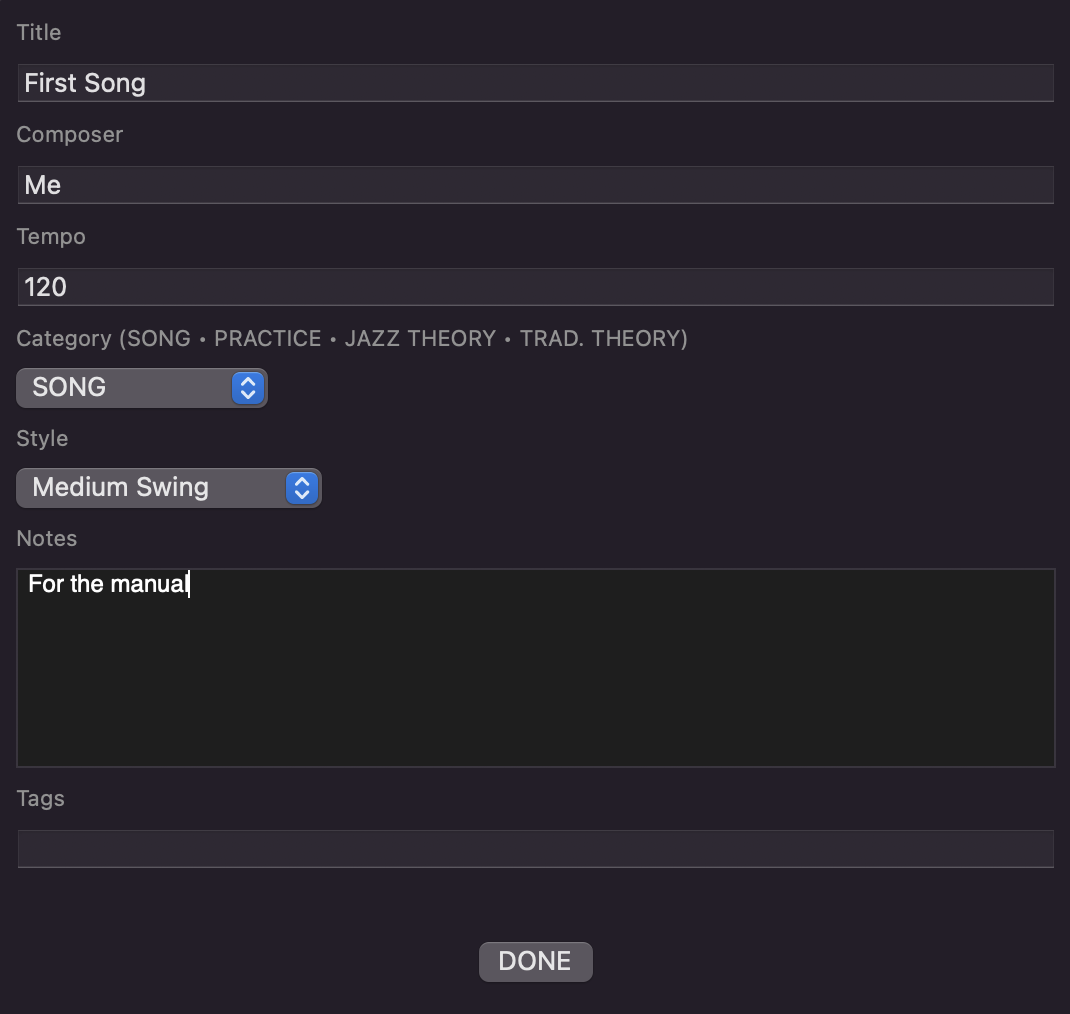
Editing the Song Header
While in edit mode you can edit the song header (title, composer, etc) by just clicking on the song title in the score. The song header editor will appear:
Save the song and turn edit mode off by clicking on the edit button on the left menu panel.
NOTE: Mapping Tonal Harmony Pro was designed to make you think in harmonic concepts. The intention of the app is to help you acquire the necessary skills to write music thinking harmonically. When you create/edit songs using the map you are also studying and learning harmony. This is why the standard song editor in Mapping Tonal Harmony Pro focuses on harmonic functions, modulations and chord/chord-scale pairings.
But now, in version 9, there’s an add-on for those who want to create/edit songs without dealing with all these concepts. Just edit the chords in a text editor and let the Analyzer do all the harmony for you! This is a great feature if you want to edit songs fast, and also for users that are not very comfortable with some harmonic concepts yet.
Create/Edit A Song Using The Analyzer (add-on)
The first steps to create a song using the analyzer are exactly the same as when using the map:
- Click on NEW
- Fill out the card with beats per measure and the map template. For the form template you can choose anything you want. I suggest using the 4 Bars Empty template, since you are going to be editing the song in a text box. Then click on APPLY CHANGES AND GO ON.
- Fill out the song header (title, composer, etc.)
Now you have an empty song with 4 measures. Click on the Analyzer button on the main top menu (above the score) to open the analyzer window.
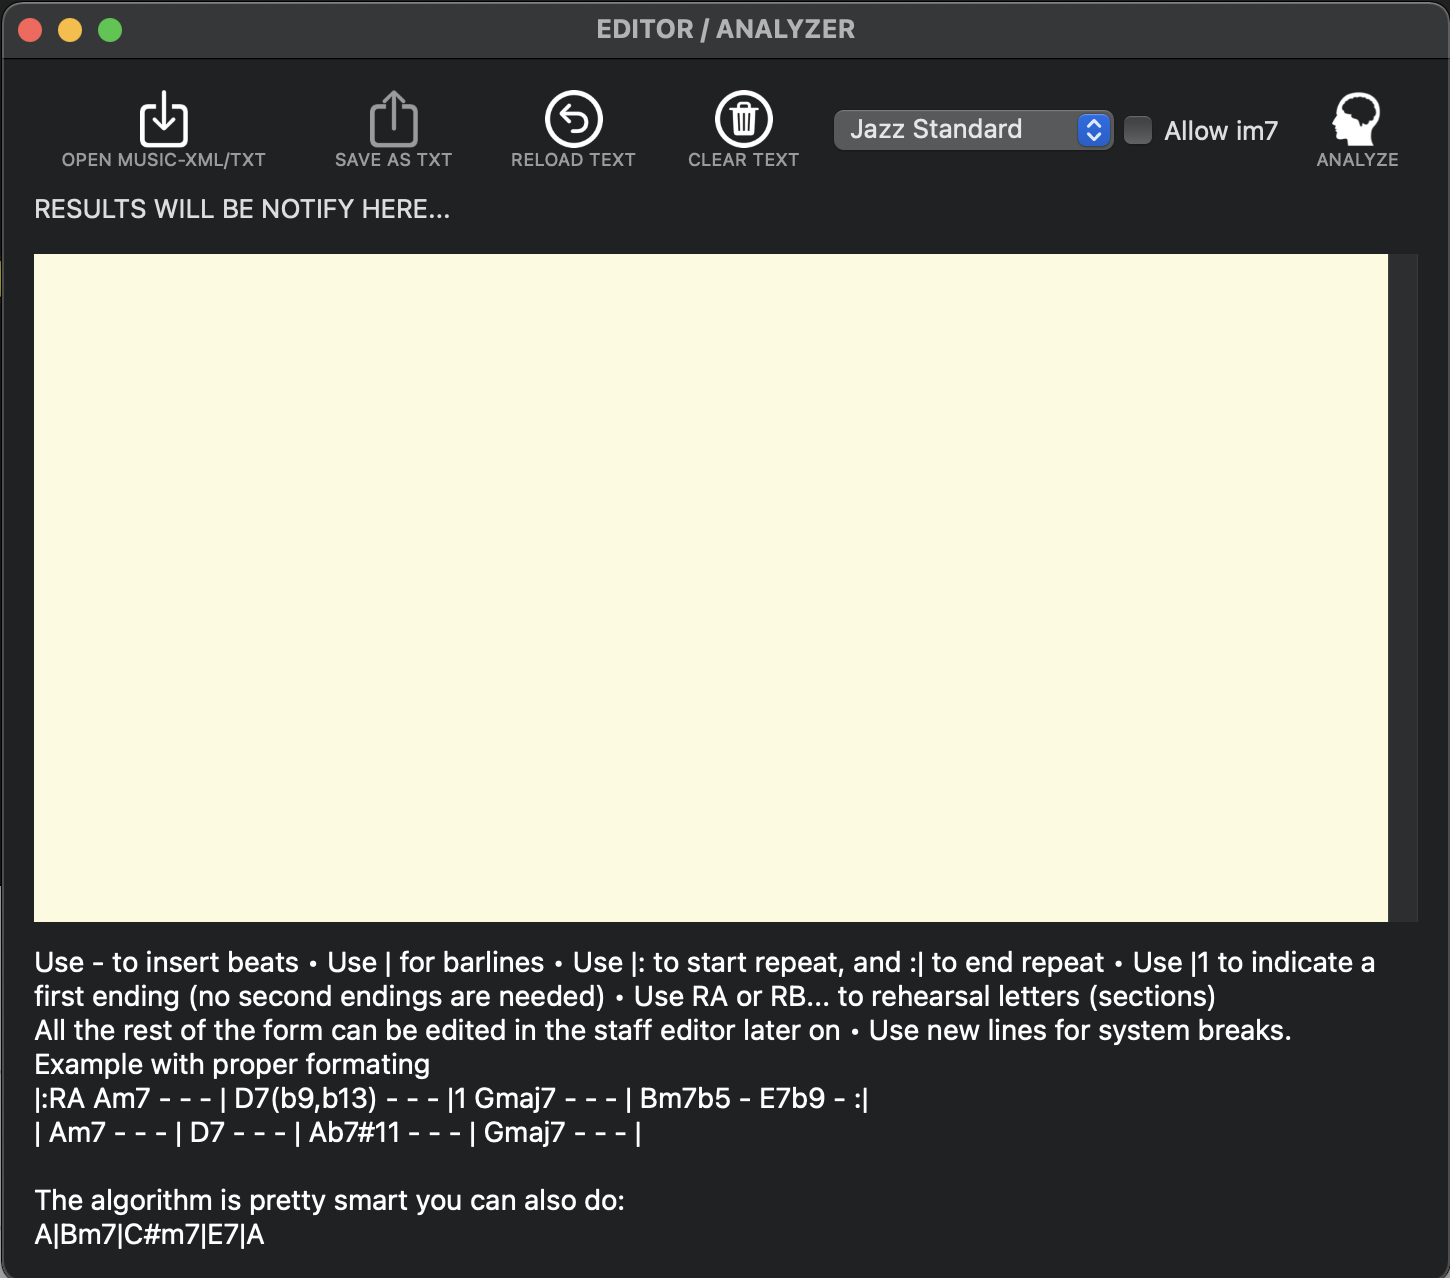
Just type a chord progression in the box. There are just a couple of formatting rules to follow:
- Use – for beats
- Use | for bar-lines
- Use |: to start repeats and :| to end them
- Use |1 to start a first ending (the 2nd ending is calculated automatically)
- If you want rehearsal marks (sections) just use |RA (rehearsal mark A) |RB, |RC… (right after the bar-line)
- Use space to separate bar-lines, chords and beats.
- Use enter (new line) for system breaks.
Here’s an example:
|:RA Am7 – – – | D7(b9,b13) – – – |1 Gmaj7 – – – | Bm7b5 – E7b9 – :|
| Am7 – – – | D7 – – – | Ab7#11 – – – | Gmaj7 – – – |
The progression recognition algorithm is pretty smart you can also write something like this:
A|Bm7|C#m7|E7|A
and Mapping Tonal Harmony Pro will understand what you mean.
NOTE: Try to keep tensions in between parenthesis like: C7(9,#11,b13). That will help the parser interpret the chord you want correctly.
Let’s try the first progression in the example I just wrote

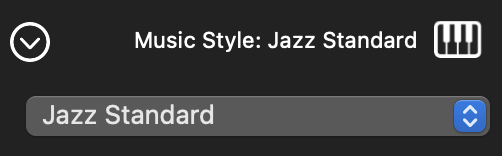
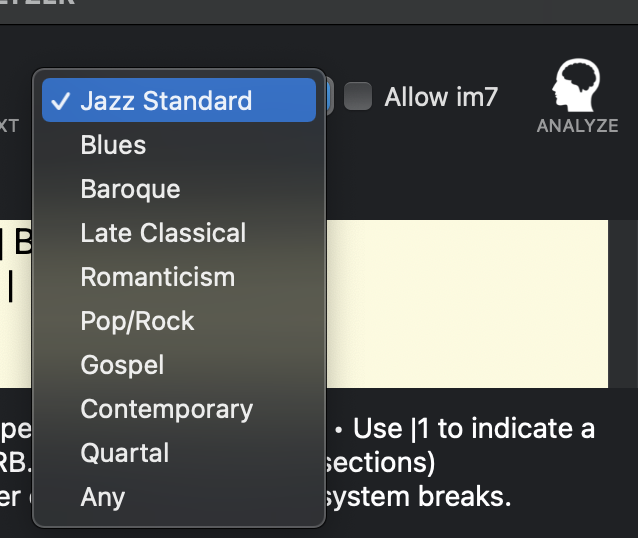
Before clicking on the analyze button, make sure you tell the analyzer the harmonic language you want it to use by selecting it in the map template popup. For this progression, Jazz Standard is a good choice. Remember, different styles have different sets of chord/chord-scales pairings for the same functions. (i.e. in Blues the tonic is a i7).
Also, if you think this song is using minor 7th chord as the tonic in a minor key (im7) then enable the Allow im7 check box next to the popup. Usually the tonic minor is a im6 or a immaj7 (the im7 as the tonic is tricky to interpret since it could be working as a iim7 (it will greatly help the analyzer find the right answer if it knows to look for a possible im7)
Now click on the ANALYZE button, and you’ll see the entire progression, fully analyzed appear in the staff panel:
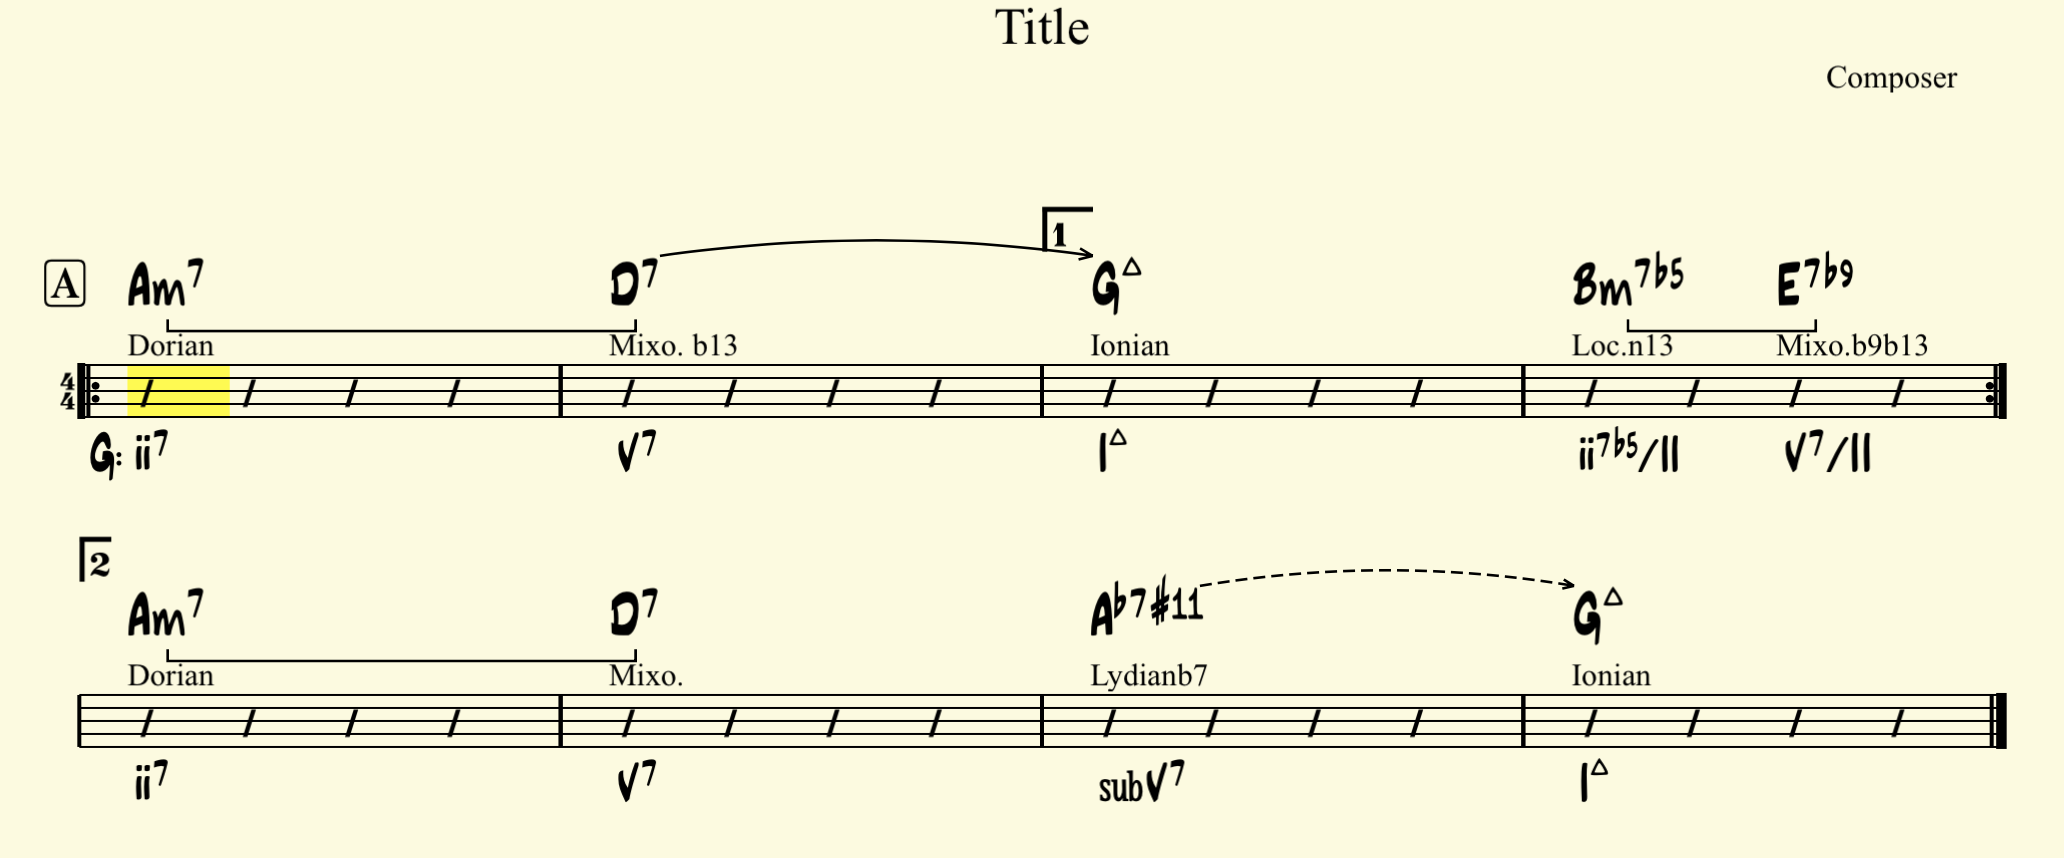
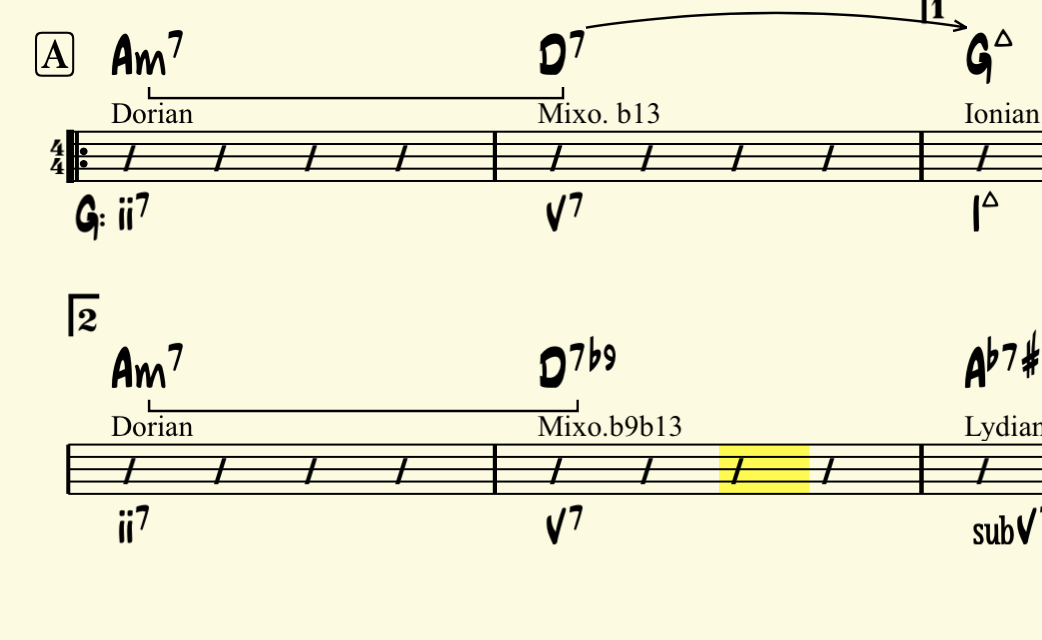
Mapping Tonal Harmony Pro is saying this progression is in the key of G major, and the first chord Am7 is a iim7 (notated as ii7. Remember, Mapping Tonal Harmony Pro use the more standard notation without the m). It has also find the best scale to pair the chord with: Dorian scale. And is showing all important cadences (arrows & brackets).
You also have the 1st ending (and the 2nd ending, which was automatically added,) and the system breaks where you wrote the in the text box.
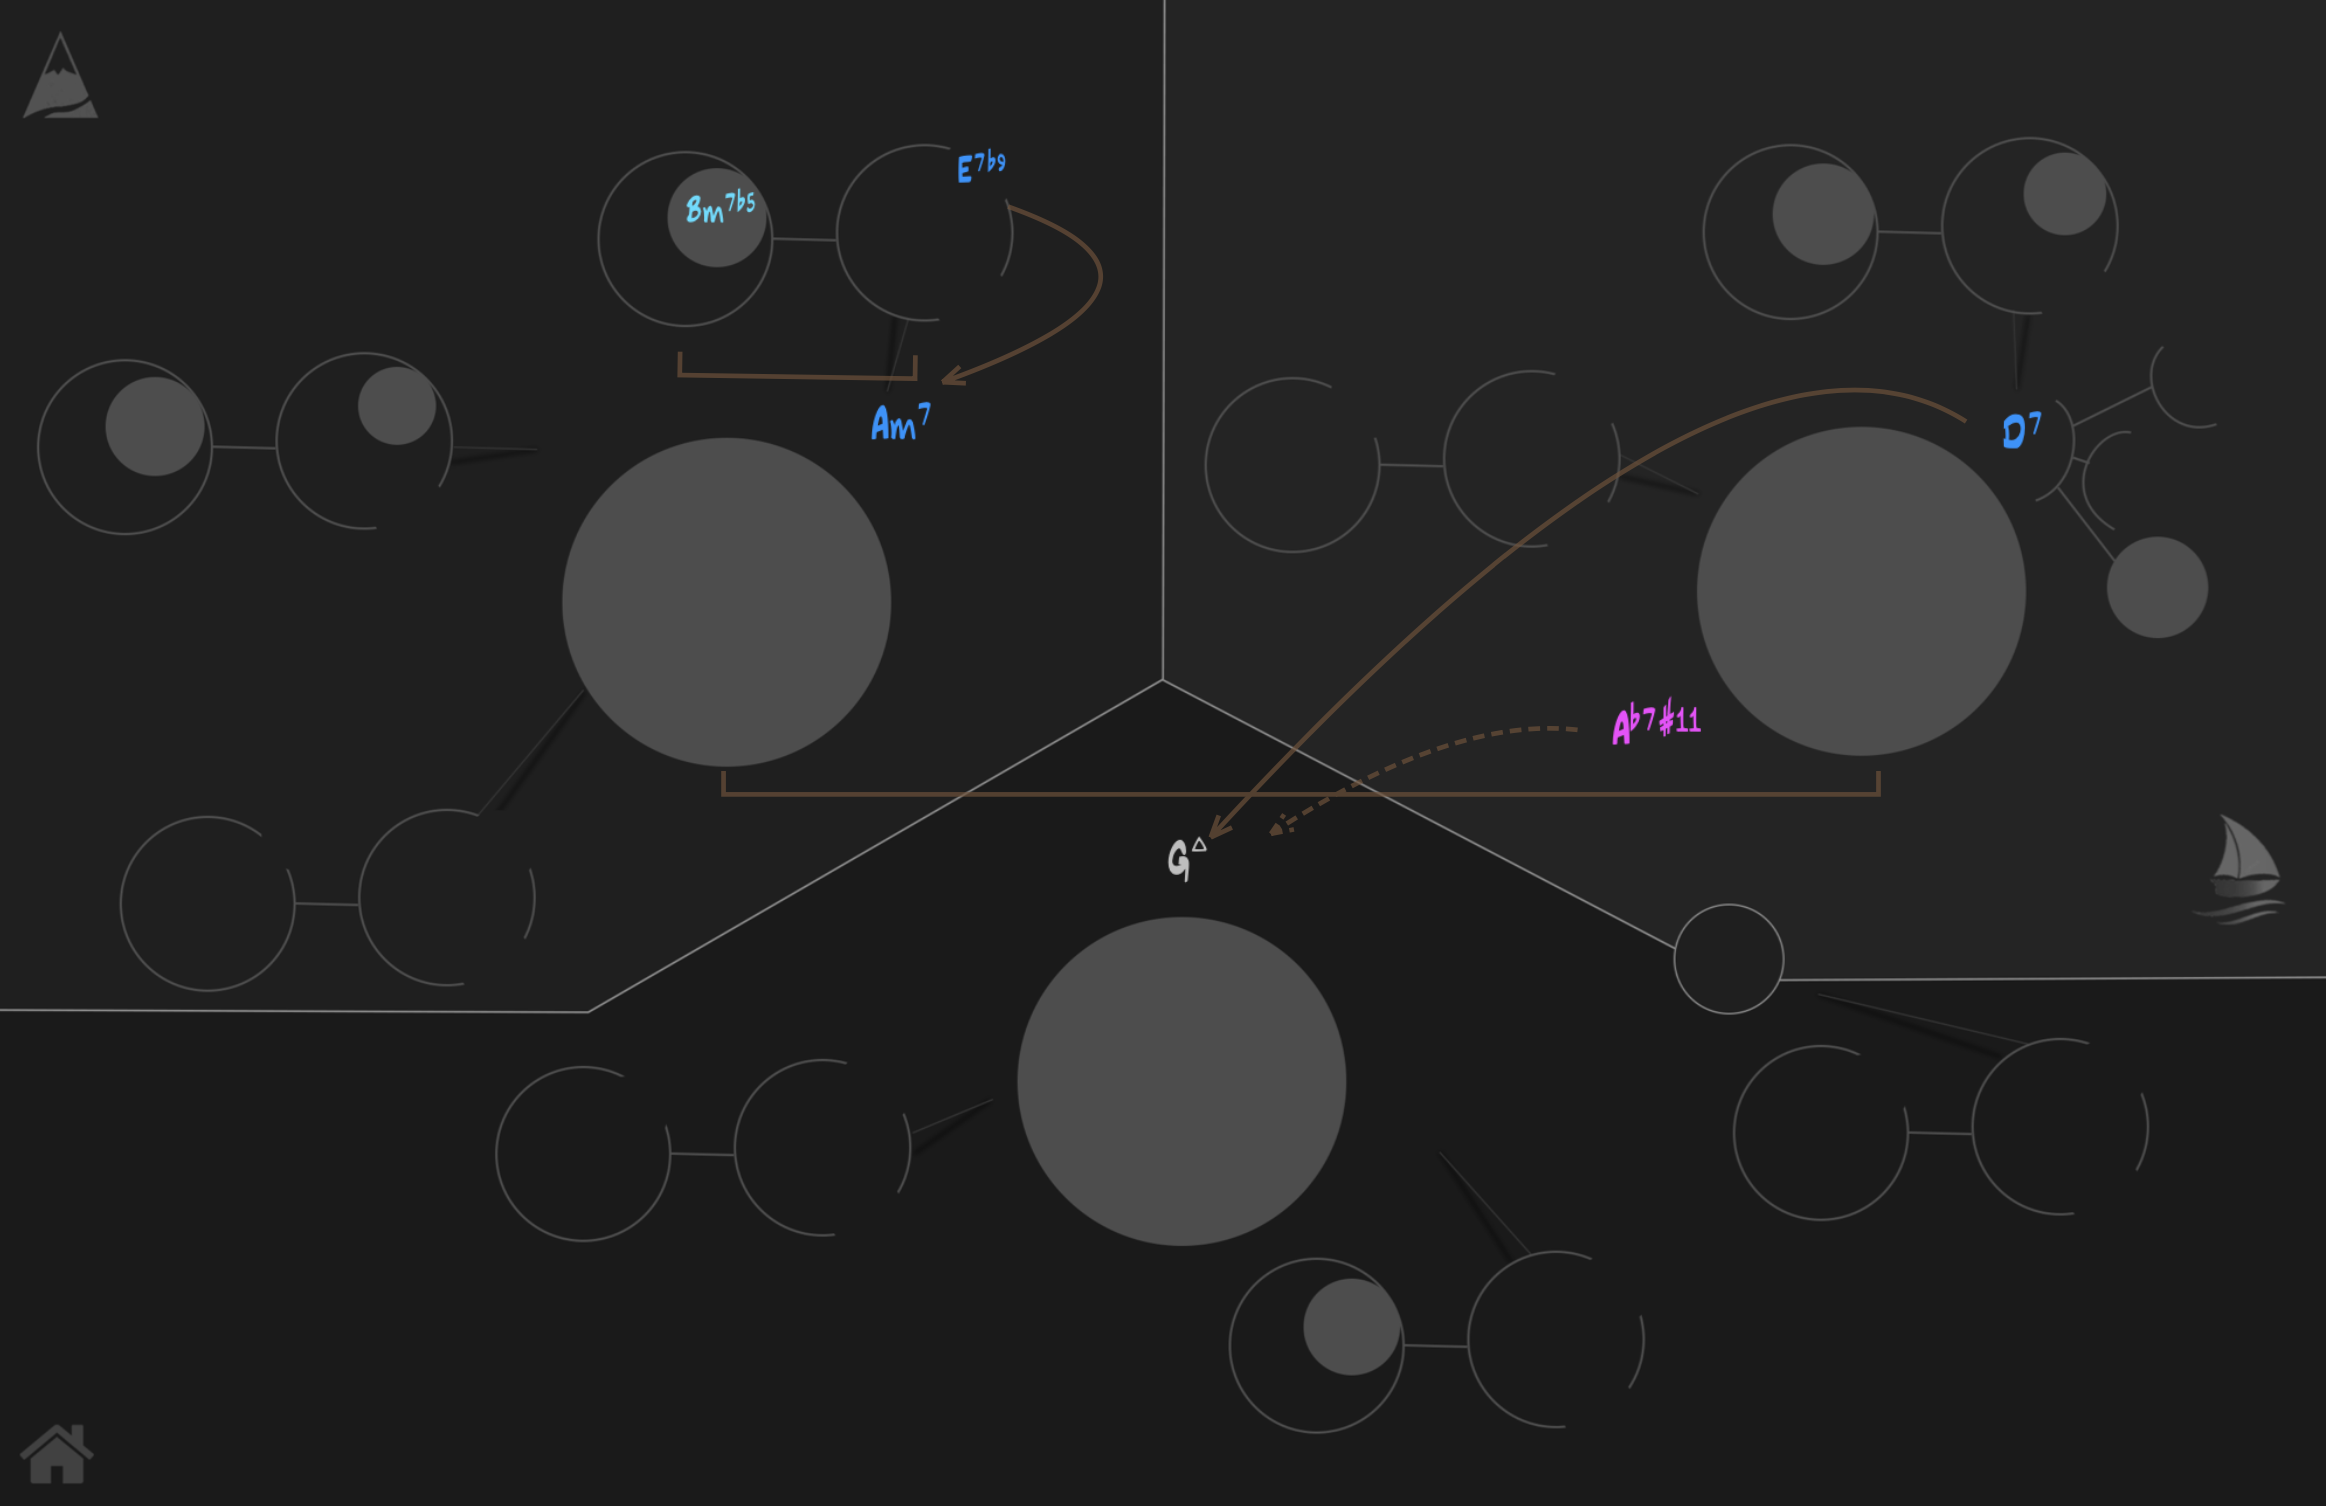
Of course, the map is also showing the song in the key of G major.
Now you can just play play and practice. Pretty cool, eh?
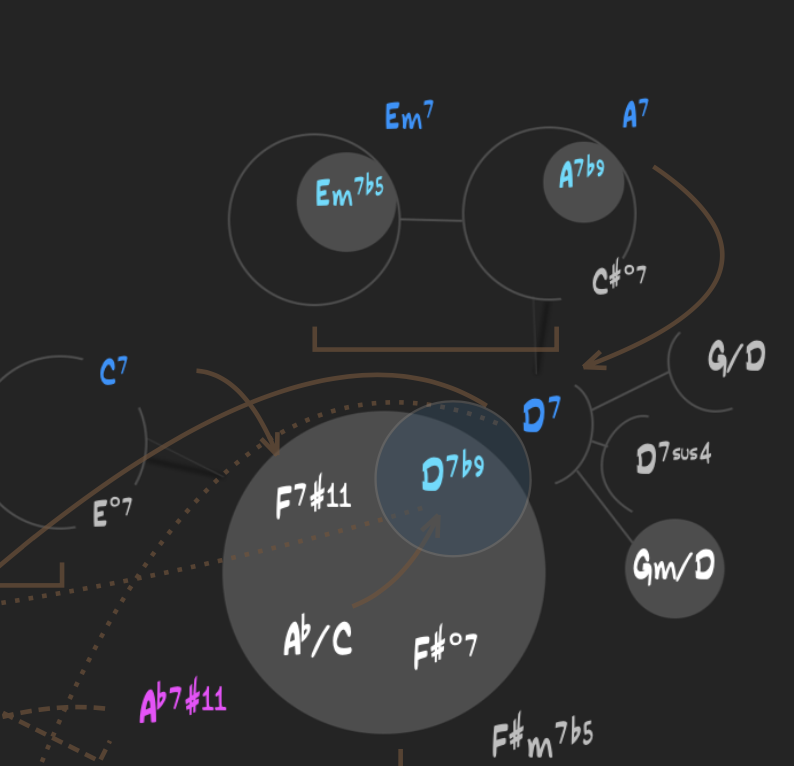
If you want to edit the song further, you can use the map and staff as explained before. So, let’s say we want to change the D7 in measure 6 to a D7b9 (from the minor mode) using the staff and map.
Click on that beat to select it.
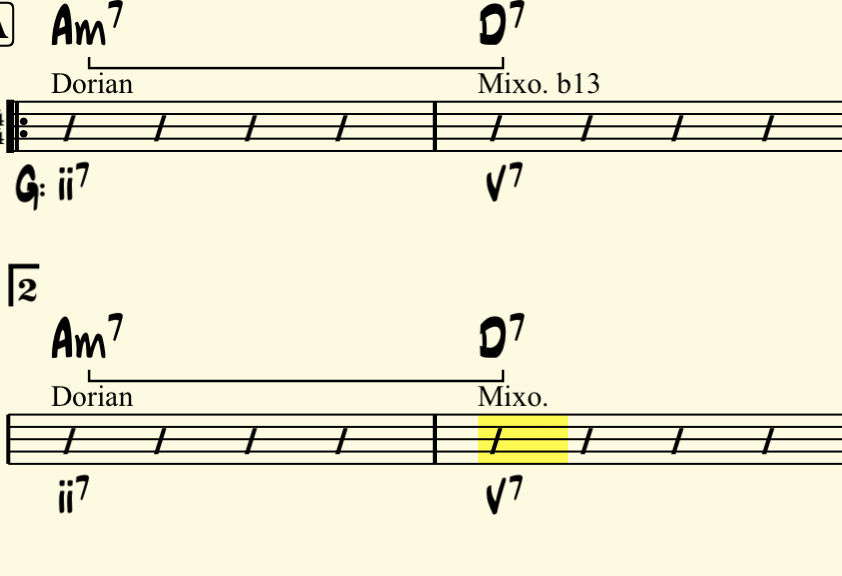
Then click on the D7b9 in the dominant region of the map inside the circle (the V7b9 from the parallel minor) to replace the D7 in the staff.
Turn off edit mode (with the pencil button)
…and save the progression.
No open the analyzer window again, and click on the RELOAD TEXT button to convert the current progression back to text.

You can see the D7b9 appear in the text box

In other words, you can now do some editing in the text box and some editing in using the map and staff. Use the RELOAD TEXT button to move the progression from the staff to the text box, and the ANALYZE button to move from the text box to the staff. Pretty easy!
You can also open any progression from the catalog, turn it into text, edit it, and then re-analyze to commit your edits into the staff, or just to check how your own analysis compares to the analyzer’s analysis.
NOTE: Analysis is not an exact science, it is sometimes subjective. Many times, there are several valid interpretations of a harmonic progression. The A.I. in the analyzer was trained by musicians, using neural networks, but it will never replace a well-versed musician with years of experience. Having said that, it does a pretty decent job for a computer program. What’s really important, is that it is a starting point from where to develop your own analytical skills. (and it will save you tons of times if you are not sure how to analyze a certain progression)
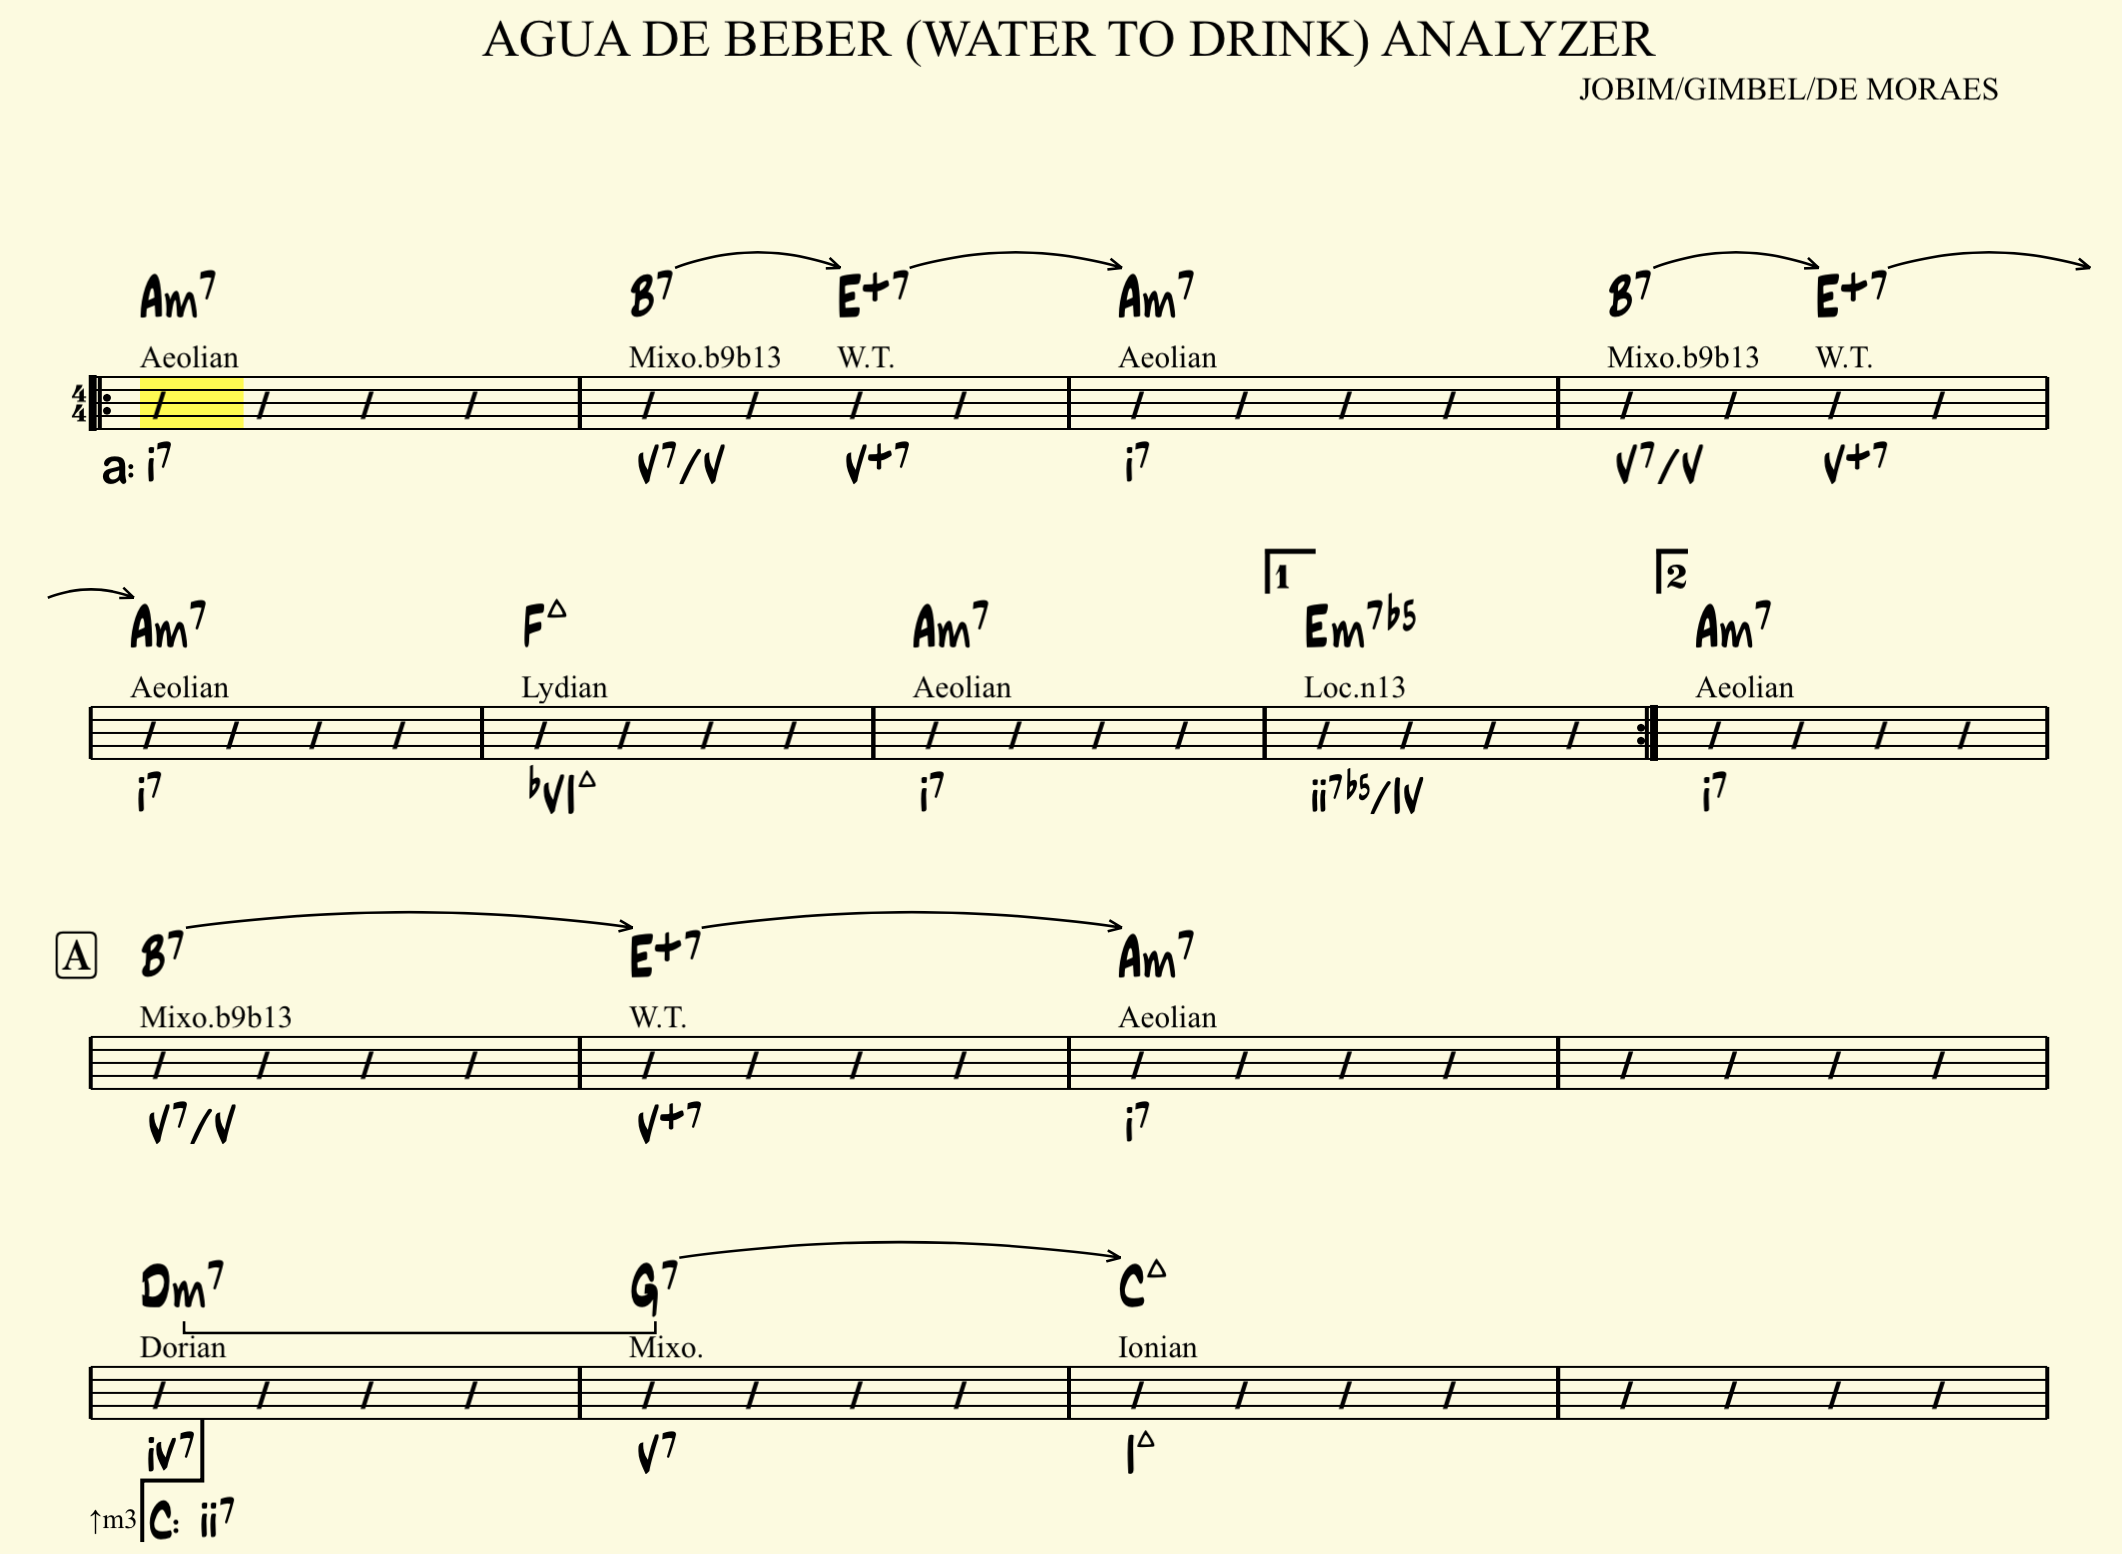
If we open AGUA DE BEBER (WATER TO DRINK) by Jobim (included in the 1300+ Jazz Standards add-on,) we can see the entire analysis (handmade by musicians.)
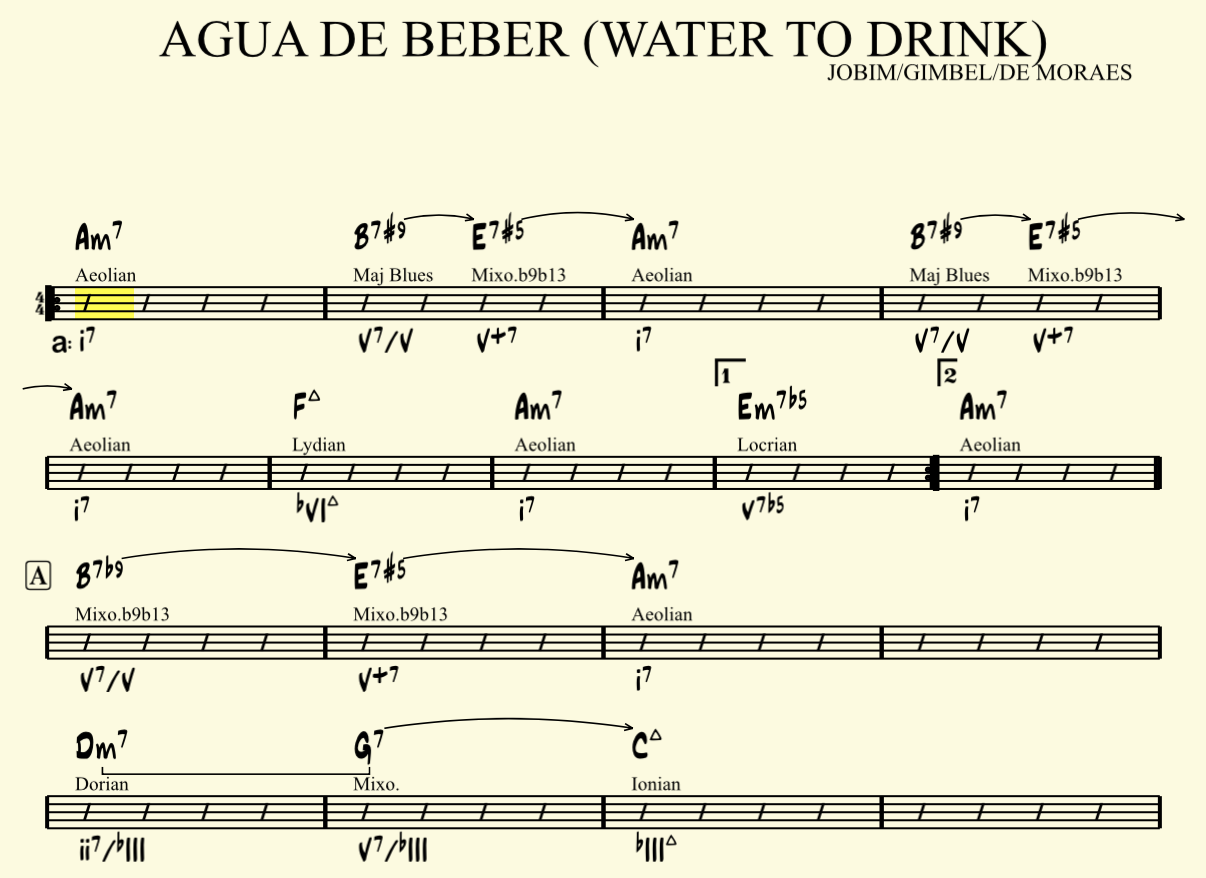
This song is in the key of A minor, and the first chord is an Am7 (Aeolian.) The i7 is not the expected tonic in a tonal setting, but it is very common in jazz (and notice how this is not a modal song.) Also notice how the Dm7 G7 to Cmaj7 at the end has been interpreted as a ii7/bIII – V7/bIII – bIIImaj7 (not as a modulation to C major)
If we reload the text into the analyzer and analyze it back with the analyze button we get this:
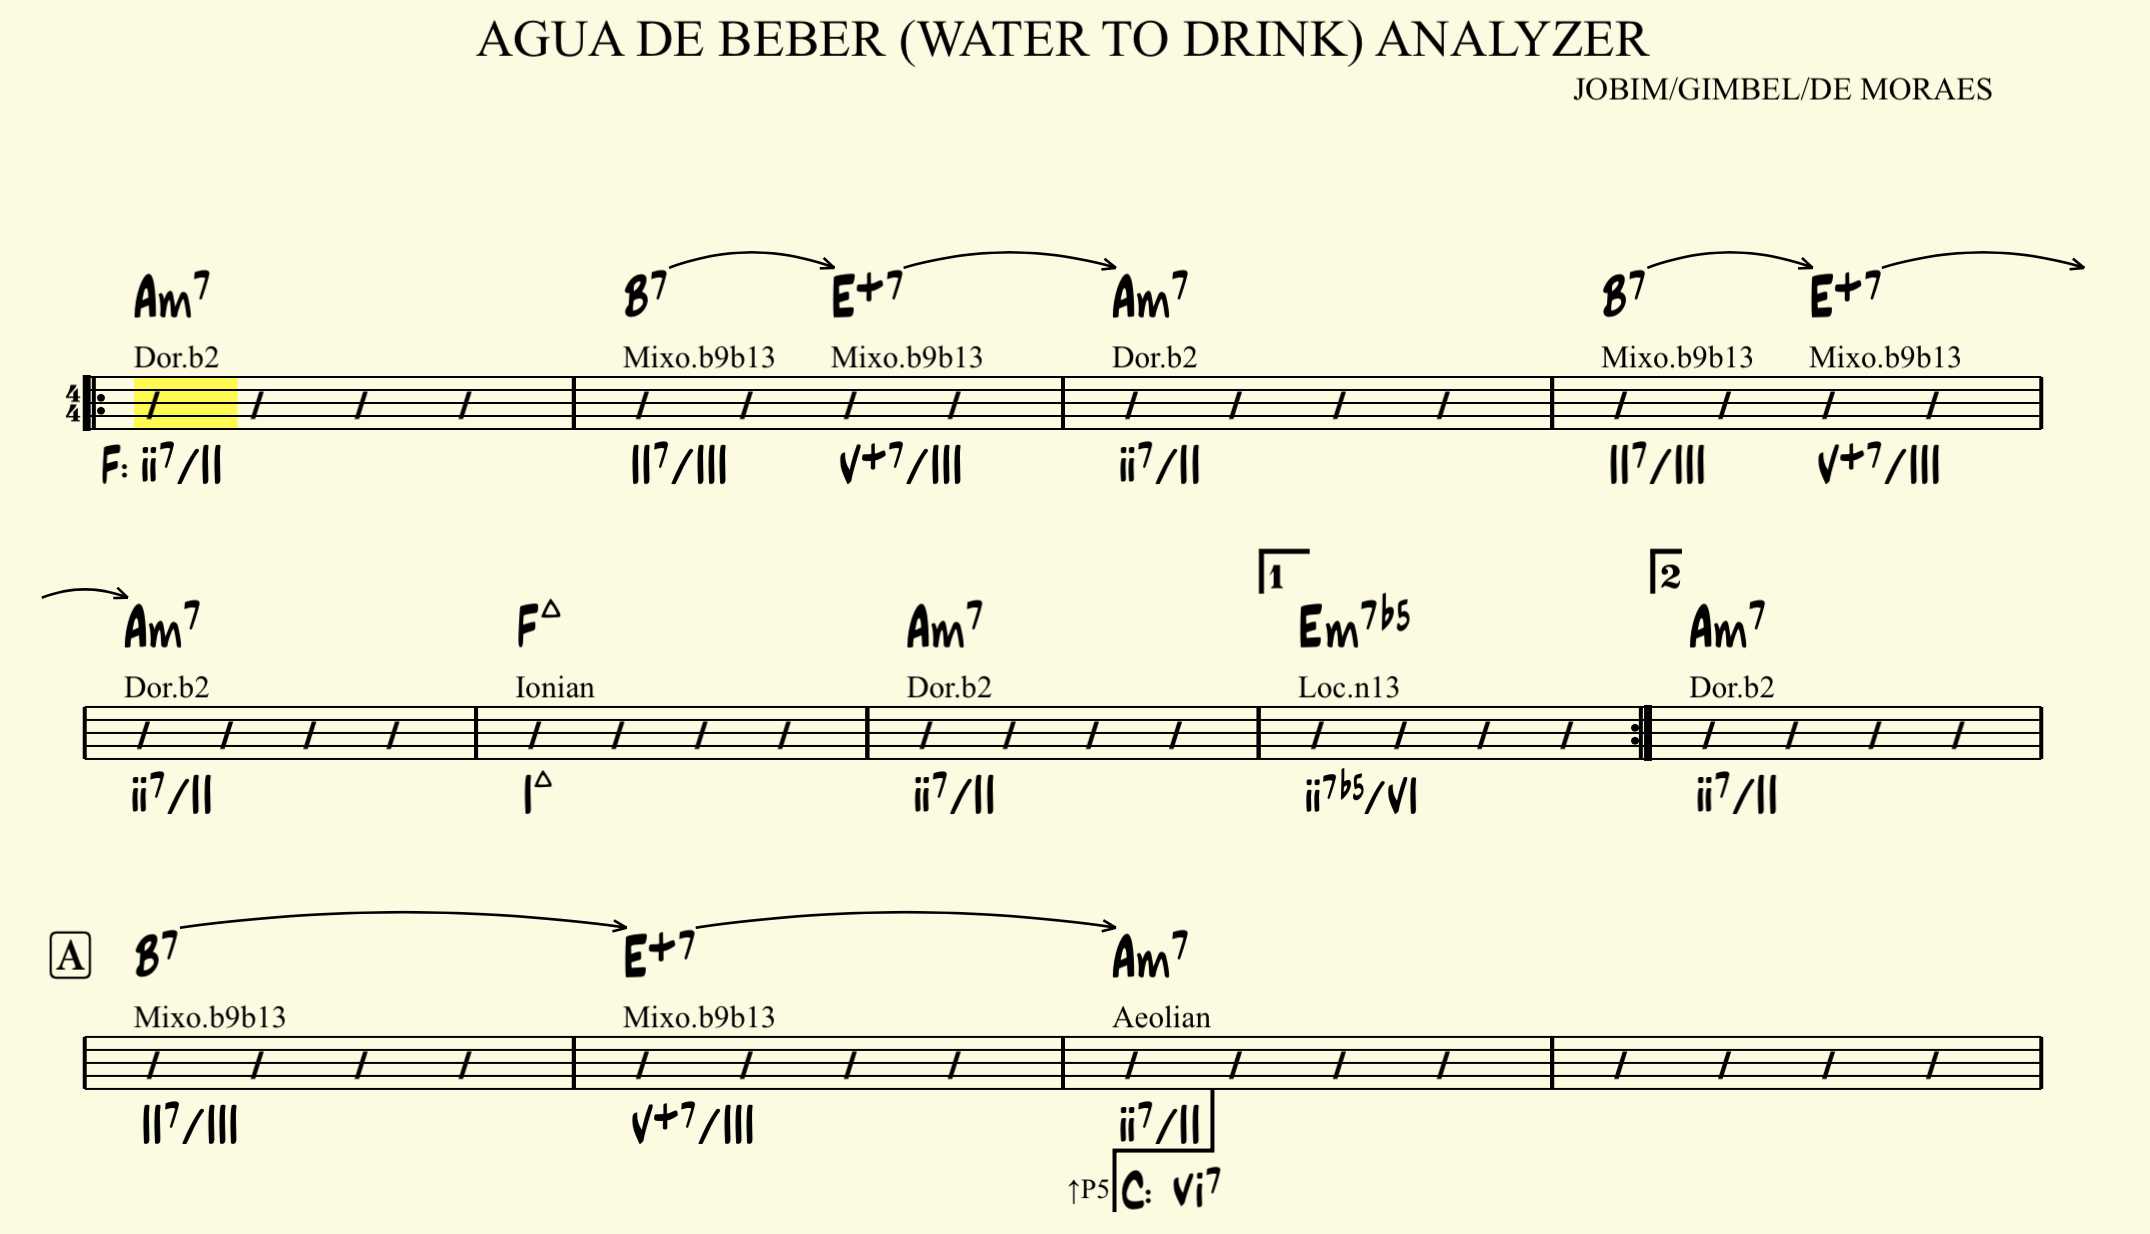
Gibberish! And that’s because we need to tell the analyzer that his could be in a minor key that uses a i7 as the tonic! So, click on the checkbox labeled Allow im7 and click on the analyze button again.
Now the analysis makes sense! But also notice how the Dm7 G7 Cmaj7 is now in the key of C major.
In a way, both analysis are correct. The first analysis (handmade) is telling us you can still be in the key of A minor when you get to the Cmaj7. The second analysis (analyzer) is telling us there’s enough tonicization of the Cmaj7 chord (being preceded by a 2 5) that a modulation is granted.
NOTE: This tool is not about making handmade analyses obsolete. It is a great way to learn what analysis really mean, and it creates an environment ideal for discussion by offering a consistent point of view, hard to rebut at first glance.
Let’s open one more song so I can show you how the map templates popup can also change the resulting analysis. Let’s try Blues Ex.3 (this is included in the original catalog when you get Mapping Tonal Harmony Pro)
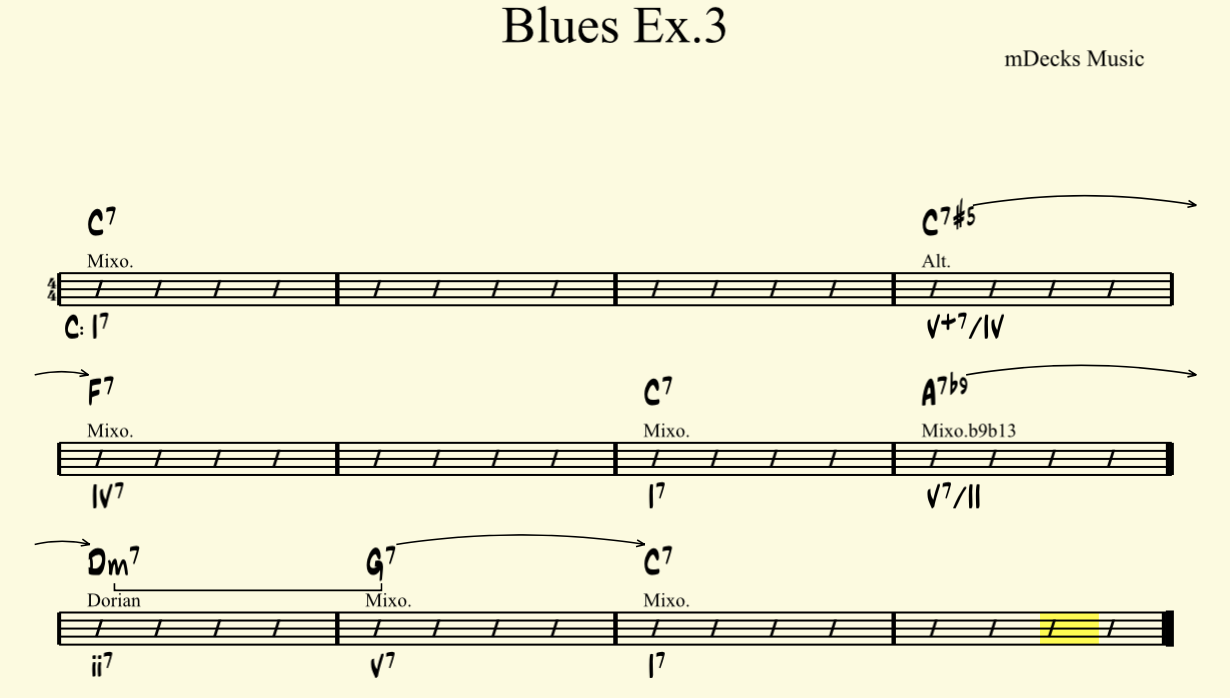
This is a Blues. So to analyze it we need to use the map template for Blues. Watch what happens if we choose to analyze it with the jazz standard template:
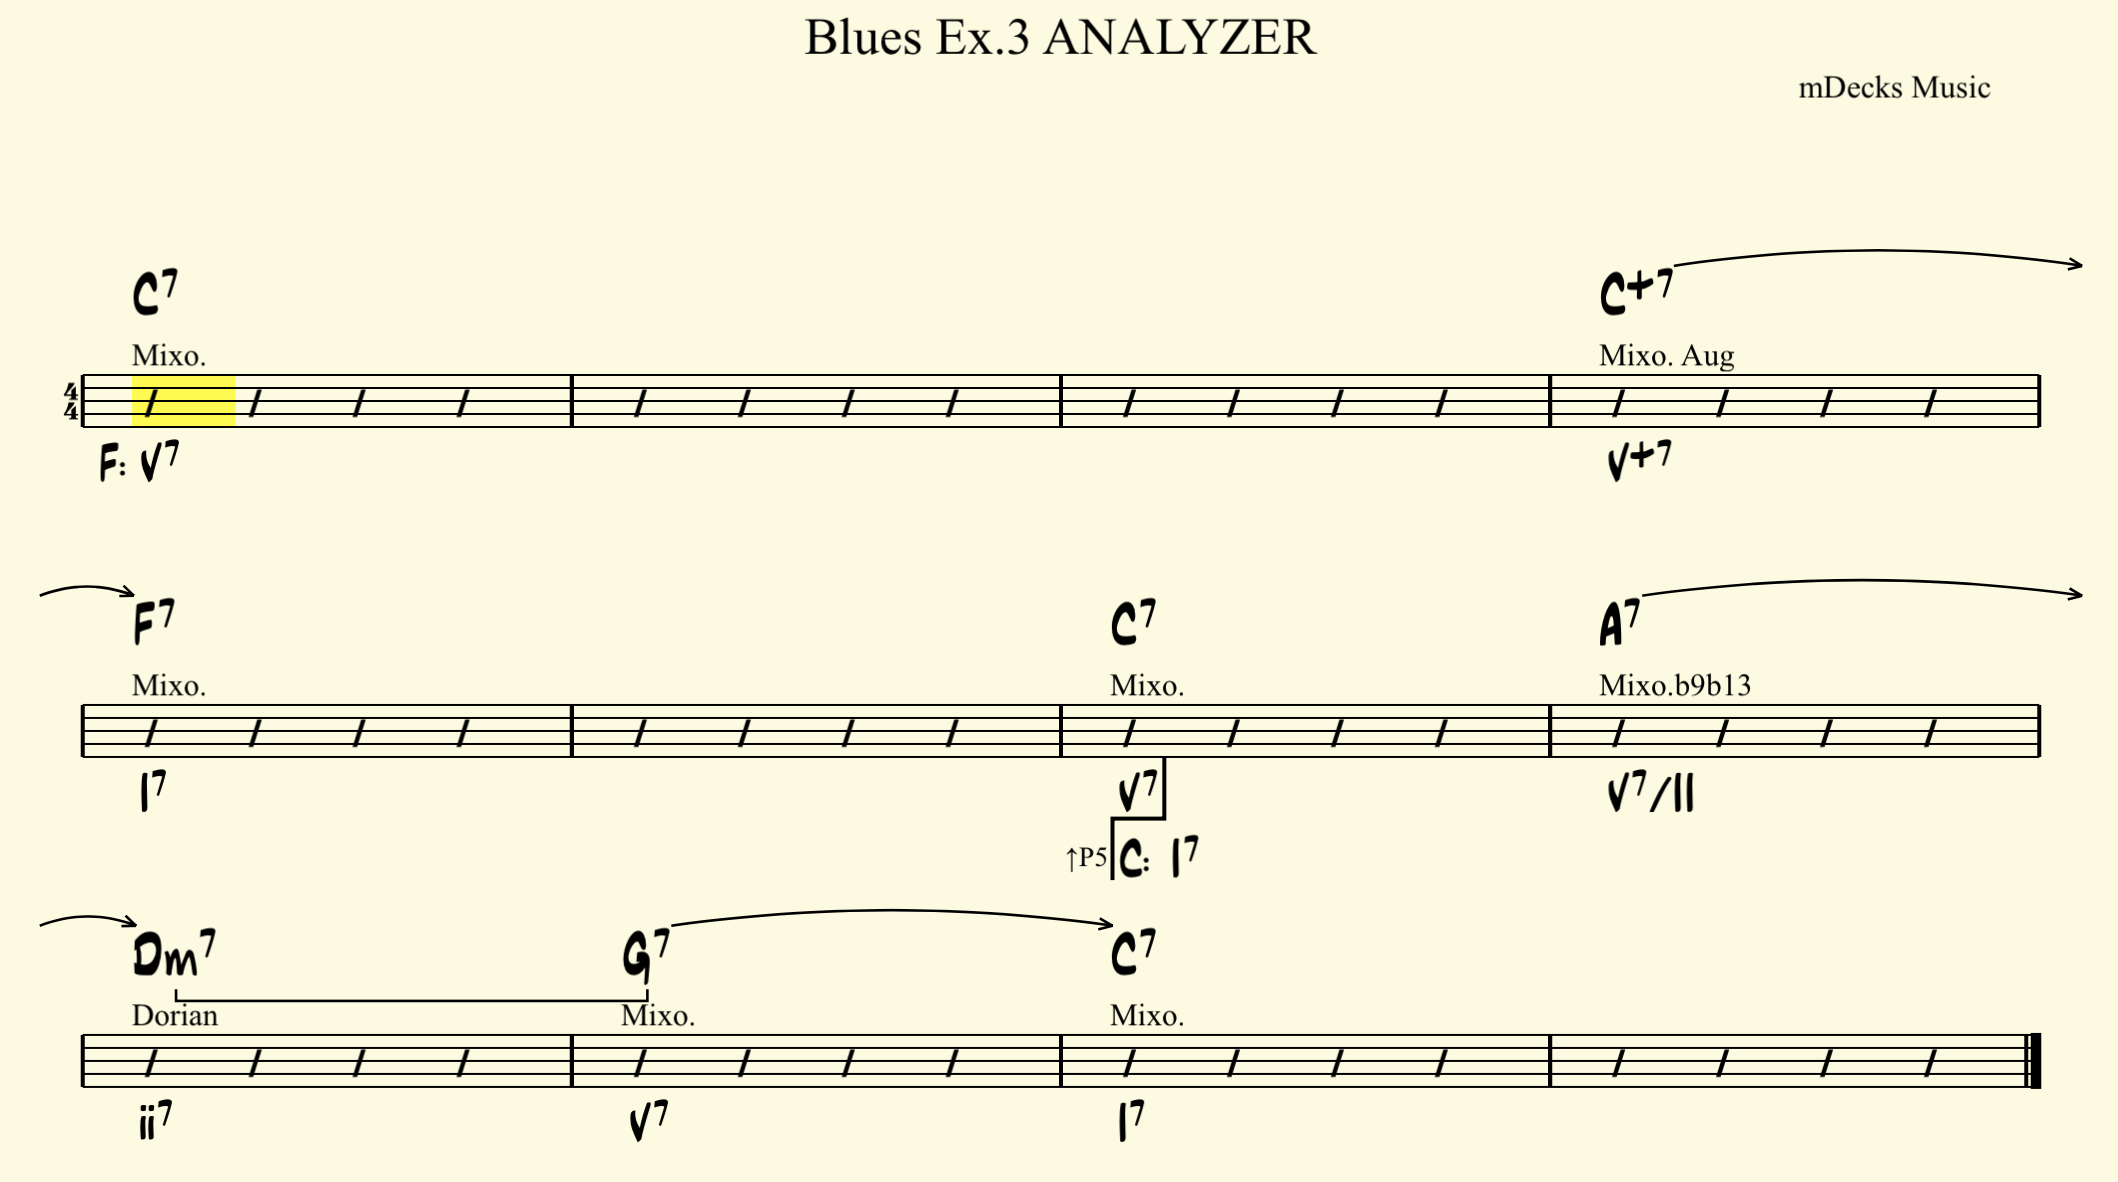
The app says this song is in the key of F major. Of course! The C7 is the V7 of F major.
But if we change it to Blues we get this:
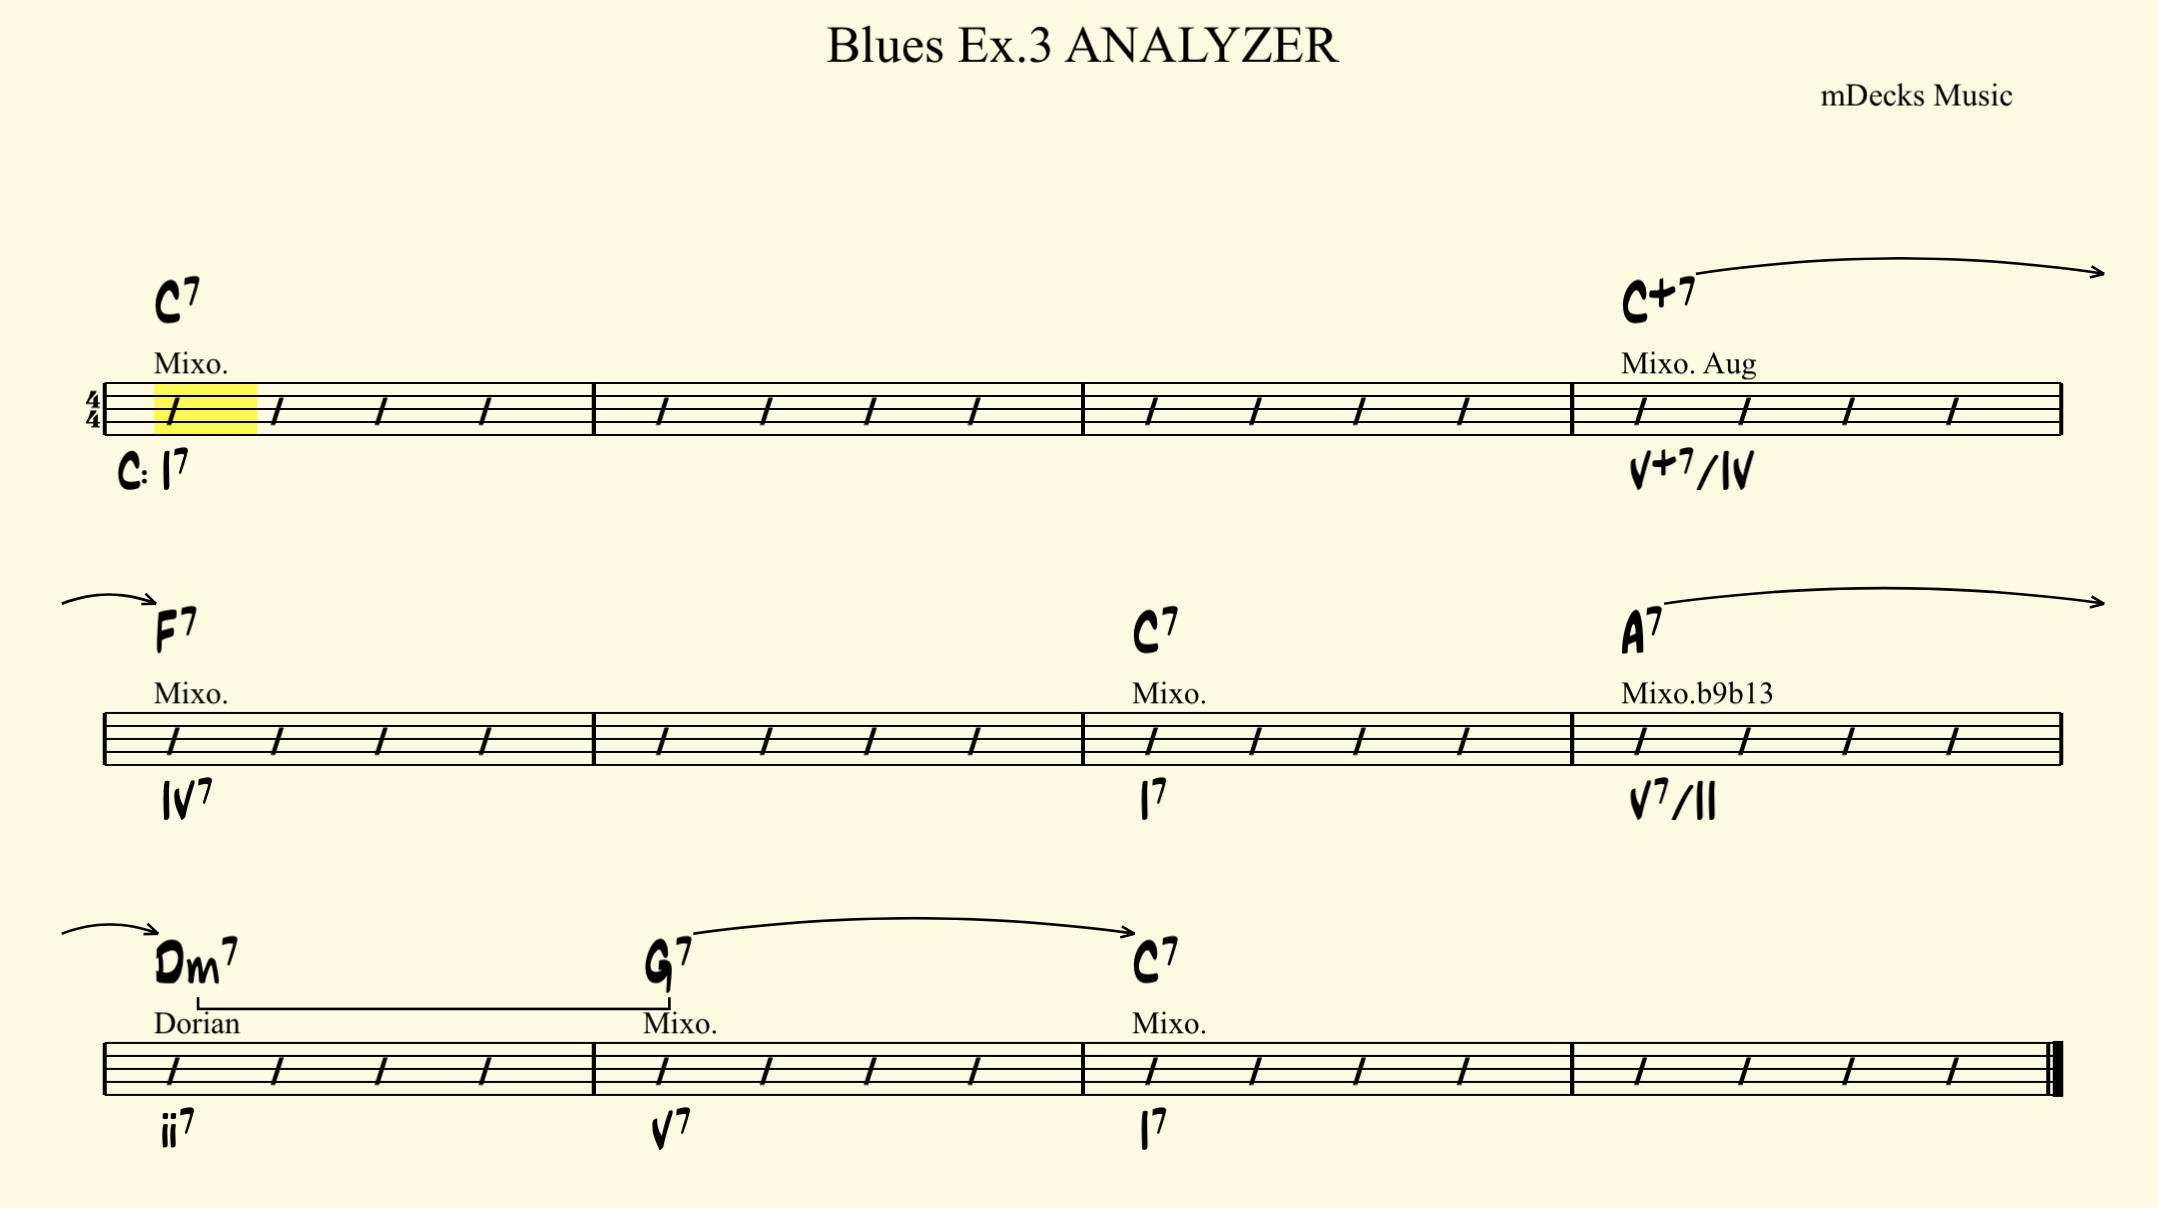
Now it is correct!
So, remember to choose the right settings before you use the analyzer.
Music XML Files
The analyzer is also able to open music xml files from other backing track apps (such as iReal Pro.) Click on the OPEN MUSIC XML button, and select the xml you’ve just exported from iReal Pro.
Mapping Tonal Harmony Pro will automatically open the file, save it to your catalog, and analyze it. Hit play and practice using Mapping Tonal Harmony Pro’s amazing play-along!
Saving & Sharing Progressions As Text Files
Having progressions in text format allows you to copy and paste, email them as text, send them via text messages or share them in social media. You can select the text and copy it, or just click on the SAVE AS TXT button if you want to save it as a text file directly from Mapping Tonal Harmony Pro.
Song Collections by mDecks Music

Now that you’ve seen the workflow to create an edit songs, you probably realize how essential (and convenient) our song collections add-ons are.
These are entire collections of songs already analyzed (by the hand of experienced musicians), all ready for you to play and study, and in Mapping Tonal Harmony Pro format. Every function was greatly discussed to make sure the analyses reflect the subtleties and intricacies of the language.
The available collections are:
- Jazz 1300+
This contains 1300+ Jazz Standards fully analyzed. All the tunes from the Real Book Vol.1-4. - Reharmonized
These are the same jazz standards but reharmonized using effective reharmonization techniques (such as the ones you find in the reharmonizer.) - Bird Bebop
This contains all Charlie Parker Bebop Tunes (like the ones in the Omnibook. Another essential collection to practice improvisation over bebop progressions.
The Tools Panel

This panel offers a suite of useful tools that can be applied to any progression:
12-Key Workouts • Reharmonizer • Upper Structures (add-on) • Target Notes (add-on)
12-Key Workouts
With this tool you can convert a maximum of 8 bars into a workout. The workout will be created using the beginning measures (up to 8) of the piece. These measures will be repeated in all keys using the selected modulation pattern.
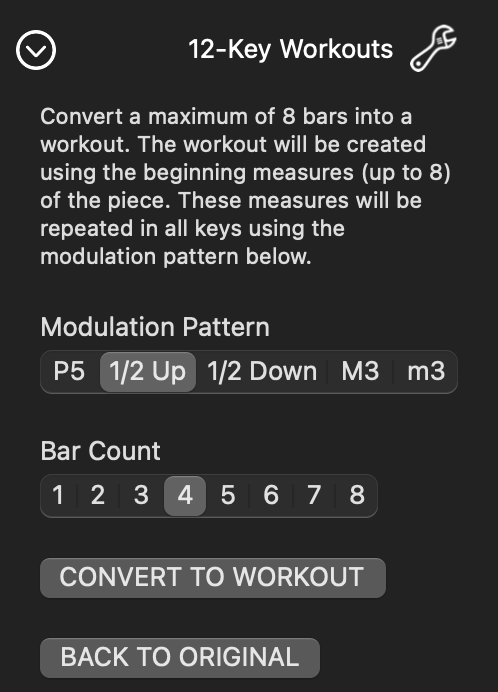
Let’s say you have entered a ii – V – I – [ii/ii – V/ii] progression and you want to practice playing over it in all keys around the circle of fifths (G Major to C major to F major…)
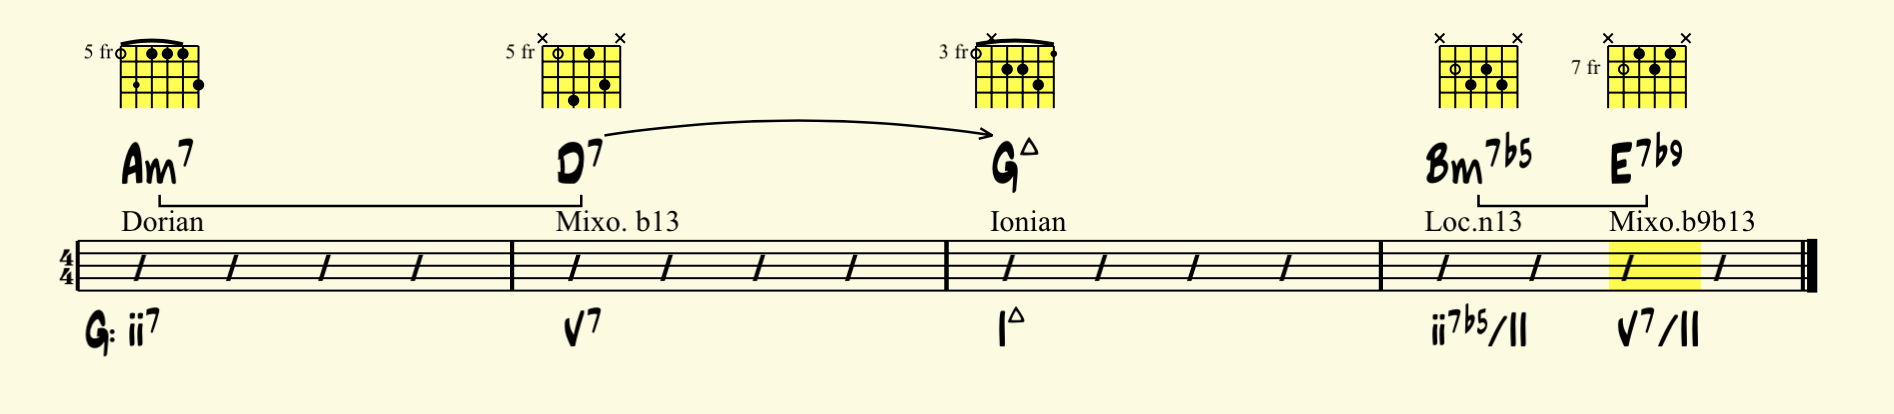
Choose the P5 (perfect fifths) modulation pattern to modulate around the circle of fifths, and select 4 measures in length (because that’s the amount of measure you want to use to create the workout with)
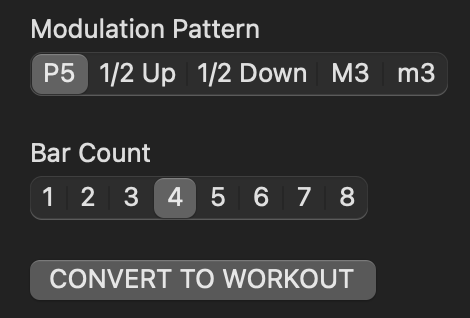
Click on the CONVERT TO WORKOUT button and you’ll have your workout ready
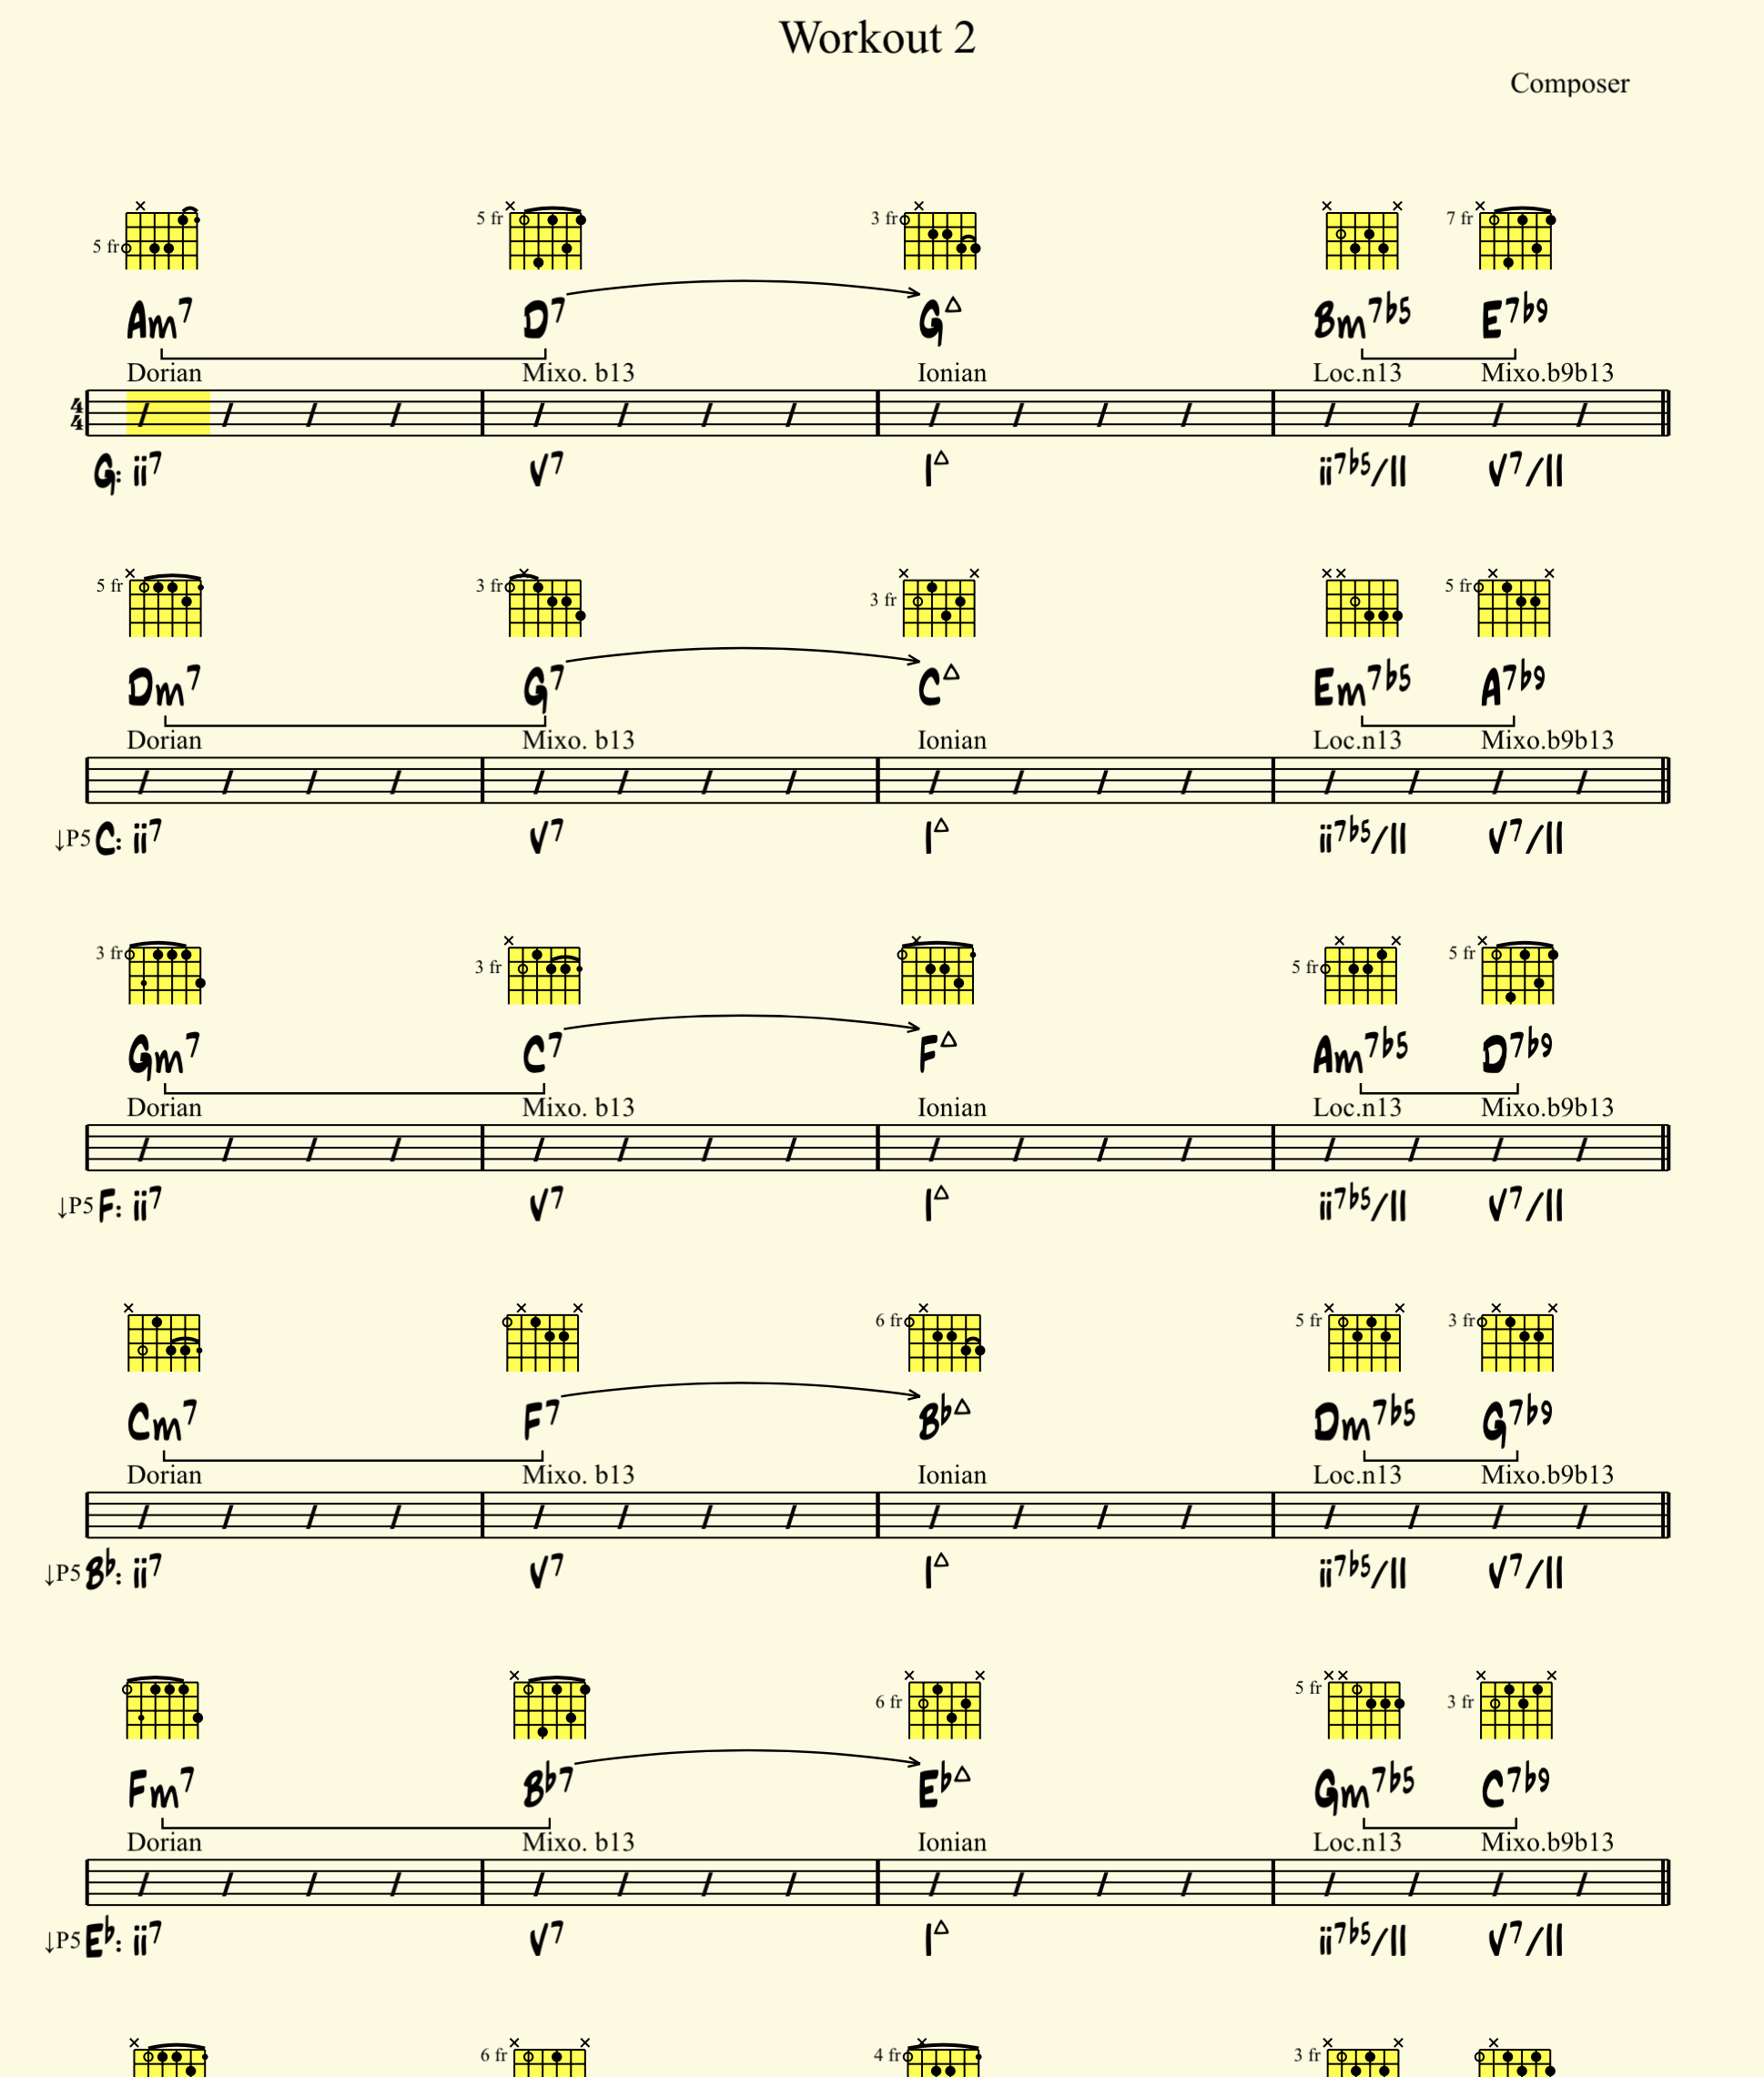
Saving workouts: Click on the title (that will enable edit mode) and give the workout a name.(this will overwrite the initial progression, if you want to keep it make a duplicate first.) Then click on the save button. Remember: the save button will save the progression only if the app is in edit mode. (otherwise, it just saves the performance settings)
Reharmonizer
This is an awesome tool to add new colors to your progression. The Reharmonizer knows effective reharmonization techniques used in jazz, pop, blues, etc. The topic of reharmonization is vast (and out-of-scope for this manual) but you can watch our YouTube videos on reharmonization techniques if you are interested in learning more about it.
This is a very intuitive tool. You can use it without knowing anything about reharmonization. Just choose different technique combinations and watch your progression change.
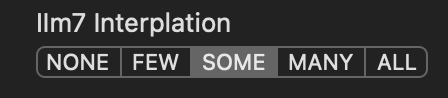
Every technique has a segmented button with 5 choices: NONE, FEW, SOME, MANY, ALL. So, Mapping Tonal Harmony Pro finds all the places in the current song where a certain technique could be applied and then apply it at random using the choice you make in this button.
- NONE = don’t use the technique
- FEW = use the technique in 25% of the candidate places.
- SOME = 50% • MANY = 75% • ALL = 100% (in all possible places where it is applicable)
If you know these techniques you can be very precise about them, and balance your reharmonization depending on the results you want. If not, you can just choose a combination of values and see what happens. Any reharm created by the Reharmonizer will work. (FYI, these reharmonizations do not consider the melody, so they are usually better suited for solo sections.)
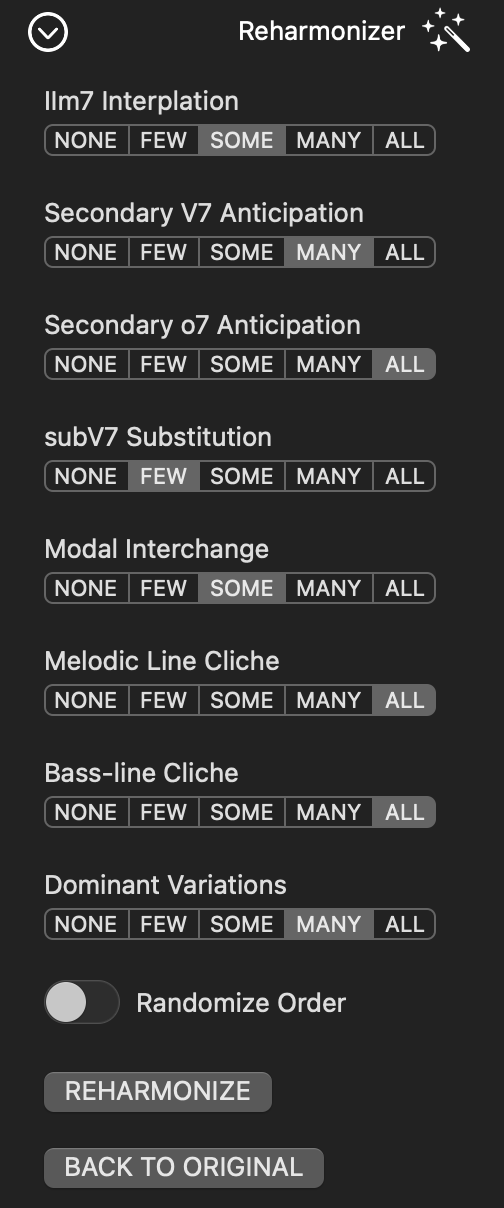
The techniques are applied in the order they appear. But you can randomize the order in which they are applied by enabling the Randomize Order button.
Clicking on the REHARMONIZE button several times in a row will reharmonize the previous reharmonization. So you’ll be adding more and more reharms on top of each other. If you want to go back to the original version of the song use the BACK TO ORIGINAL button.
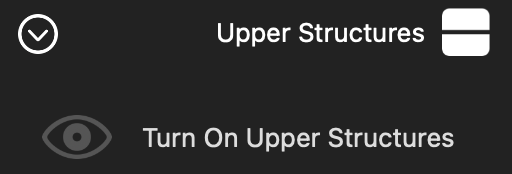
Upper Structures
Using upper structures to create voicings and to improvise over chord changes is essential in jazz, gospel and blues. This tool will add upper structures on every single chord in a progression based on the harmony and chord-scales assigned to the chord.
You can turn them on/off with the Turn on Upper Structures button.
When turned on, they will show up on every chord in a progression, and you will see the complete upper structures panel where you can customize which type of upper structures you want to use.
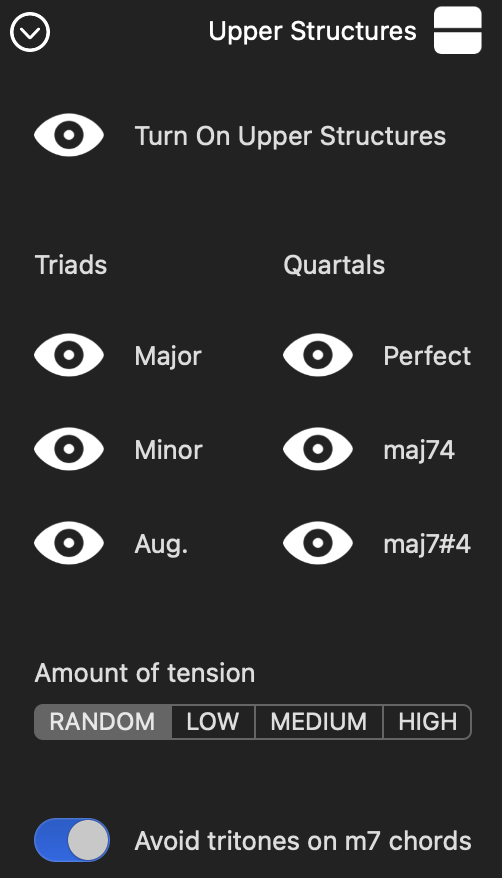
You just need to tell Mapping Tonal Harmony Pro which type of upper structures you want to include as candidates. If you only want major triads turn all the other options off, and now Mapping Tonal Harmony Pro will only use available upper structure triads that are major.
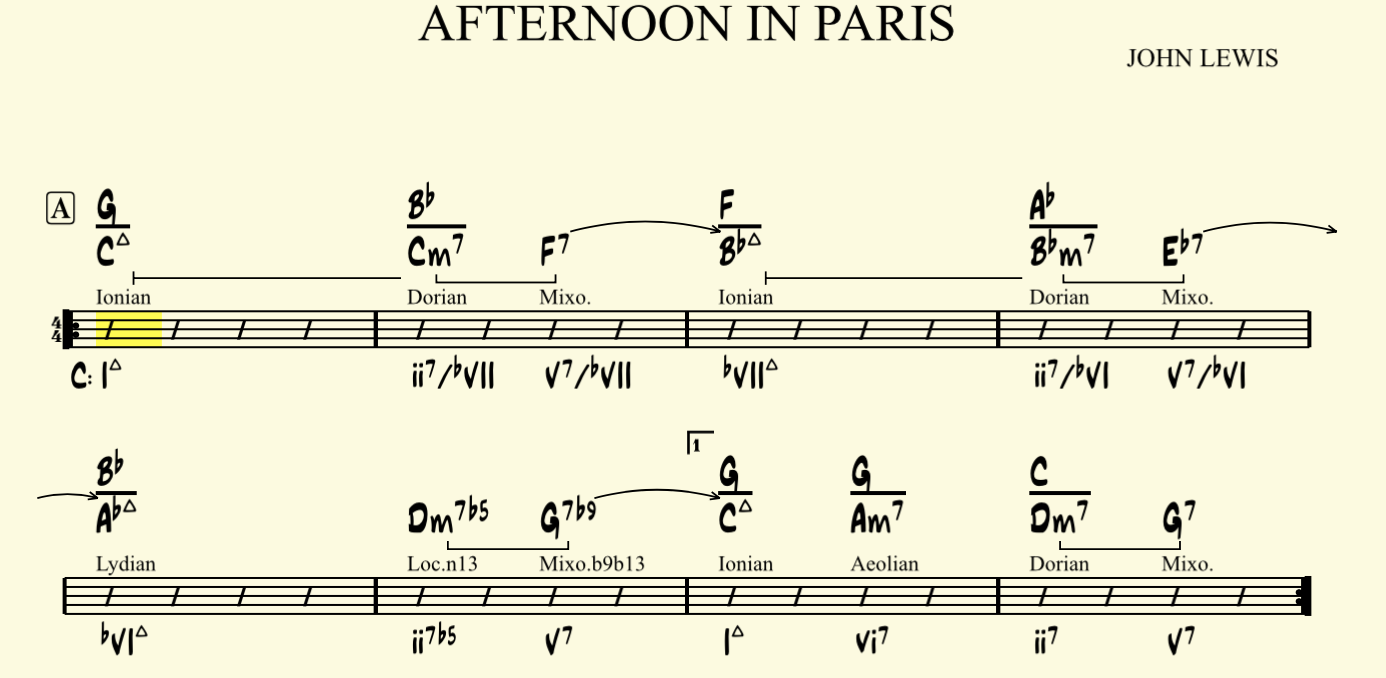
NOTE: Some chords might not have any upper structures of the type available (i.e. in Afternoon in Paris there are no major triads available to use over the Dm7b5 (Locrian n13) or the G7b9 (Mixo b9 b13) chords
The notation used for quartals is the same one we used in our Upper Structures For Piano Voicings & Improvisation Vol.2 course. C47 = Perfect quartal (C F Bb) Cmaj74 = Altered Quartal (4) C F B and Cmaj7#4 = Altered Quartal (#4) C F# B.
As with reharmonization techniques, upper structures is a vast topic and out-of-scope for this manual. You can check any of your courses on upper structures on mdecks.com or on our YouTube channel.
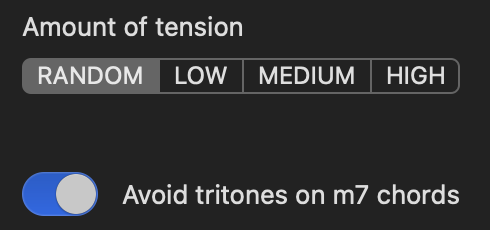
You can also tell Mapping Tonal Harmony Pro to only consider upper structures that offer a certain amount of tension. Remember that every time you click on one of these options the app will show a brand new set of upper structures using its algorithm.
Avoid tritones on m7 chords when you are in a tonal setting. If the song has modal implications you can disable this option (this is because tritones, on m7 chords, add too much of a dominant flavor to them. Remember, m7 chords and are usually subdominant chords, like the ii chord. But you can use this color on modal Dorian tunes for example.)
Target Notes
The last tool in the suite is the Target Notes. Another incredibly useful tool to practice improvisation.
Target notes are essential points of resolution when you improvise. Each target note offers a certain color, and practicing them over the chord changes is a great way to improve your improvisational skills.
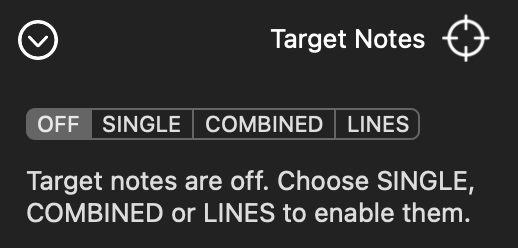
This tool will show one target note per chord, and you can choose the type in this panel. This is a very intuitive tool as well. Make your selection and Mapping Tonal Harmony Pro will show the target notes in the staff.
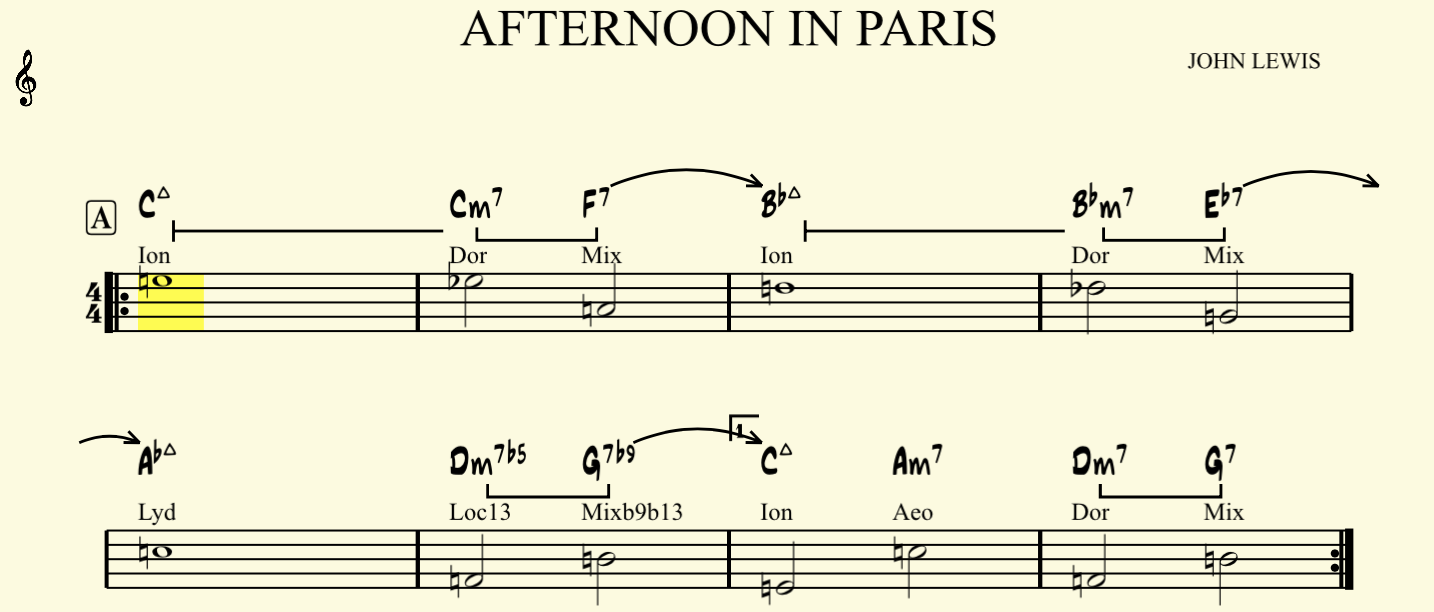
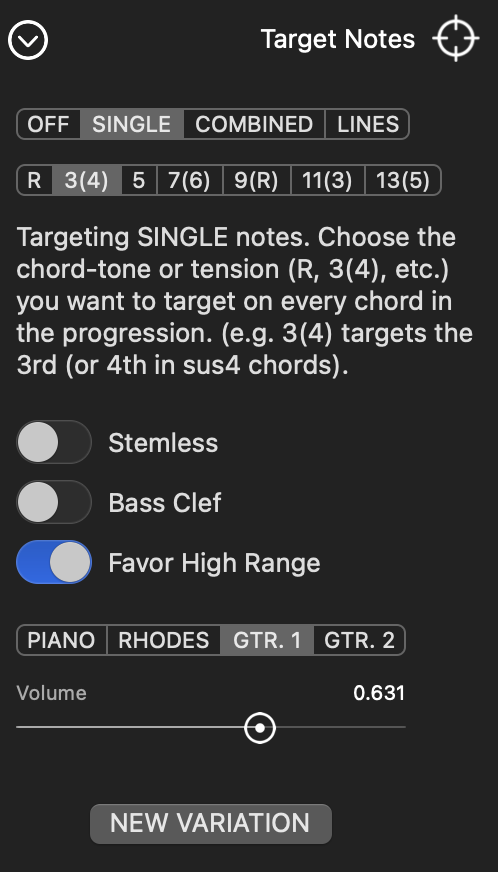
Every target note is explained in detail when selected. Try them all!
By default, target notes show up as note-figures taking the entire length of the chord (half-notes, whole-notes, etc.) Sometimes, it is useful to see the target notes without the length (because your brain feels free to improvise around them better.) Enable the Stemless button to see target notes as stemless notes and the spaces between notes filled up with slashes.
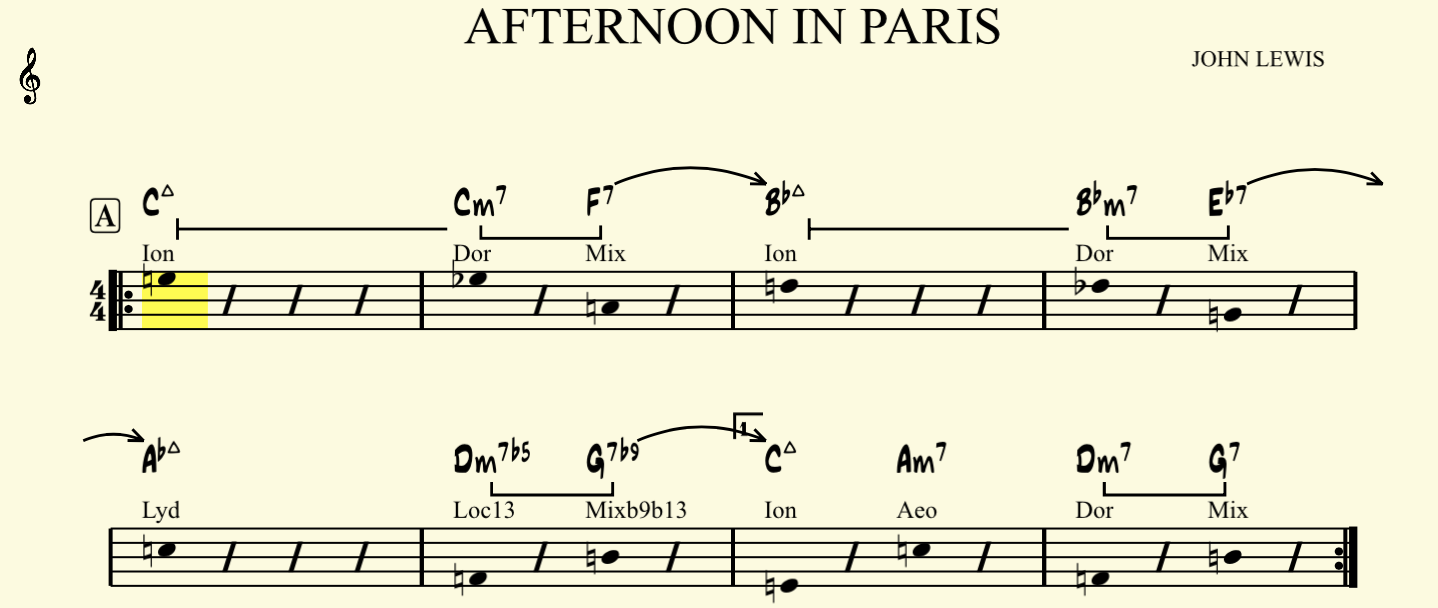
At the top of the score you can see the clef that’s being used to write the target notes. If you play an instrument that reads in bass clef, enable the Bass Clef button
Target notes are written mostly within the staff lines (ledger lines are avoided for the most part) to fit any instrument’s range. You can still tell Mapping Tonal Harmony Pro to use a higher range (lower range) in the staff with the Favor High Range switch button.
When you play the accompaniment track (and target notes are enabled,) Mapping Tonal Harmony Pro will include the target notes in the accompaniment. You can select the instrument sound you want for the target notes, and their volume in the mix.
Panels in the Panel Loader
This panel contains a collection of often-used tools to improve your workflow. We have already covered how these work. It is divided in three sections. The top section: play-along settings, the middle section: A.I. player and staff settings, and the bottom section: dedicated to the map.
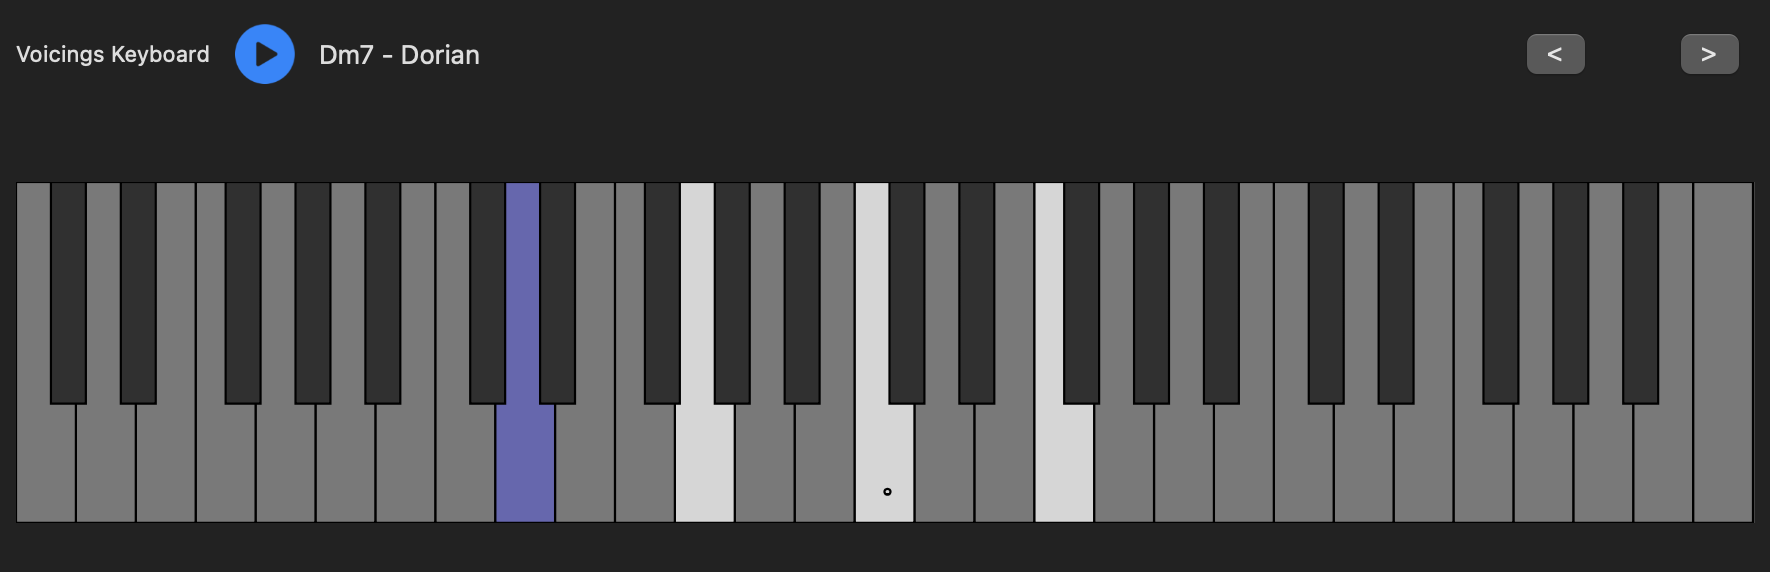
The Voicings Keyboard
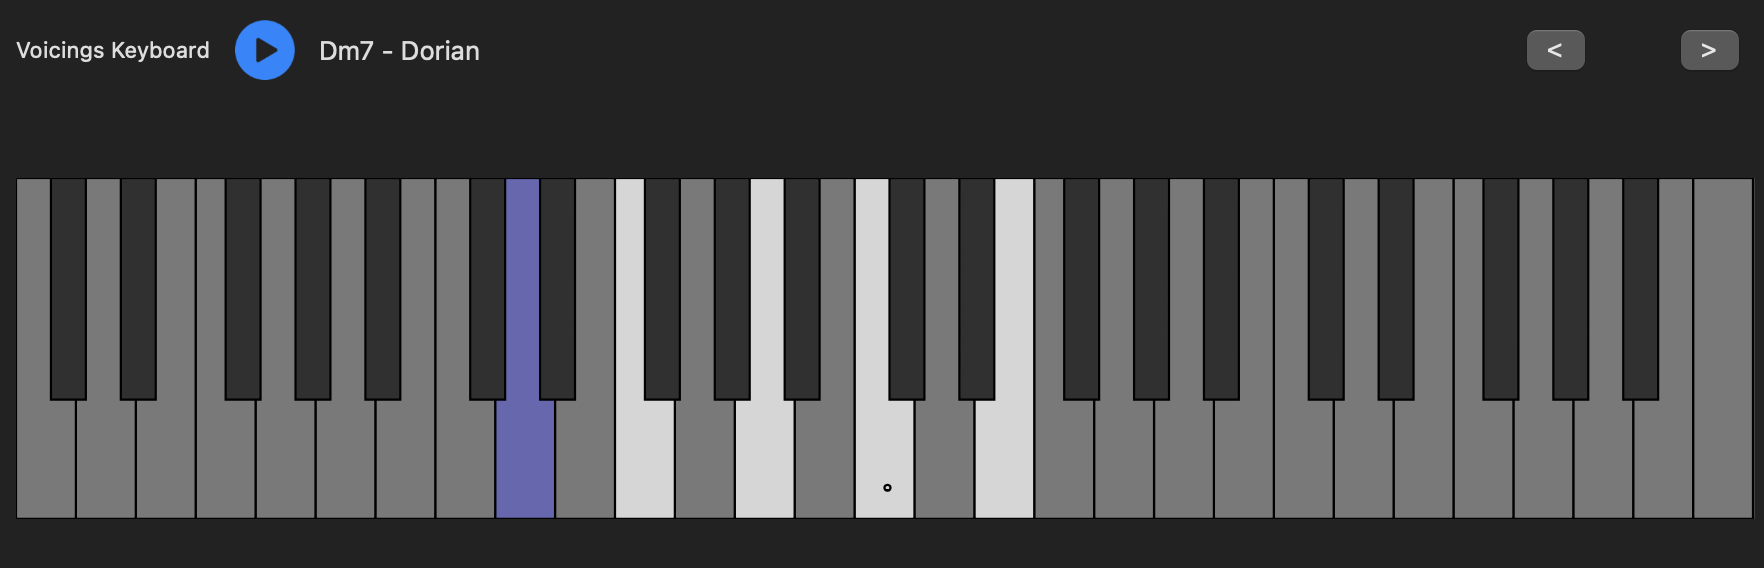
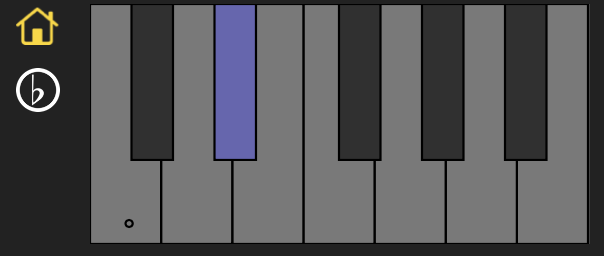
Click on any chord on the map (or the staff) and it will show the voicing that’s being played.
Voicings are created based on the active A.I. player and the harmonic context. Every time you click on a chord the voicing will change depending on those parameters. Here’s the same Dm7 -Dorian chord voicing I got when clicking on the same chord again.
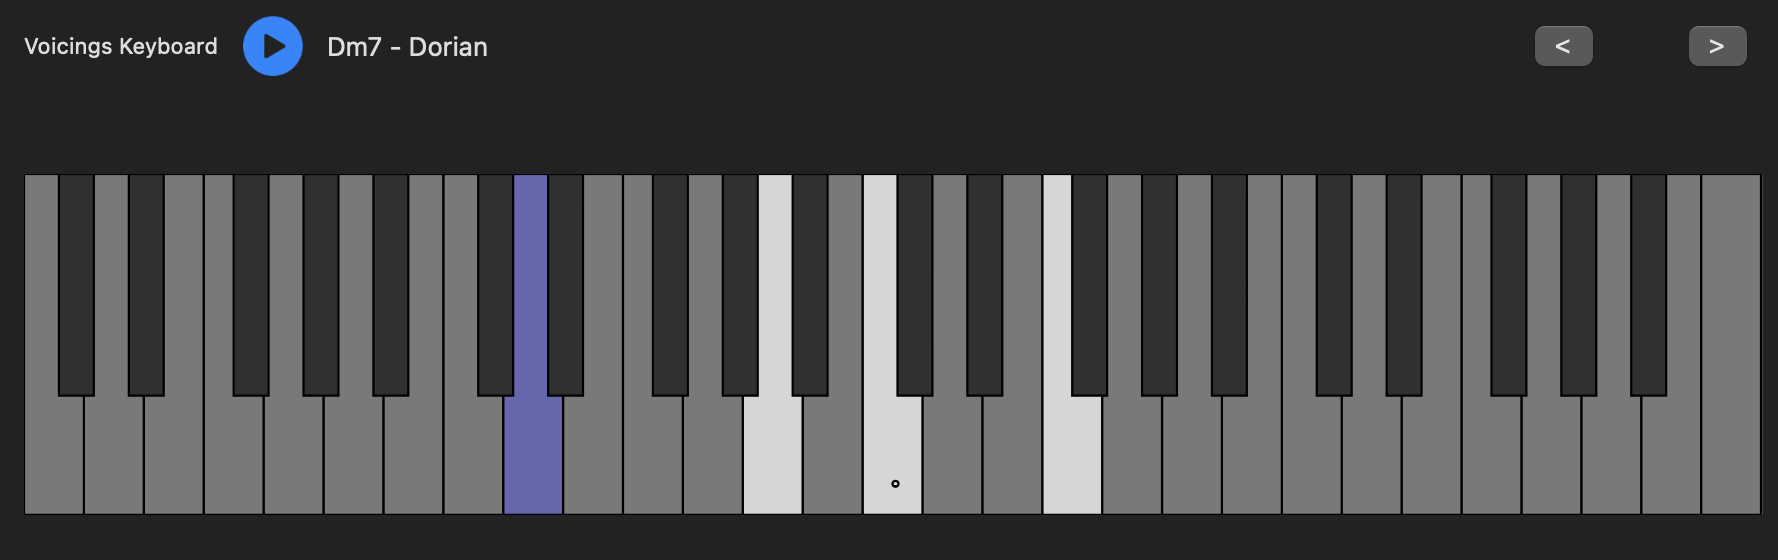
The bass note (in purple) is optional. It is played by the bass. The actual piano voicing is shown in white. Remember, players usually use rootless voicings to give space to the bass player. If you want to learn more about rootless voicings you can check out our Essential Voicings for Jazz Piano Book/Course.
This is a great tool to study piano voicings. Remember, these are the voicings being played by the current A.I. player (which was Duke in the previous pictures.) But if I load another A.I. player (like McCoy) the voicings will be completely different. McCoy likes quartal voicings.
You can also browse through all available voicings, for the current chord and A.I. player, using the arrow buttons at the top right of the panel (< >), and play the current voicing with the play button on the top left.
NOTE: The keyboard does note show the voicings while the app is playing (we tested that feature, but it was changing too fast, and wasn’t helpful at all)
The Scales Keyboard
The scales keyboard functions similar to the voicings keyboard. Click on a chord in the map or staff and you will see the chord-scale assigned to that chord displayed.
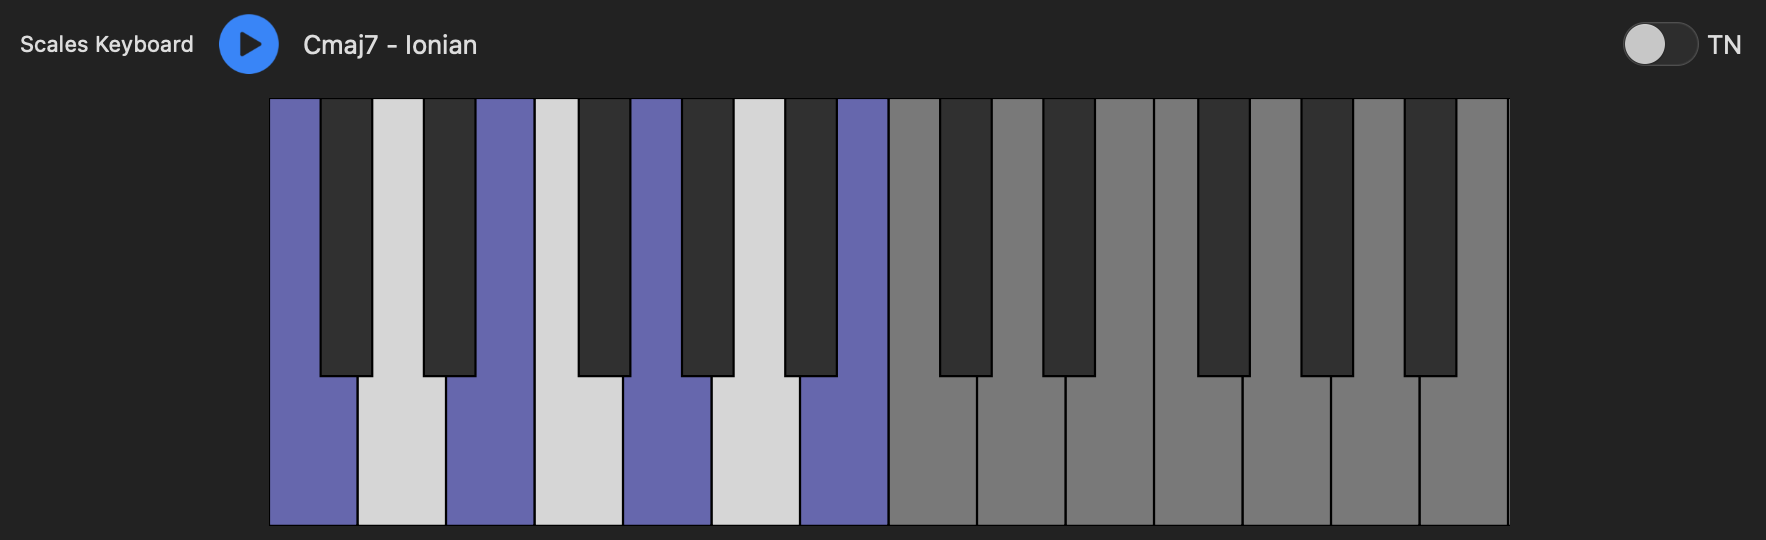
Chord-tones are in purple and tensions in white. If you want to classify tensions even further enable the tensions button at the top right (TN)
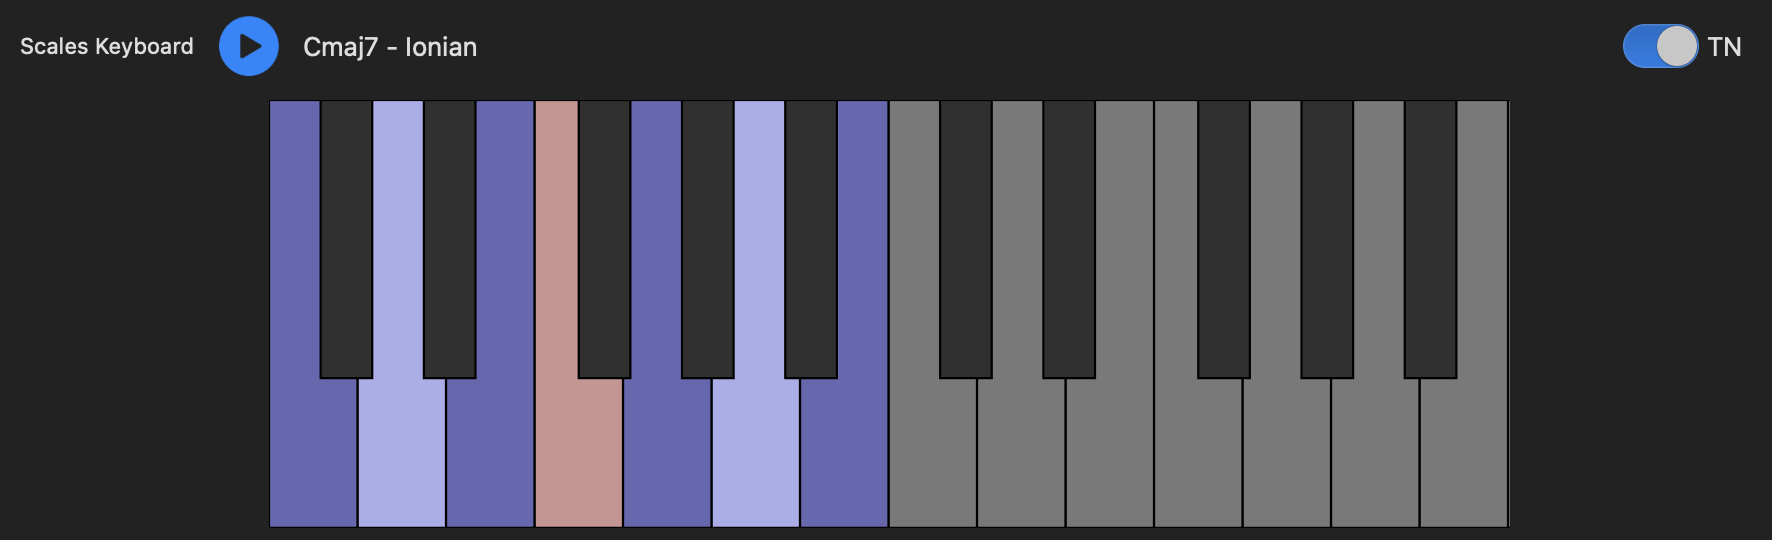
Available tensions will be in light-purple and avoid tensions in shell-pink. (in Cmaj7 – Ionian: C E G B are chord-tones, D and A are available tensions, and F is an avoid tension)
Guitar Fretboard
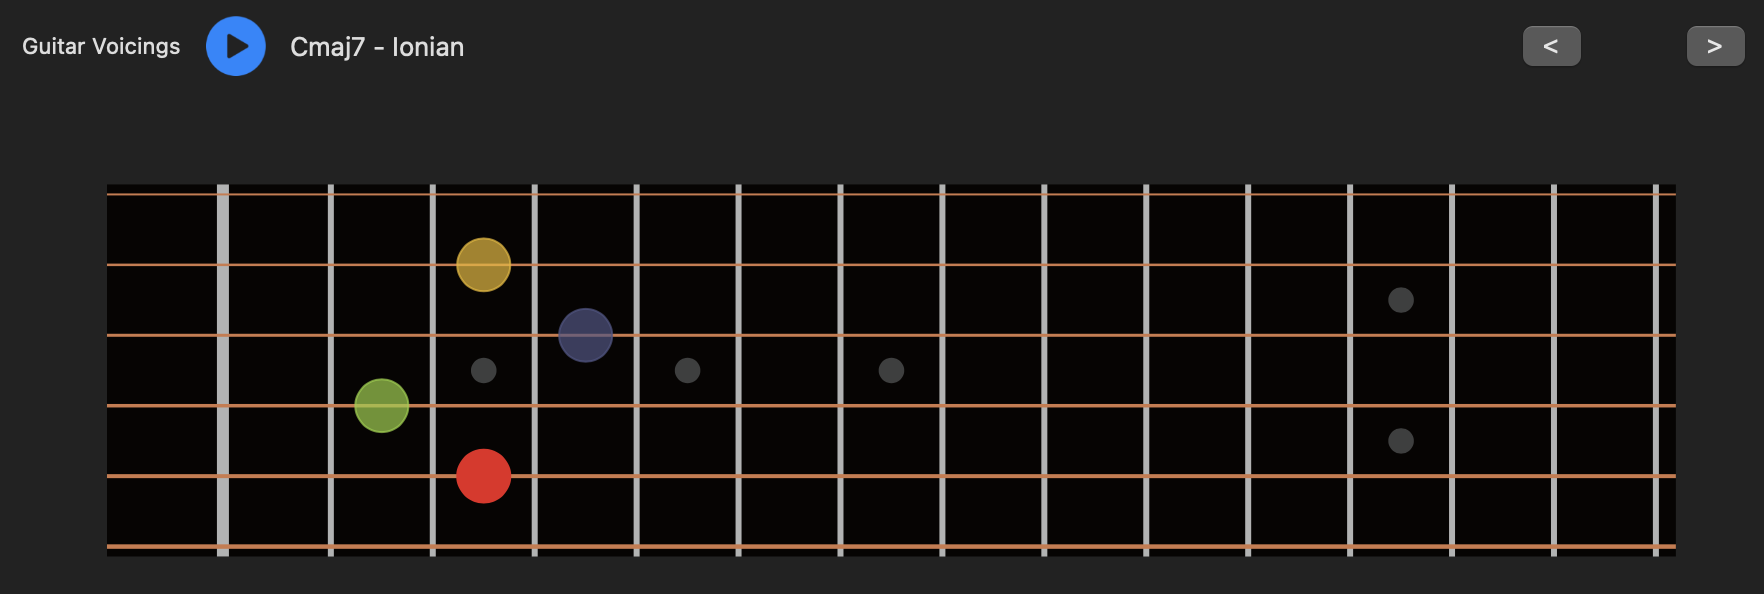
The guitar fretboard also works similarly to the voicings keyboard. Tap on any chord on the map or the staff and it will show a guitar voicing for it.
NOTE: The main difference with the voicings keyboard, is that it does not show the voicings being used by the current A.I. player. This is because you could have someone like McCoy loaded as the A.I. player, which will play chords unplayable in a guitar. So this panel has a collection of guitar friendly voicings for every chord/chord-scale pairing.
You can listen to the voicing shown by clicking on the play button at the top left. And you can browse available voicings for the current chord/chord-scale pairing with the arrows at the top right. This is another great feature to learn chords on the guitar.
The History Staff
In the history staff you can see up to ten of the last chords you clicked on (map or staff). This is a useful feature to investigate voice-leading, and see how to write multi-voice arrangements.
The history staff is fully customizable. It has the same available layers as the staff panel. You turn on/off the different layers using the buttons on the left menu of this panel. The voicings shown are the ones being played by the current A.I. player.
Let’s say you want to see a 2 5 1 written in the map’s current key.
- Clear the staff with the trash button in this panel
- Play a 2 5 1 progression on the map (one chord at a time.) It will be entered into the history staff.
- If you want to hear it, click on the play button in this panel.
The only layer that it is unique to this panel, is the show all jazz tensions in the chord layer (you turn it on by clicking on the saxophone button) Now every chord shows the entire set of tensions contained in it.
The Map Inspector

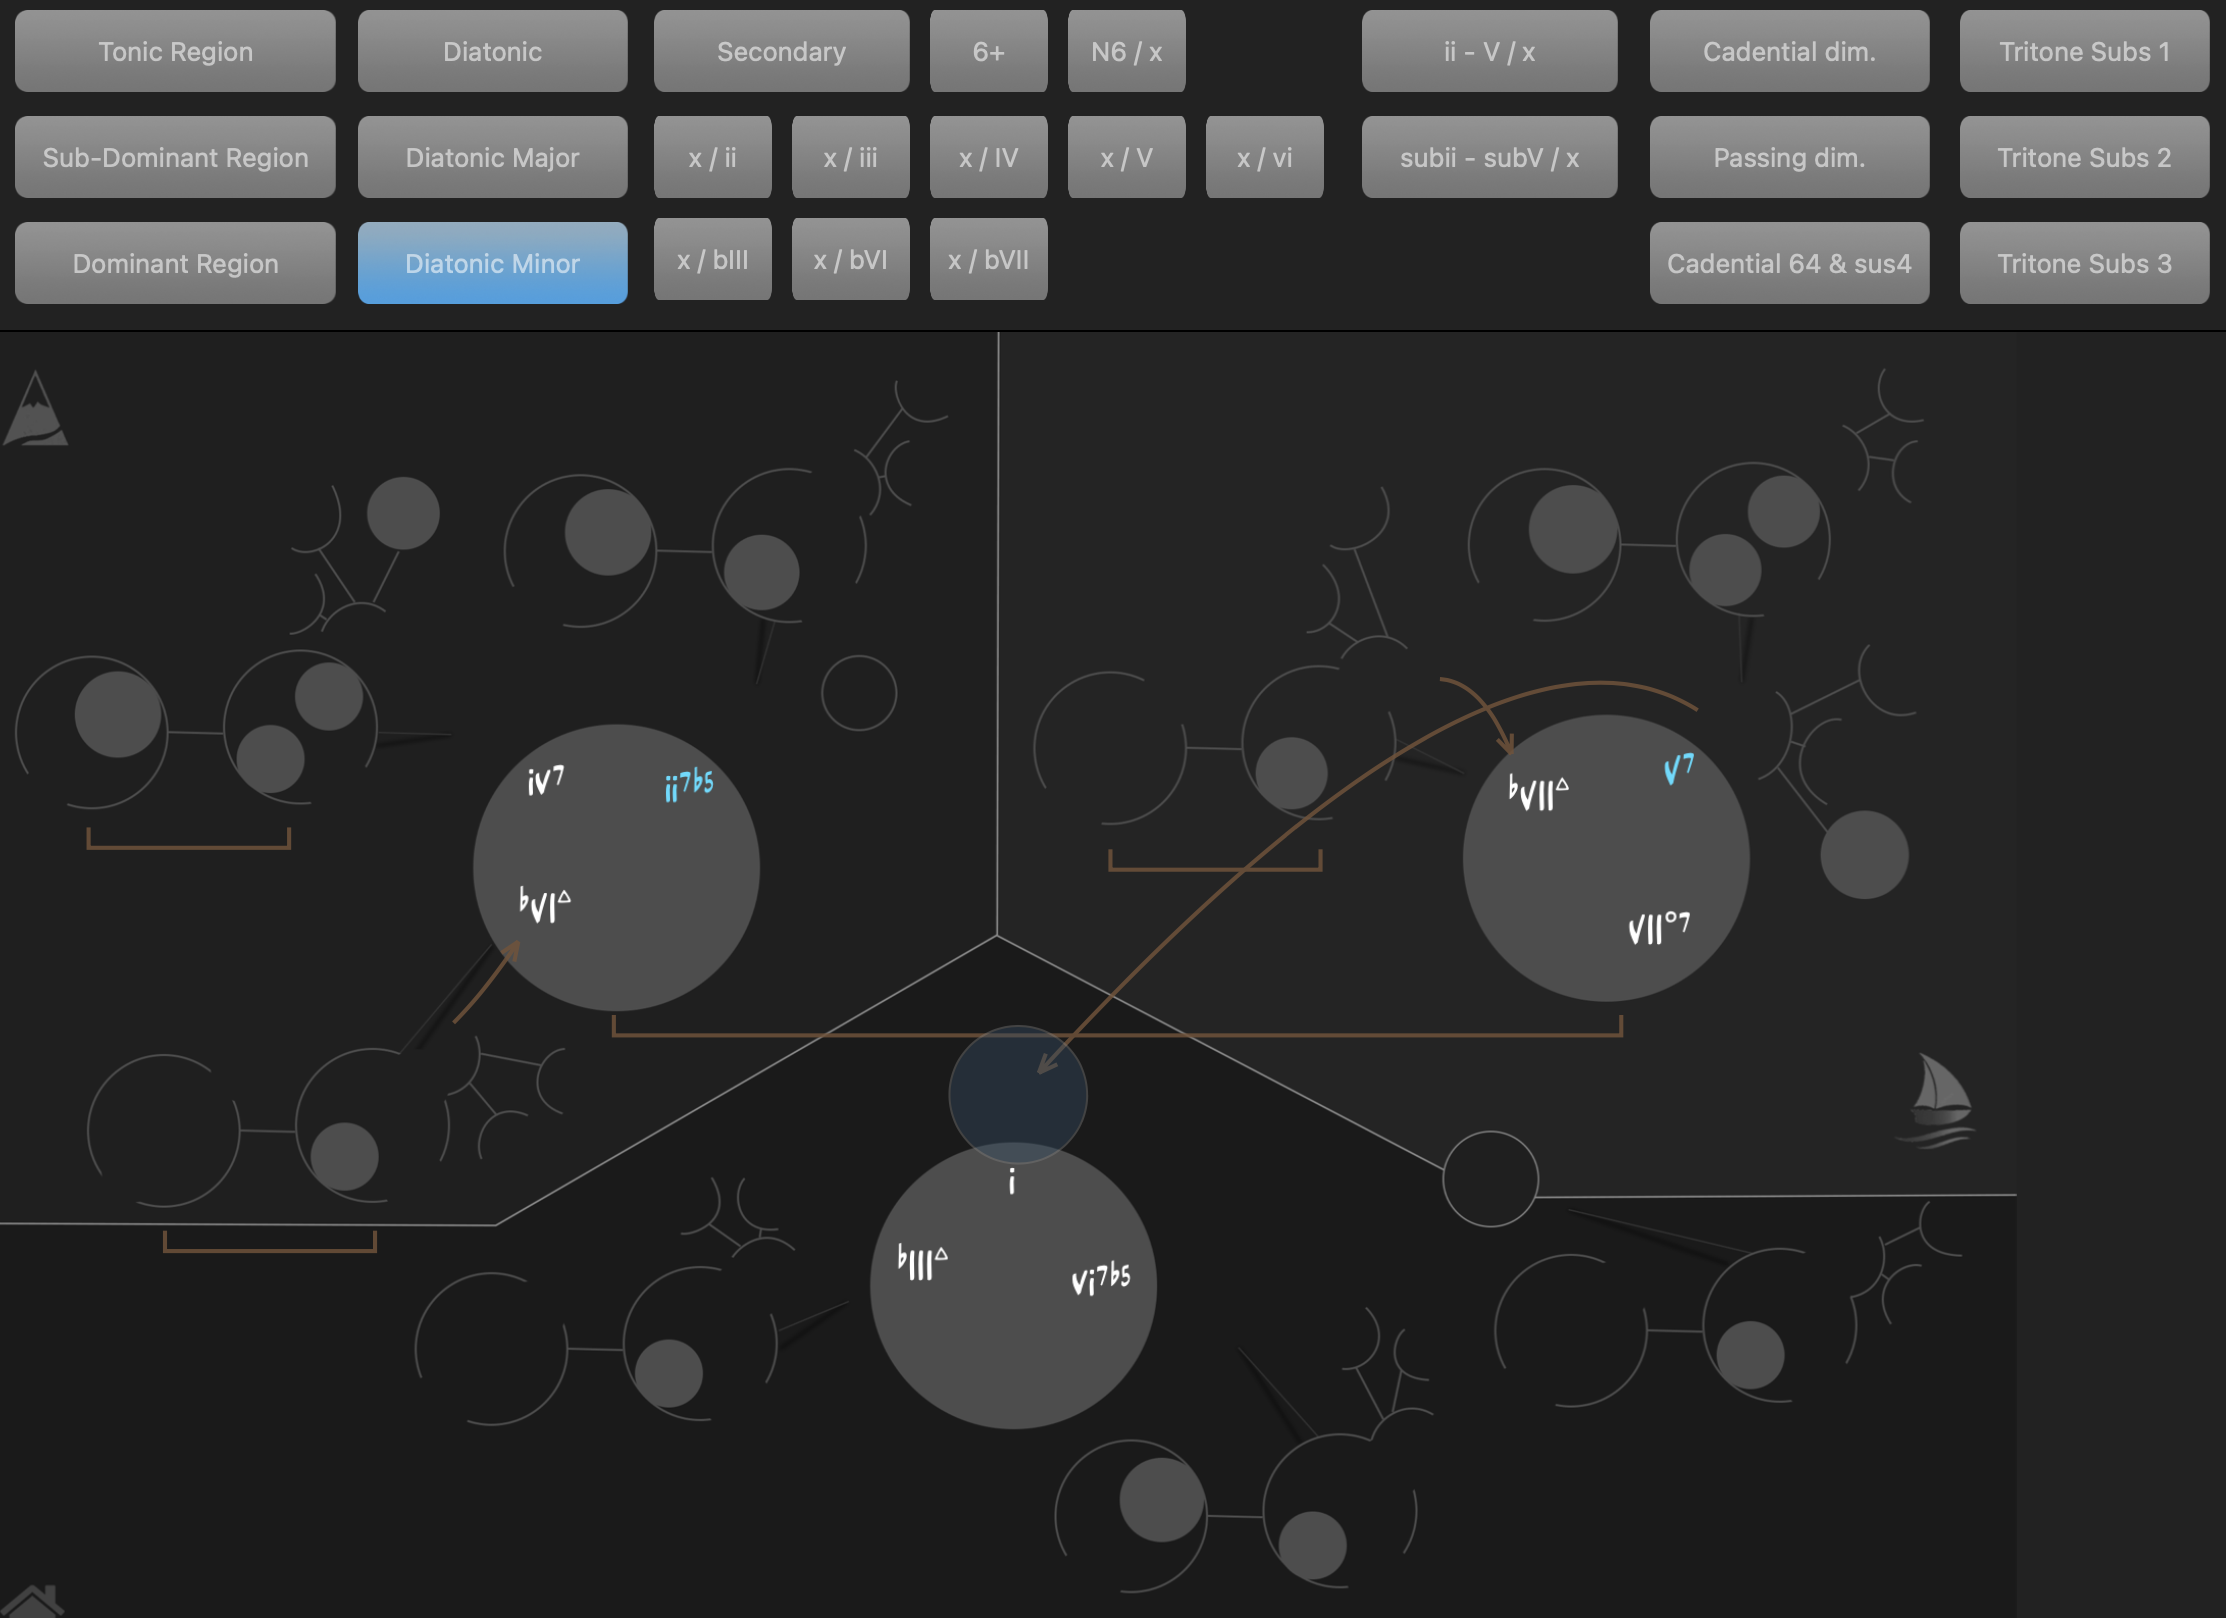
This is a very informative tool for those studying harmonic concepts.
Just hover over any of the buttons, and the map will highlight all the chords that belong to that class of functions. Here’s an example of the diatonic chords in minor:
Playlists & Favorites
Version 9 also include playlists and the option to mark songs as favorites.
You manage, edit and access playlist in the catalog. Click on OPEN to open the catalog.
You’ll see the PLAYLISTS popup button with showing — (if you open the popup it will show one list already there called Unnamed)

Managing Playlists
Let’s add a new playlist called My playlist, and edit the name of the Unnamed to My other playlist.
- Click on the MANAGE PLAYLISTS button to open the playlist manager window
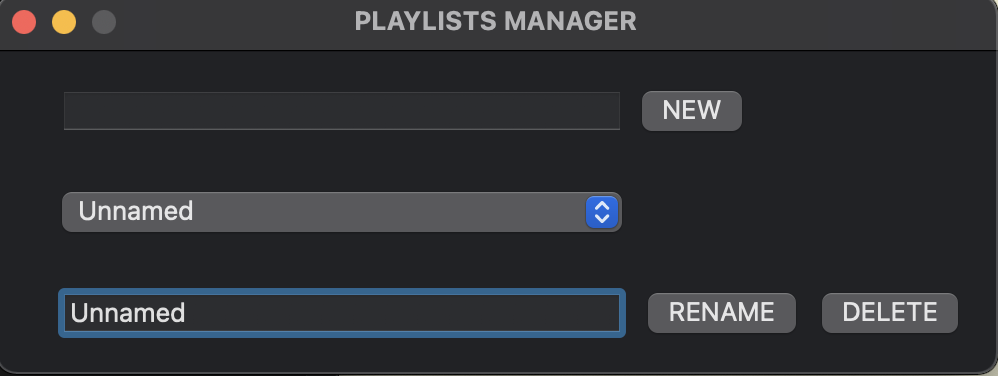
- In the top edit box type My playlist and click on NEW. If you open the popup you’ll see it now shows two playlists.
- In the bottom edit box replace Unnamed with My other playlist and click on RENAME.
- Close the window
If you now open the playlists popup in the catalog you’ll see there are two playlists.
Populating and Editing Playlists
Let’s add a couple of songs to the playlist named My playlist.
- Make sure to choose the — item from the playlists popup (so you can see all the songs in the catalog)
- Type Afterno in the search text box to look for songs that contain that text in the title
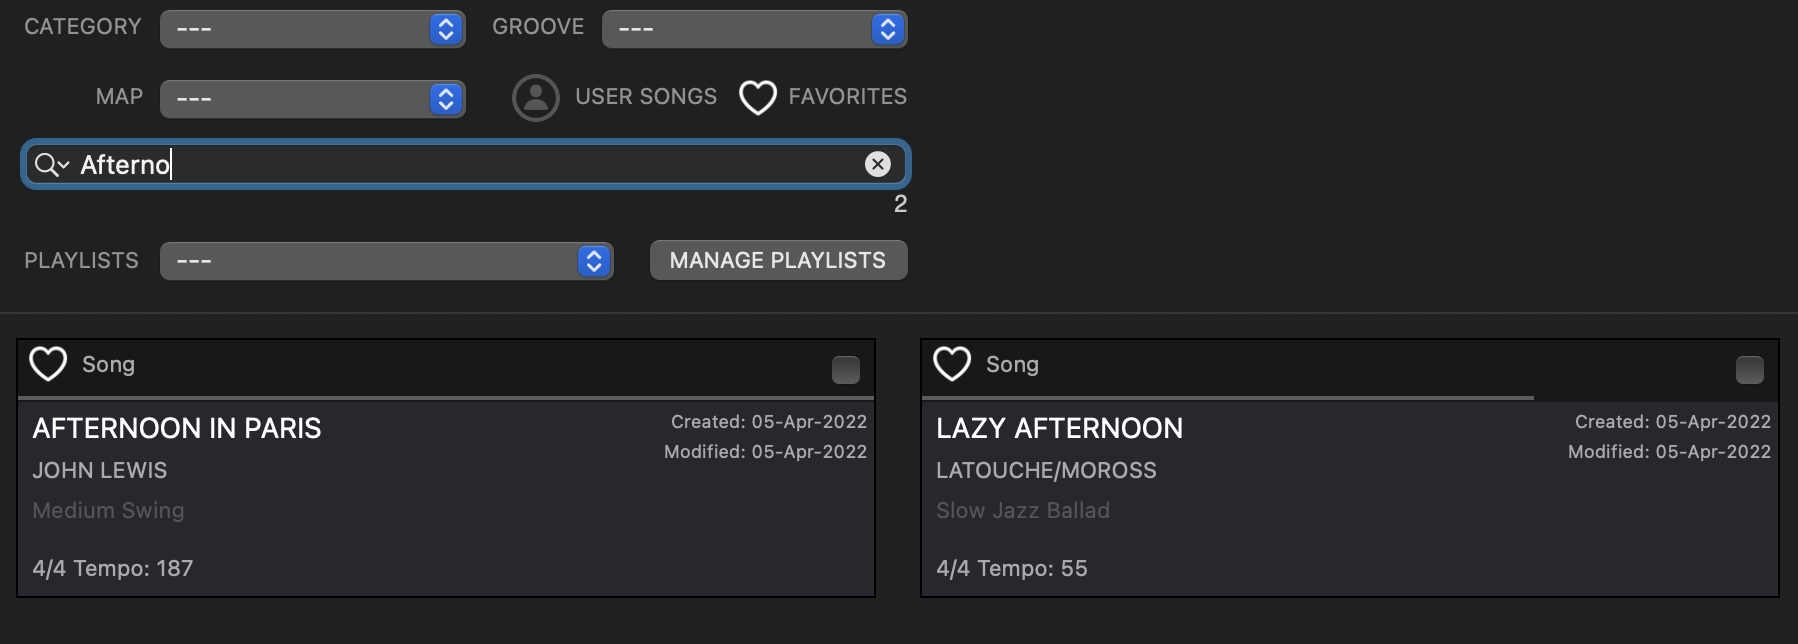
You’ll see two song appear.
- Select both songs (by clicking on the check box at the top of each song-card)
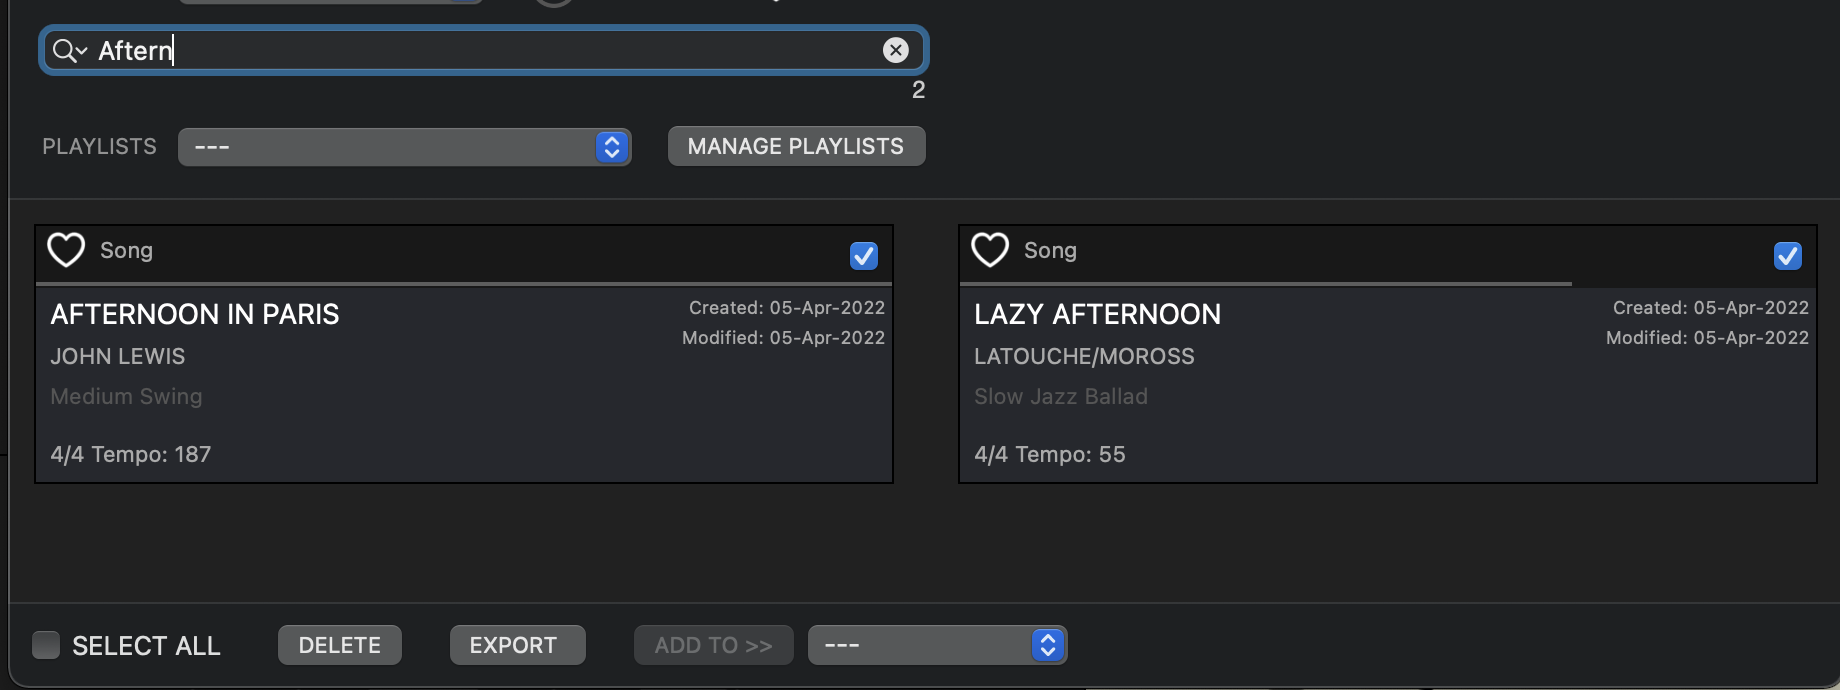
- Now use the popup at the bottom of the catalog window (next to the ADD TO >> button) and choose My playlist. The ADD TO >> will become enabled.
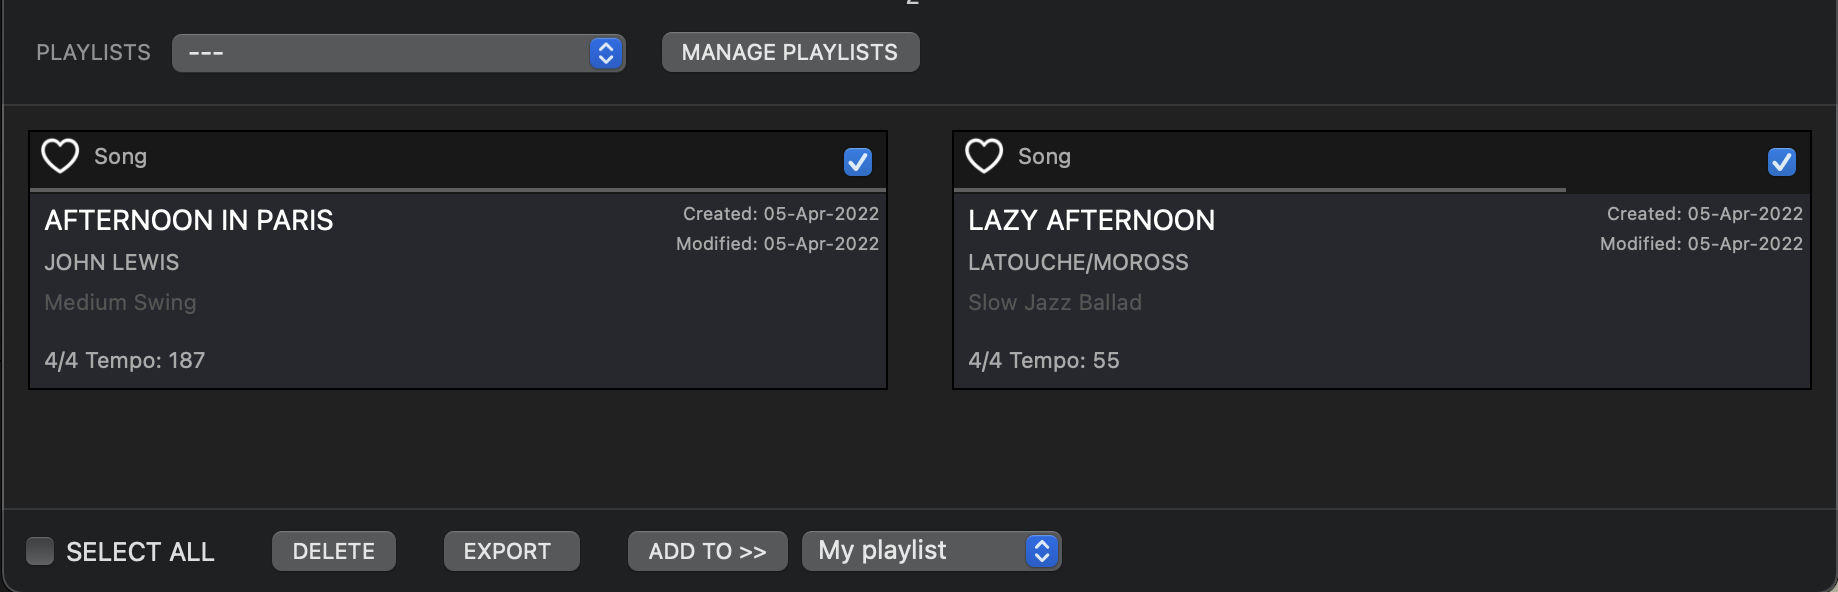
- Click on the ADD TO >> to add the currently selected songs to the My Playlist. It’s done. Afternoon in Paris and Lazy Afternoon have been added to your playlist.
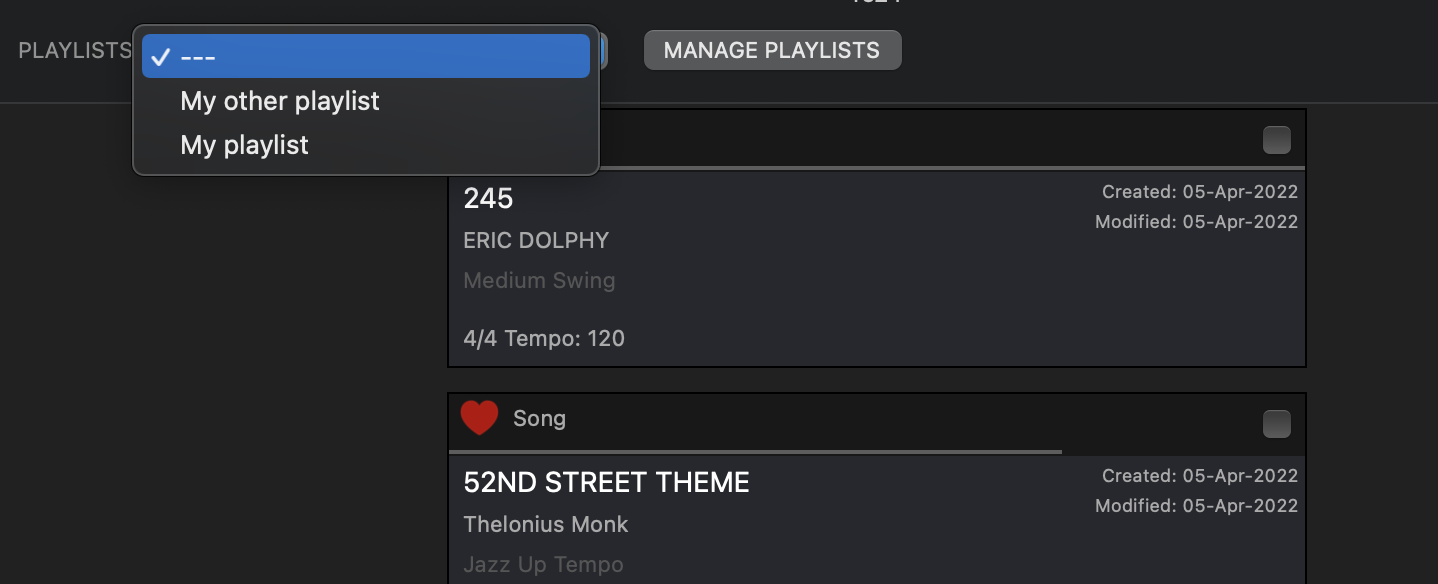
- To view the playlist, just use the PLAYLISTS popup button at the top of the song list, and select the item My playlist. The catalog will turn into a playlist organizer. The song cards will look different because now you are looking at songs in the currently selected playlist (My playlist)
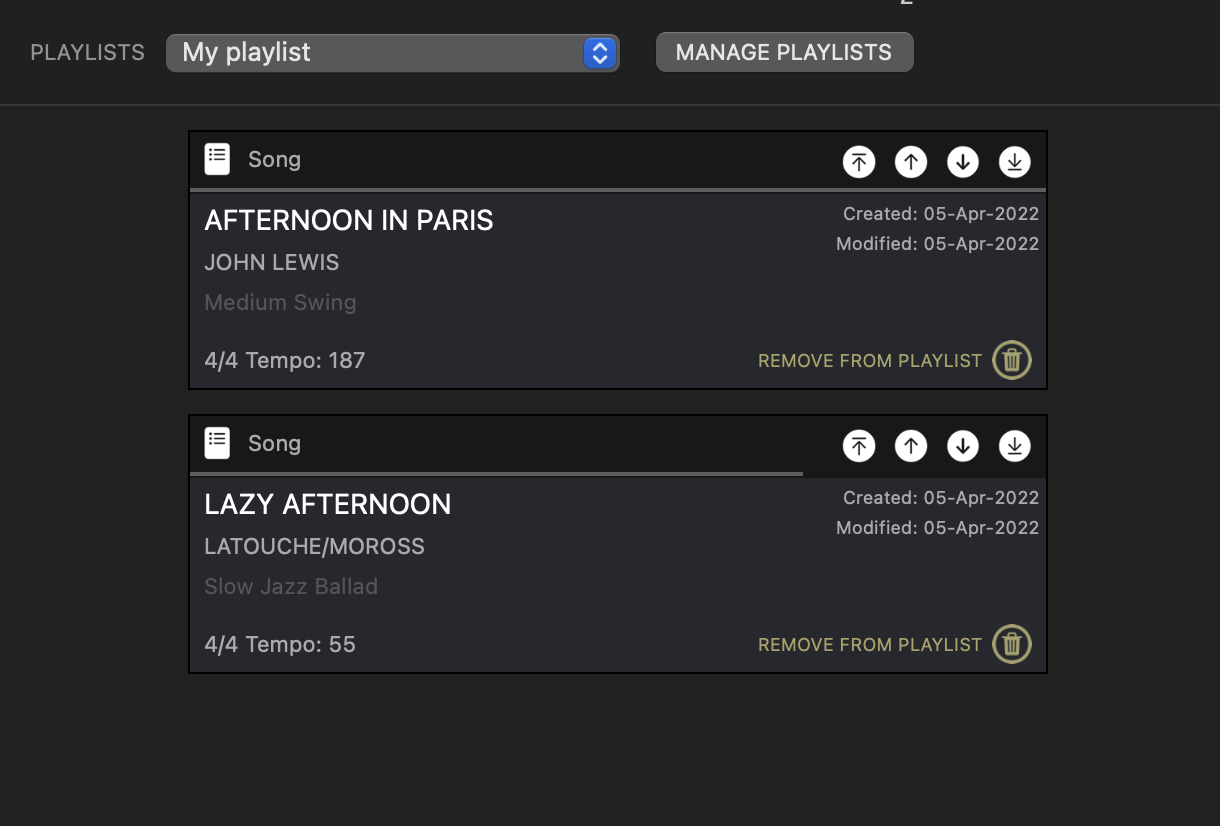
You can now organize your playlist using the arrows on the righthand side. The arrows allow you to move a song to the top of the list, one up, one down, or to the bottom of the list. You can also delete songs from the playlist with the trashcan at the bottom. (this will NOT delete the song from your catalog, just from the current playlist)
If you want to go back to looking at the catalog of songs (instead of viewing a playlist) just choose the
— item from the PLAYLISTS popup.
END OF THE MAPPING TONAL HARMONY PRO MANUAL

Will there be an update for versions 8?
LikeLiked by 1 person